Install Raspberry Pi which is discussed this time with a headless method. Installing using this method does not require a monitor, so it is easier and more concise. Basically, a headless installation is installed by setting it automatically. So, the Raspberry Pi is directly connected to Wifi. After we have finished installing we can use SSH to access the Raspberry Pi via a wireless network. From SSH access we can install VNC for the remote Raspberry Pi desktop, or can install other applications.
Preparation
The equipment needed is not so much, because this method is very concise. The following are equipment that must be prepared.
- Raspberry Pi unit (which already supports Wifi) (Buy Here)
- Raspberry Pi power unit, recommended above 1A (Buy Here).
- Micro SD 8GB or more recommended Micro SD class 10 (Buy Here).
- Card Reader that supports Micro SD (Buy Here).
- Laptop or PC with Windows or Mac OS that has Putty installed and VNC Viewer.
- Image burning software like Etcher or Win32DiskImager. Please click on the link to download.
- Access Point Wifi.
Putty software can be downloaded via the Putty download page. Whereas for VNC viewer can be downloaded on the VNC Viewer download page.
In this experiment, we used the Raspberry Pi 3 Model B+ with 32GB Micro SD. We have already set up wifi access point with the name teknotut.com and teknotut123 as password. The operating system we choose is Raspbian Stretch with desktop. For burning software, we use Etcher.
Download and Create Image
Download the Raspbian image first through the Raspbian Download page. The downloaded file is in the form of ZIP compression. After downloading, please extract. The extracted file is an extension file .img with the name 2019-04-08-raspbian-stretch.img. The size is quite large around 3.4GB.
Prepare Micro SD and Card Reader, open the Etcher software that has been installed before.
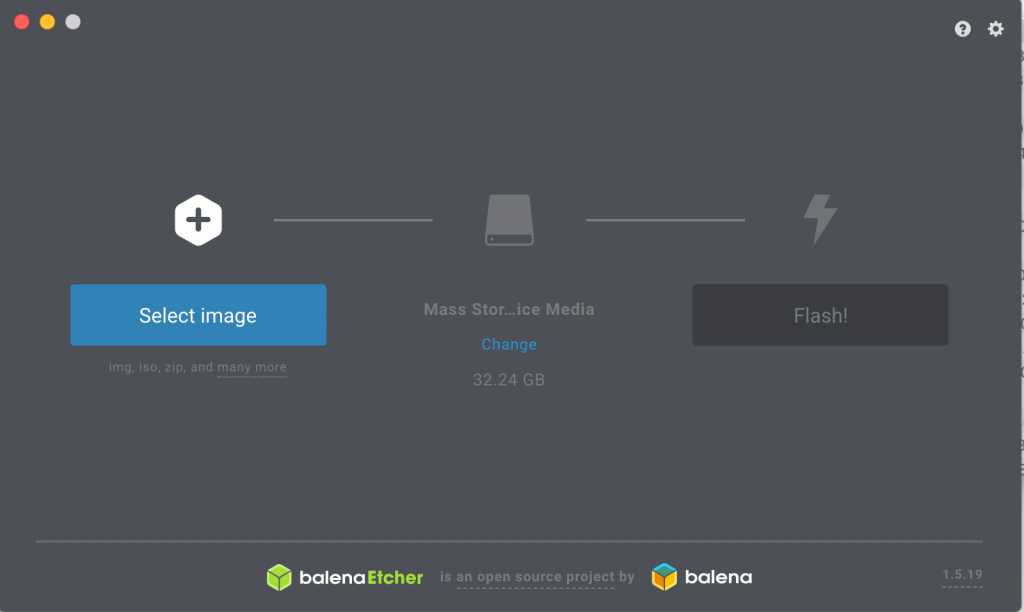
Click on the Select image button, then select the .img image file that was extracted. On the Select drive button select the Micro SD drive that was previously installed. When done, click on the Flash! Button. Wait until the process is complete, usually takes about 10 minutes.
After the process is complete, don't unplug your Micro SD. We will set our Raspberry Pi settings to be connected to Wifi and can be accessed with SSH. Basically, we only create the ssh file and the wpa_supplicant.conf file. Leave the ssh file without an extension, and leave the file blank. As for wpa_supplicant.conf, fill in the text line below.
ctrl_interface=DIR=/var/run/wpa_supplicant GROUP=netdev
update_config=1
country=ID

network={
	ssid="teknotut.com"
	psk="teknotut123"
	key_mgmt=WPA-PSK
}
For ssid and psk please adjust the wifi in your place. For how to create a file, follow the steps below.
Mac OS
Open the terminal then type the following code.
touch /Volumes/boot/ssh
nano /Volumes/boot/wpa_supplicant.conf
The editor will appear then enter the script wpa_supplicant.conf above. When finished press Ctrl+X then press the Y button to instruct exit and save.
Windows
For Windows, the headless setting is very different. However, in essence this setting only requires storing two files. The first file is empty with the file name ssh and the second file with the contents of the script above with the file name wpa_supplicant.conf.
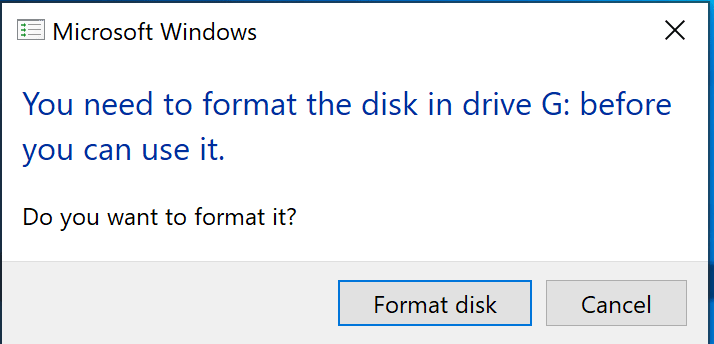
If you use Windows, writing the image with Etcher will create two partitions. So when the image burning process is complete, maybe you will find a message to format your flash disk as below. Please ignore by pressing the Cancel button.
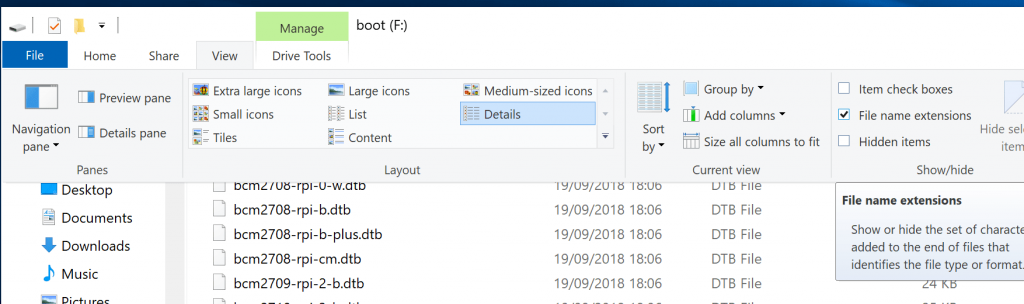
Next, open your File Explorer Windows. You will find a new drive with a boot label. During this experiment, the boot label is on the F drive letter. It might be different on your computer. But surely we only look for drives with boot labels. Open the drive by clicking on the drive with the boot label.
If your Windows defaults, usually Windows hides extensions to prevent users from manually changing extensions. You must set windows to display extensions. On your Windows Explorer, click on the View menu, then check the File Name Extension option.
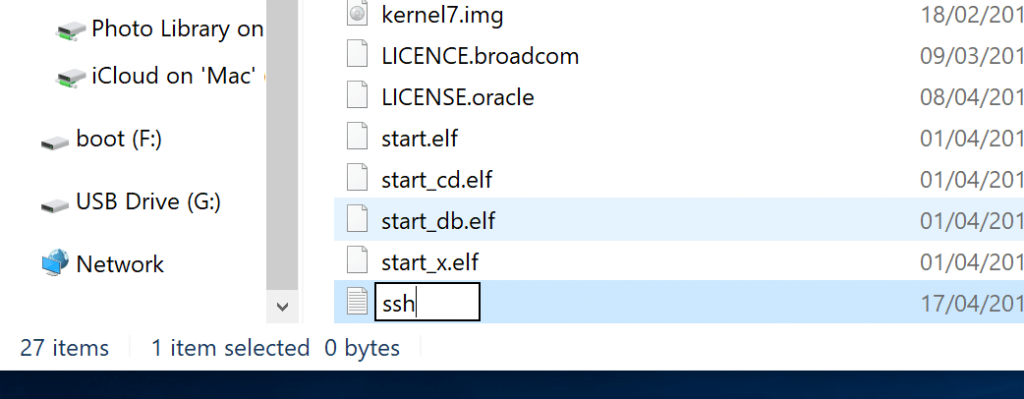
Well, then we only need to make the two files that are needed. Right-click on the list of files on drive F (Drive with boot label), then click New -> Text Document. A new txt file will be formed, immediately rename and delete the extension txt, replace it with the ssh file, then press enter.
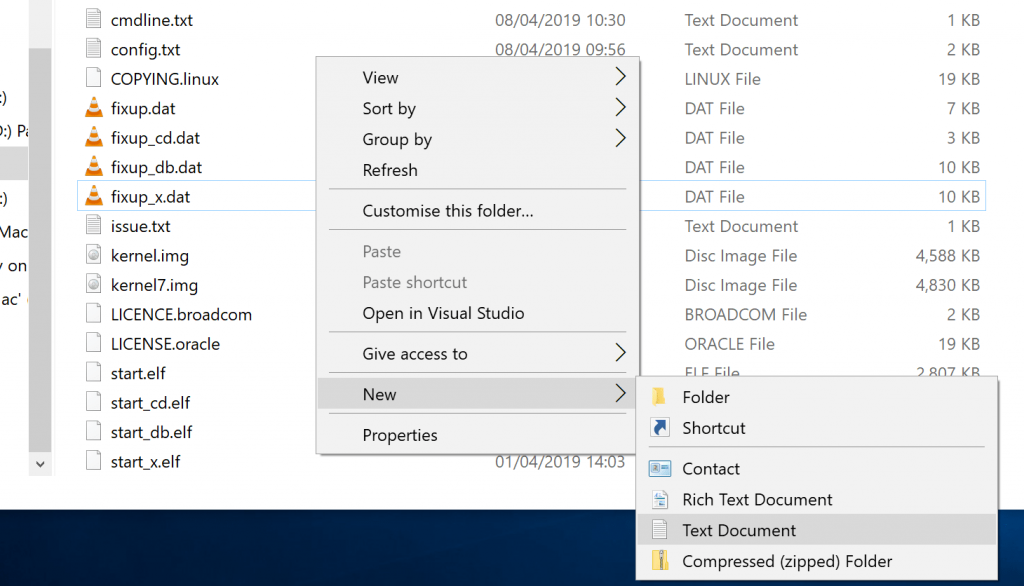
To create a second file, do it the same way, then rename the file to wpa_supplicant.conf. After the file is formed, right-click on the wpa_supplicant.conf file, then click Open With. Select Notepad and enter the script above. Don't forget to adjust the SSID and PSK according to the wifi in your place.
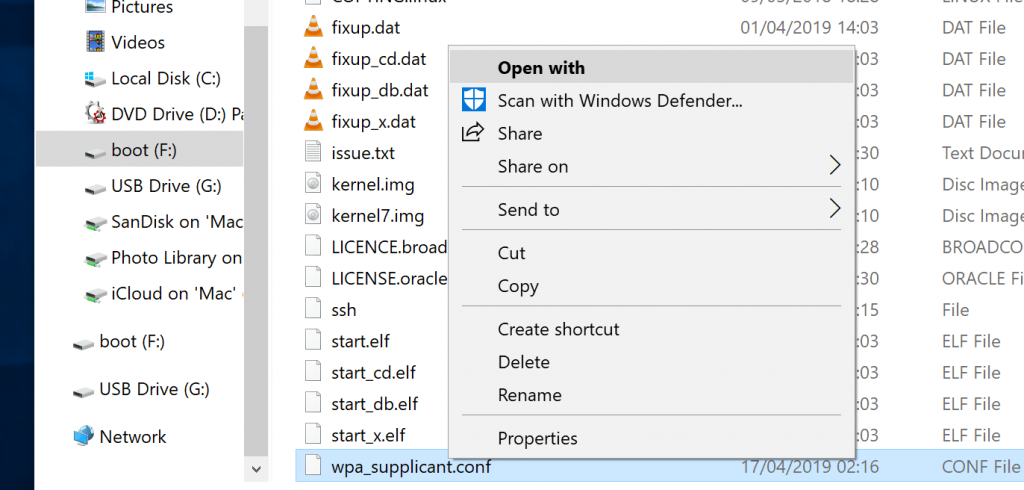
When finished, save the file by selecting the File -> Save, or by pressing the CTRL+S key combination. Close the Notepad application, then eject your Micro SD. Micro SD is ready to boot your Raspberry Pi.
Run the Raspberry Pi
Next, enter the Micro SD that was burning the image to your Raspberry Pi, then turn it on by installing the power cable. If you see a blinking green light that means your Raspberry Pi is booting.
Up to this point, we don't know what your Raspberry Pi IP Address. Because we don't install static IPs on the Raspberry Pi, Raspberry Pi will get dynamic IP through your Wifi DHCP Server. There are several ways that you can connect directly with your Raspberry. If you are a network admin and have access to your wifi. You can see all connected clients, and look for devices with raspberry hostnames. Usually, you will see an IP Address and MAC Address, if it is visible, record the IP, and ping through your Windows Command Prompt. If it replies, we are ready to connect to your Raspberry Pi.

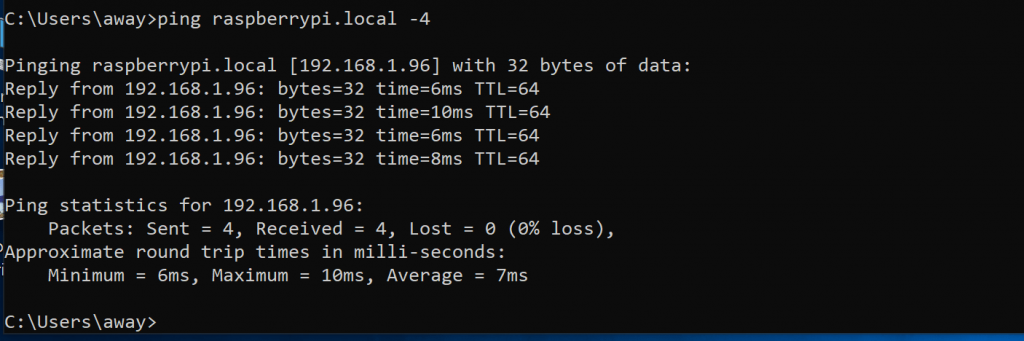
But if you are not a network admin, we can find out the IP address by pinging host raspberrypi.local. Macbook users can ping directly from the terminal. However, if you are a Windows user, you need to install Bonjour Print Service on a Windows PC. The method is to download Bonjour Print Service from this page, then install. When done, open your Command Prompt, then type;
ping raspberrypi.local -4If you get a reply like the picture below, the Raspberry Pi is ready to use.
Initial Configuration
Next, we will remote your Raspberry Pi by using Putty. Open the downloaded Putty, in the Host Name (or IP Address) column, enter the raspberrypi.local as hostname or raspberry IP address that you already know through the wifi client list or the ping result. In this example, I use the raspberrypi.local hostname to make it easier. If you want to use an IP Address, please enter the IP address that you already know in the same column. Next, press the open button, or immediately press Enter key.
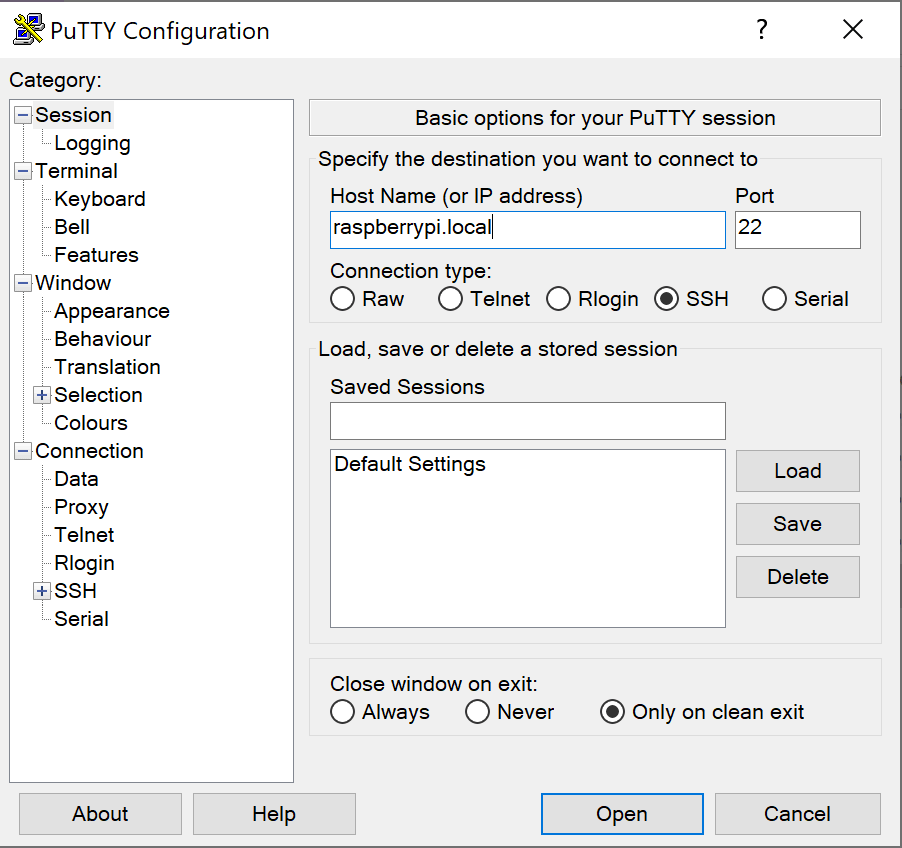
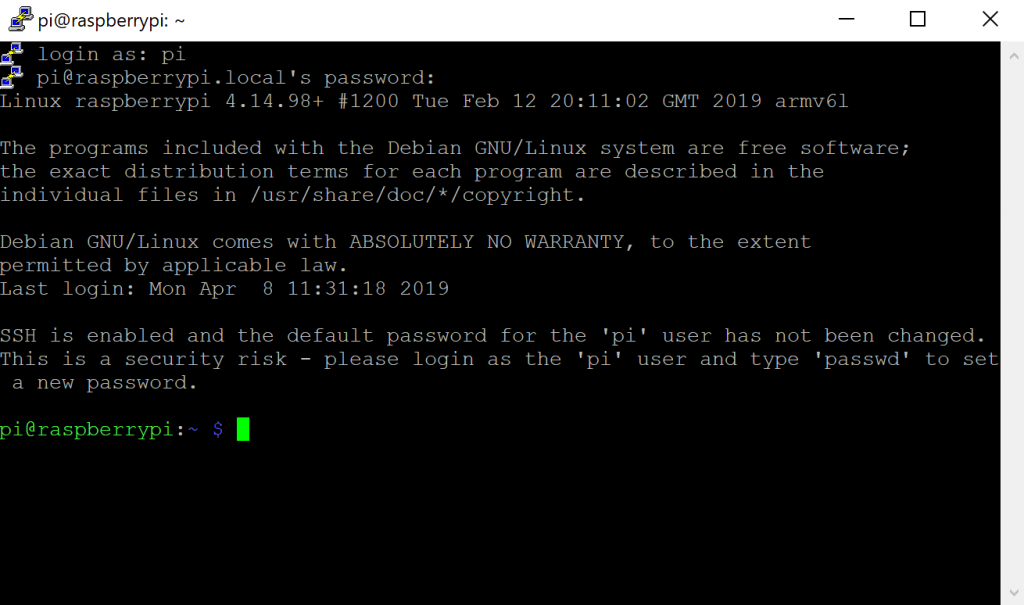
When you first open it, you might get a Putty Security Alert message. This is because to make sure that you already know your Raspberry Pi server. Please immediately press the Yes button. A login putty will appear. Please log in with the default Raspberry Pi username and password namely;
username : pi
password : raspberry
If you have successfully logged in, your Raspberry Pi is ready to use.
Updates and Upgrades
If you have used Debian or Ubuntu, the update command is certainly no stranger. In your CLI putty, type the following command.
sudo apt update
sudo apt upgrade -y
Wait until the upgrade is complete so that your Raspberry Pi uses the latest update.
VNC Server Settings
The VNC server on the Raspberry Pi is useful so that we can view desktop displays remotely using the VNC Vieawer application. The way to install it is very easy. Raspbian already provides commands to configure your Raspberry Pi base.
On your Putty CLI, type the following command;
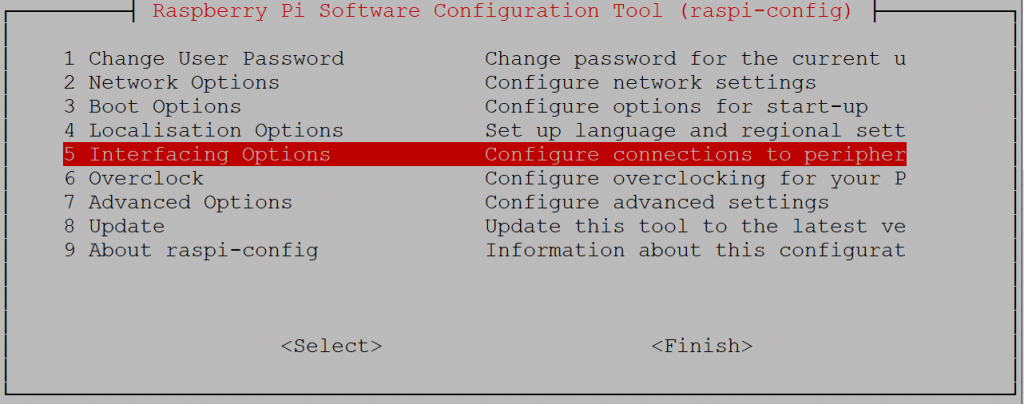
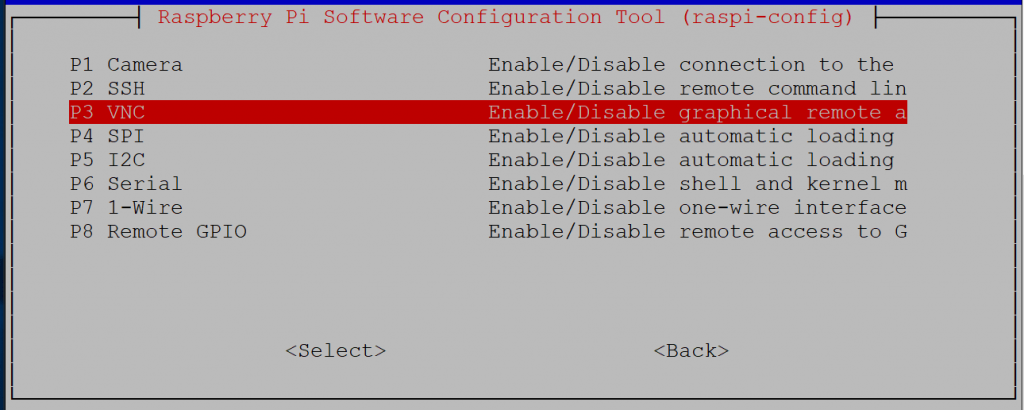
sudo raspi-configThe configuration option will appear, select the Interfacing Options menu, then select VNC, then select Yes. Options can be made by pressing the up, down, left and right arrow keys. Confirming the choice can be done by pressing the Enter key.
Usually, it will be asked to reboot for this setting. Restart the Raspberry Pi by confirming OK. Alternatively, if you enter in the CLI, you can use the command below.
sudo rebootVNC Viewer
If we already connected to the Raspberry Pi in a CLI (Command Line Interface) using Putty. This time we will try to access Raspberry Pi using VNC Viewer remotely.
Open the VNC Viewer that you have installed before. In the Enter a VNC Server Address or Search column, enter your Raspberry Pi hostname or IP Address, then press Enter.

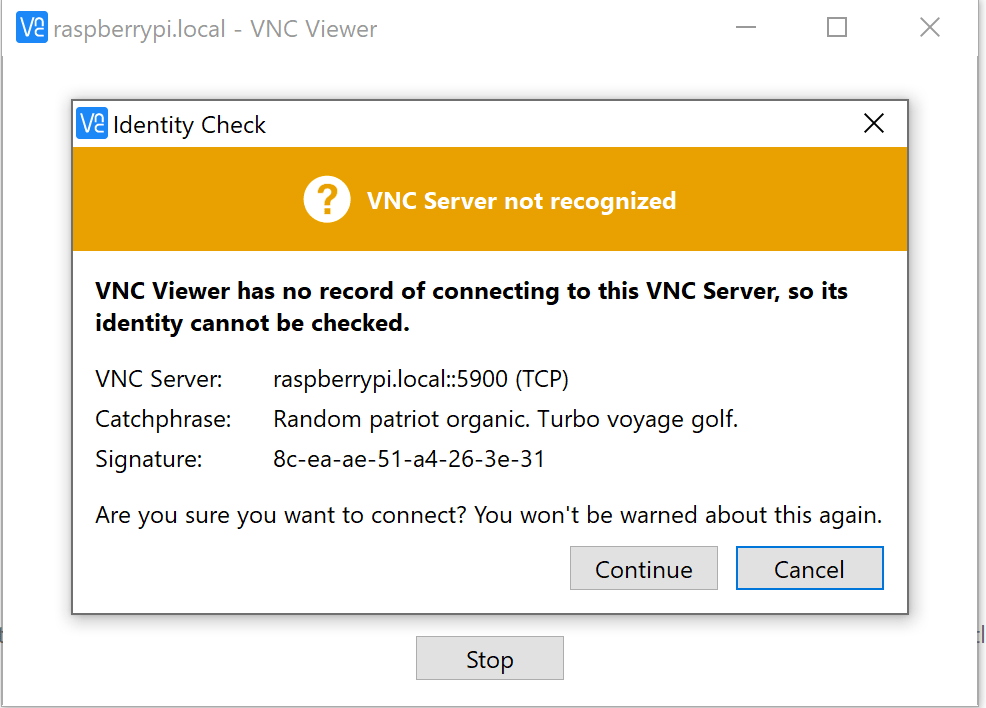
After pressing Enter, VNC will try to contact your Raspberry Pi. Same as for SSH access with Putty, Identity Check may appear as shown below. Please confirm by pressing the Continue button.
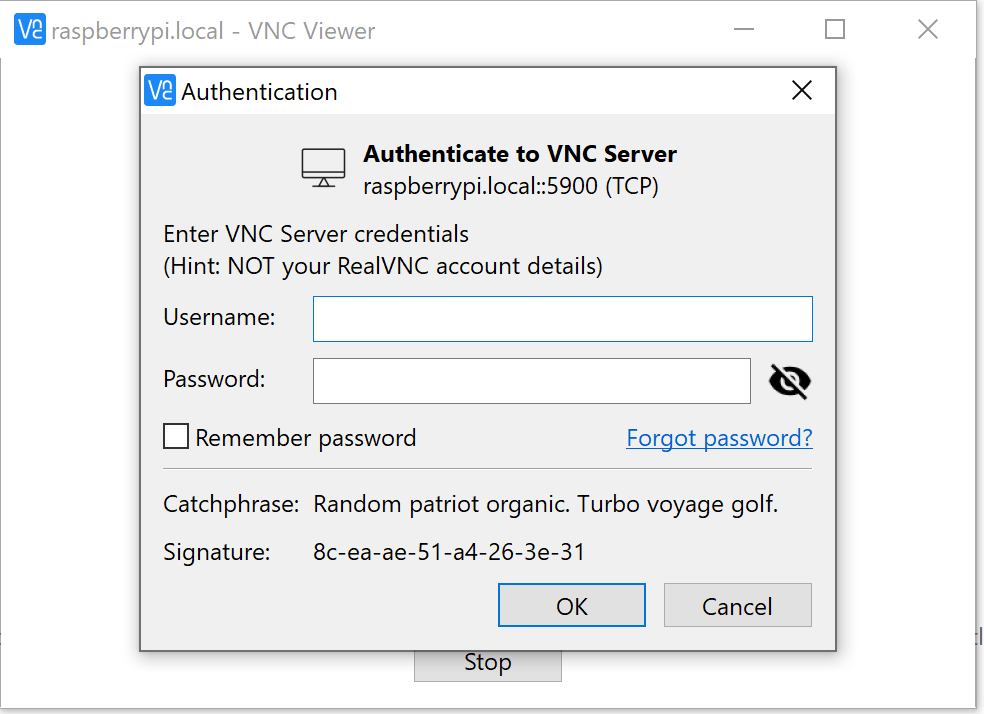
Next, a request for the Username and Password input will appear. Enter the Raspberry Pi default username and password, namely username: pi and password: raspberry.
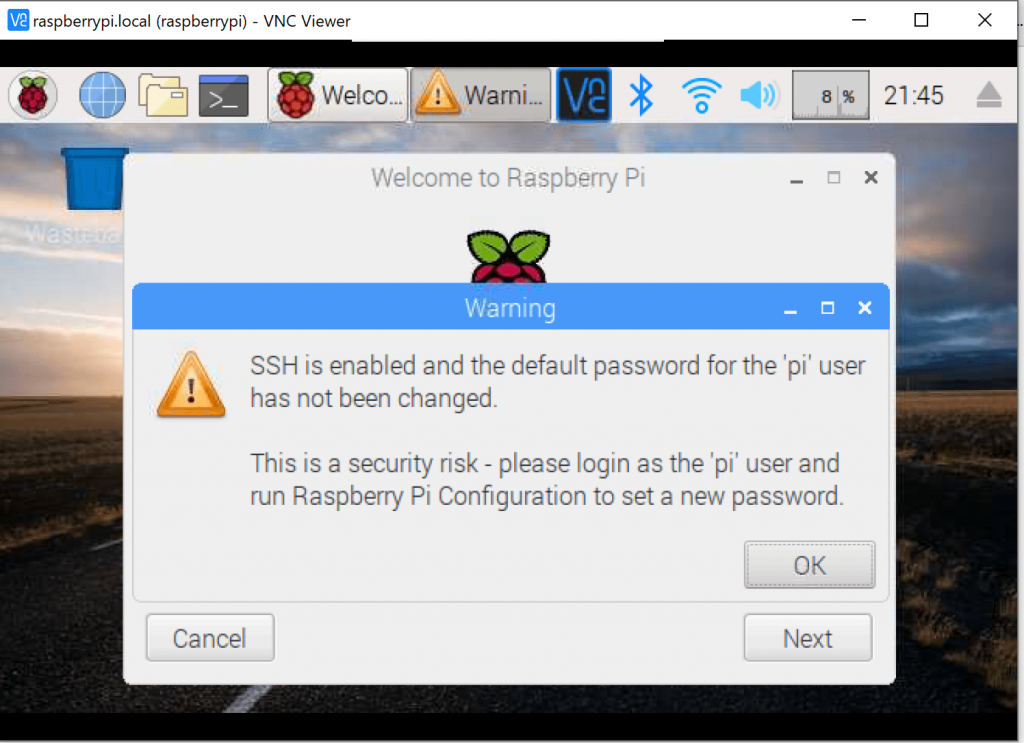
If you have successfully logged in, you will be directed to the Raspberry Pi desktop display. At the first login, your Raspberry Pi configuration wizard will appear, please follow it and adjust it to your needs.
Until this stage is complete, you can run the Raspberry Pi Desktop. Please try to see the available menus.
Conclusion
Installing Raspberry Pi headless is a very easy and not complicated way. We don't need a monitor, keyboard, or mouse on your Raspberry. Installation is done remotely using SSH.
In this article, you can understand the remote concept in CLI and the Remote concept of Desktop. Both are sometimes needed. If you are more familiar with the CLI, it will be easier and faster to configure your Raspberry Pi.
Hopefully, this article is useful.