The Raspberry Pi 3 Model B+ is equipped with the DSI (Display Serial Interface) and CSI (Camera Serial Interface) interfaces. For the Raspberry Pi 3 Model B + you can directly use the 22 pin ribbon cable to connect to the Camera. Especially for Raspberry Pi Zero, there is now a CSI Interface. You can use ribbon cable 14 pin to 22 pins.
The Raspberry Pi camera application is very wide. The Raspberry Pi can only be used to snap photos, record videos, CCTV cameras to smart camera applications.
In this article, we will discuss about preparing the Raspberry Pi camera and its use with a few basic commands.
Preparation
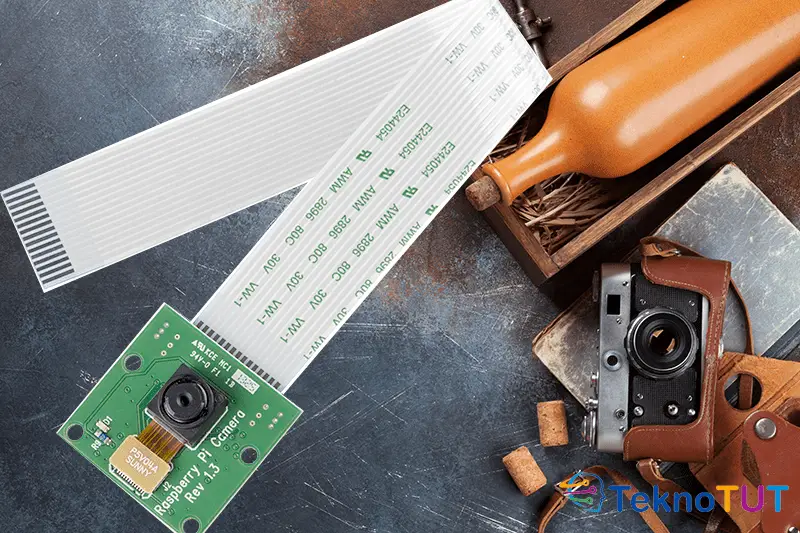
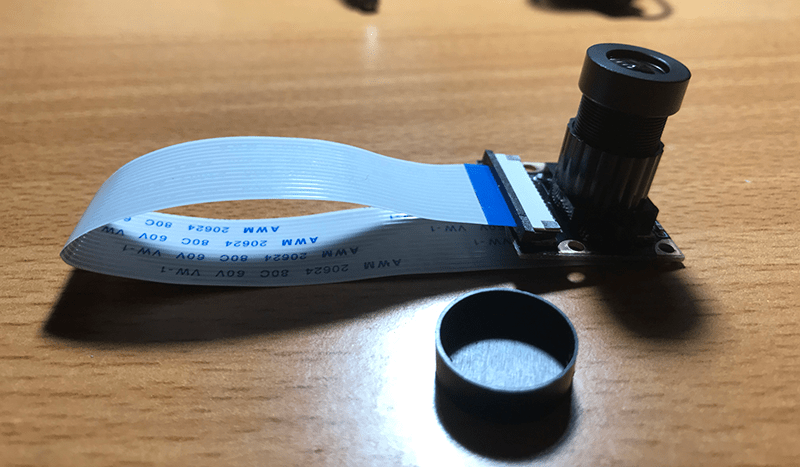
Here are some tools that must be prepared.
If you use Raspberry Pi Zero, you can use ribbon cable 15 to 22 pins (Buy Here). If you buy the original Pi Zero casing, you will get this cable.

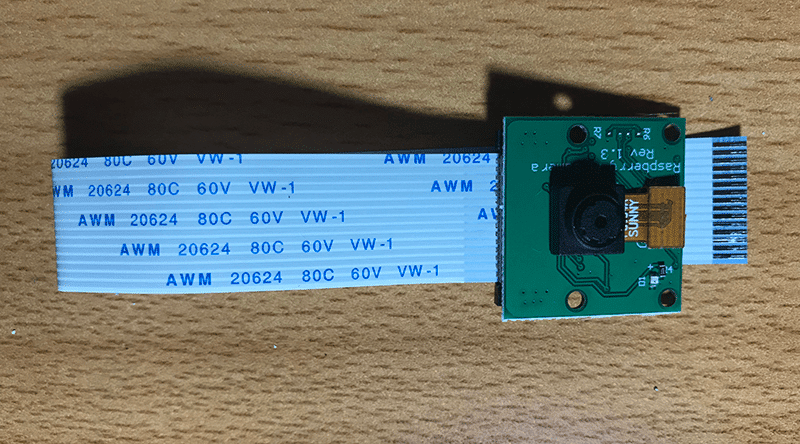
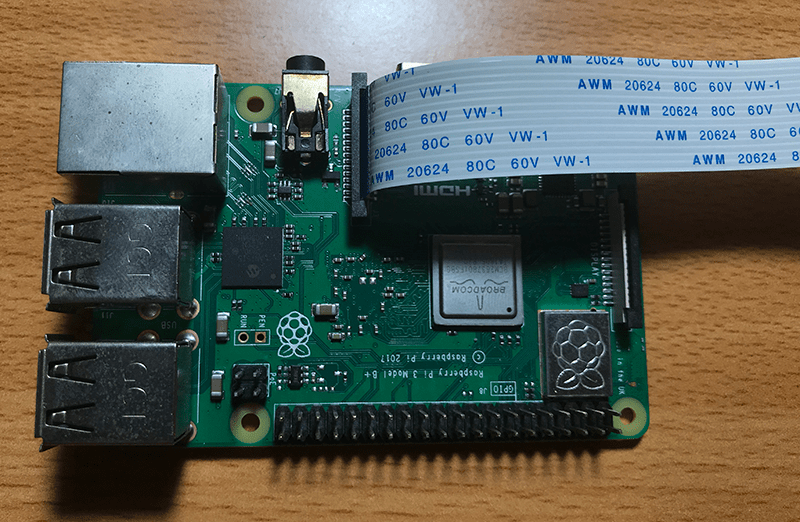
Camera Installation
Attach the Camera's ribbon cable to the CSI interface, as shown below.
Configuration
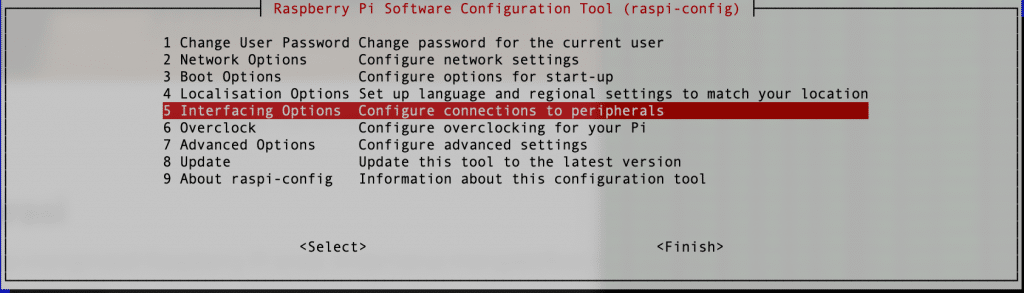
If you have just installed your Raspberry Pi. You must first activate the Camera from the device configuration.
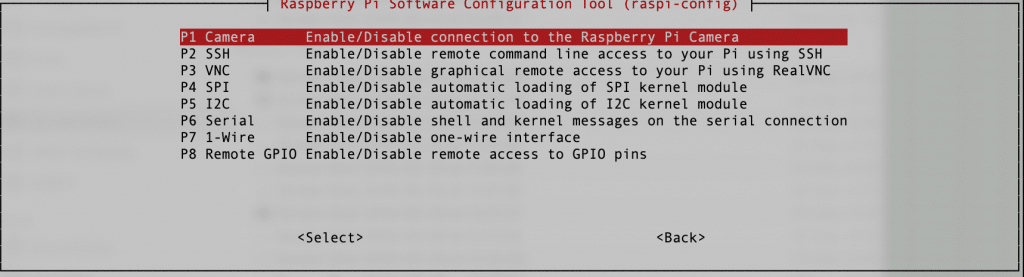
sudo raspi-configSelect Interfacing Option then P1 Camera then Yes.
If you have finished installation and configuration, then you can directly use Pi Camera to get photos or record videos.
Using the Camera
Raspbian provides basic commands for taking photos and recording videos. You can execute from the terminal or ssh.
Capture photos
To capture photos, you can use the raspistill command. For example, as shown below.
raspistill -O fotopertamaku.jpgThe above command will take a picture from the Camera and save it with the file name fotopertamaku.jpg. The file will be saved in the current directory. To save photos on the directory, you specify you can immediately type in the directory name. For example, we will take pictures of the Camera and save them in the ~/Pictures folder. Then, type the following command.
raspistill -O ~/Pictures/fotoku1.jpgraspistill also provides vertical flip and horizontal flip. You can try with the following command and see the difference in the results.
raspistill -vf -o ~/Pictures/vf.jpg
raspistill -hf -o ~/Pictures/hf.jpg
There are still many other options with this raspistill command. To find out all available options, you can type the command below.
raspistill 2>&1 | lessAll options available on raspistill are
"raspistill" Camera App (commit 7cbfbd38d982 Tainted)

Runs camera for specific time, and take JPG capture at end if requested

usage: raspistill [options]

Image parameter commands

-q, --quality	: Set jpeg quality <0 to 100>
-r, --raw	: Add raw bayer data to jpeg metadata
-l, --latest	: Link latest complete image to filename <filename>
-t, --timeout	: Time (in ms) before takes picture and shuts down (if not specified, set to 5s)
-th, --thumb	: Set thumbnail parameters (x:y:quality) or none
-d, --demo	: Run a demo mode (cycle through range of camera options, no capture)
-e, --encoding	: Encoding to use for output file (jpg, bmp, gif, png)
-x, --exif	: EXIF tag to apply to captures (format as 'key=value') or none
-tl, --timelapse	: Timelapse mode. Takes a picture every <t>ms. %d == frame number (Try: -o img_%04d.jpg)
-fp, --fullpreview	: Run the preview using the still capture resolution (may reduce preview fps)
-k, --keypress	: Wait between captures for a ENTER, X then ENTER to exit
-s, --signal	: Wait between captures for a SIGUSR1 or SIGUSR2 from another process
-g, --gl	: Draw preview to texture instead of using video render component
-gc, --glcapture	: Capture the GL frame-buffer instead of the camera image
-bm, --burst	: Enable 'burst capture mode'
-dt, --datetime	: Replace output pattern (%d) with DateTime (MonthDayHourMinSec)
-ts, --timestamp	: Replace output pattern (%d) with unix timestamp (seconds since 1970)
-fs, --framestart	: Starting frame number in output pattern(%d)
-rs, --restart	: JPEG Restart interval (default of 0 for none)

GL parameter commands

-gs, --glscene	: GL scene square,teapot,mirror,yuv,sobel,vcsm_square
-gw, --glwin	: GL window settings <'x,y,w,h'>

Common Settings commands

-?, --help	: This help information
-w, --width	: Set image width <size>
-h, --height	: Set image height <size>
-o, --output	: Output filename <filename> (to write to stdout, use '-o -'). If not specified, no file is saved
-v, --verbose	: Output verbose information during run
-cs, --camselect	: Select camera <number>. Default 0
-md, --mode	: Force sensor mode. 0=auto. See docs for other modes available
-gps, --gpsdexif	: Apply real-time GPS information to output (e.g. EXIF in JPG, annotation in video (requires libgps.so.22)

Preview parameter commands

-p, --preview	: Preview window settings <'x,y,w,h'>
-f, --fullscreen	: Fullscreen preview mode
-op, --opacity	: Preview window opacity (0-255)
-n, --nopreview	: Do not display a preview window

Image parameter commands

-sh, --sharpness	: Set image sharpness (-100 to 100)
-co, --contrast	: Set image contrast (-100 to 100)
-br, --brightness	: Set image brightness (0 to 100)
-sa, --saturation	: Set image saturation (-100 to 100)
-ISO, --ISO	: Set capture ISO
-vs, --vstab	: Turn on video stabilisation
-ev, --ev	: Set EV compensation - steps of 1/6 stop
-ex, --exposure	: Set exposure mode (see Notes)
-fli, --flicker	: Set flicker avoid mode (see Notes)
-awb, --awb	: Set AWB mode (see Notes)
-ifx, --imxfx	: Set image effect (see Notes)
-cfx, --colfx	: Set colour effect (U:V)
-mm, --metering	: Set metering mode (see Notes)
-rot, --rotation	: Set image rotation (0-359)
-hf, --hflip	: Set horizontal flip
-vf, --vflip	: Set vertical flip
-roi, --roi	: Set region of interest (x,y,w,d as normalised coordinates [0.0-1.0])
-ss, --shutter	: Set shutter speed in microseconds
-awbg, --awbgains	: Set AWB gains - AWB mode must be off
-drc, --drc	: Set DRC Level (see Notes)
-st, --stats	: Force recomputation of statistics on stills capture pass
-a, --annotate	: Enable/Set annotate flags or text
-3d, --stereo	: Select stereoscopic mode
-dec, --decimate	: Half width/height of stereo image
-3dswap, --3dswap	: Swap camera order for stereoscopic
-ae, --annotateex	: Set extra annotation parameters (text size, text colour(hex YUV), bg colour(hex YUV), justify, x, y)
-ag, --analoggain	: Set the analog gain (floating point)
-dg, --digitalgain	: Set the digital gain (floating point)
-set, --settings	: Retrieve camera settings and write to stdout


Notes

Exposure mode options :
off,auto,night,nightpreview,backlight,spotlight,sports,snow,beach,verylong,fixedfps,antishake,fireworks

Flicker avoid mode options :
off,auto,50hz,60hz

AWB mode options :
off,auto,sun,cloud,shade,tungsten,fluorescent,incandescent,flash,horizon

Image Effect mode options :
none,negative,solarise,sketch,denoise,emboss,oilpaint,hatch,gpen,pastel,watercolour,film,blur,saturation,colourswap,washedout,posterise,colourpoint,colourbalance,cartoon

Metering Mode options :
average,spot,backlit,matrix

Dynamic Range Compression (DRC) options :
off,low,med,high
Video Recording
To do video recording, you can use the raspivid command. For example, use the following command.
raspivid -o ~/Videos/videoku.h264The above command will record video for 5 seconds and save it in the ~/Videos folder with the name videoku.h264. You can open the folder and play videos with VLC.
For a specific time, for example, 10 seconds, you can use the -t option followed by the number of milliseconds, for example, in the command below.
raspivid -o ~/Videos/video10s.h264 -t 10000The above command will record videos for 10 seconds (10000 ms) and will be saved in the ~/Videos/ folder.
To get other options, you can use the command below.
raspivid 2>&1 | lessAlso, here are the options available at raspivid command.
"raspivid" Camera App (commit 7cbfbd38d982 Tainted)

Display camera output to display, and optionally saves an H264 capture at requested bitrate


usage: raspivid [options]

Image parameter commands

-b, --bitrate	: Set bitrate. Use bits per second (e.g. 10MBits/s would be -b 10000000)
-t, --timeout	: Time (in ms) to capture for. If not specified, set to 5s. Zero to disable
-d, --demo	: Run a demo mode (cycle through range of camera options, no capture)
-fps, --framerate	: Specify the frames per second to record
-e, --penc	: Display preview image *after* encoding (shows compression artifacts)
-g, --intra	: Specify the intra refresh period (key frame rate/GoP size). Zero to produce an initial I-frame and then just P-frames.
-pf, --profile	: Specify H264 profile to use for encoding
-td, --timed	: Cycle between capture and pause. -cycle on,off where on is record time and off is pause time in ms
-s, --signal	: Cycle between capture and pause on Signal
-k, --keypress	: Cycle between capture and pause on ENTER
-i, --initial	: Initial state. Use 'record' or 'pause'. Default 'record'
-qp, --qp	: Quantisation parameter. Use approximately 10-40. Default 0 (off)
-ih, --inline	: Insert inline headers (SPS, PPS) to stream
-sg, --segment	: Segment output file in to multiple files at specified interval <ms>
-wr, --wrap	: In segment mode, wrap any numbered filename back to 1 when reach number
-sn, --start	: In segment mode, start with specified segment number
-sp, --split	: In wait mode, create new output file for each start event
-c, --circular	: Run encoded data through circular buffer until triggered then save
-x, --vectors	: Output filename <filename> for inline motion vectors
-if, --irefresh	: Set intra refresh type
-fl, --flush	: Flush buffers in order to decrease latency
-pts, --save-pts	: Save Timestamps to file for mkvmerge
-cd, --codec	: Specify the codec to use - H264 (default) or MJPEG
-lev, --level	: Specify H264 level to use for encoding
-r, --raw	: Output filename <filename> for raw video
-rf, --raw-format	: Specify output format for raw video. Default is yuv
-l, --listen	: Listen on a TCP socket
-stm, --spstimings	: Add in h.264 sps timings
-sl, --slices	: Horizontal slices per frame. Default 1 (off)


H264 Profile options :
baseline,main,high

H264 Level options :
4,4.1,4.2

H264 Intra refresh options :
cyclic,adaptive,both,cyclicrows

Raw output format options :
yuv,rgb,gray

Raspivid allows output to a remote IPv4 host e.g. -o tcp://192.168.1.2:1234or -o udp://192.168.1.2:1234
To listen on a TCP port (IPv4) and wait for an incoming connection use the -l option
e.g. raspivid -l -o tcp://0.0.0.0:3333 -> bind to all network interfaces,
raspivid -l -o tcp://192.168.1.1:3333 -> bind to a certain local IPv4 port

Common Settings commands

-?, --help	: This help information
-w, --width	: Set image width <size>
-h, --height	: Set image height <size>
-o, --output	: Output filename <filename> (to write to stdout, use '-o -'). If not specified, no file is saved
-v, --verbose	: Output verbose information during run
-cs, --camselect	: Select camera <number>. Default 0
-md, --mode	: Force sensor mode. 0=auto. See docs for other modes available
-gps, --gpsdexif	: Apply real-time GPS information to output (e.g. EXIF in JPG, annotation in video (requires libgps.so.22)

Preview parameter commands

-p, --preview	: Preview window settings <'x,y,w,h'>
-f, --fullscreen	: Fullscreen preview mode
-op, --opacity	: Preview window opacity (0-255)
-n, --nopreview	: Do not display a preview window

Image parameter commands

-sh, --sharpness	: Set image sharpness (-100 to 100)
-co, --contrast	: Set image contrast (-100 to 100)
-br, --brightness	: Set image brightness (0 to 100)
-sa, --saturation	: Set image saturation (-100 to 100)
-ISO, --ISO	: Set capture ISO
-vs, --vstab	: Turn on video stabilisation
-ev, --ev	: Set EV compensation - steps of 1/6 stop
-ex, --exposure	: Set exposure mode (see Notes)
-fli, --flicker	: Set flicker avoid mode (see Notes)
-awb, --awb	: Set AWB mode (see Notes)
-ifx, --imxfx	: Set image effect (see Notes)
-cfx, --colfx	: Set colour effect (U:V)
-mm, --metering	: Set metering mode (see Notes)
-rot, --rotation	: Set image rotation (0-359)
-hf, --hflip	: Set horizontal flip
-vf, --vflip	: Set vertical flip
-roi, --roi	: Set region of interest (x,y,w,d as normalised coordinates [0.0-1.0])
-ss, --shutter	: Set shutter speed in microseconds
-awbg, --awbgains	: Set AWB gains - AWB mode must be off
-drc, --drc	: Set DRC Level (see Notes)
-st, --stats	: Force recomputation of statistics on stills capture pass
-a, --annotate	: Enable/Set annotate flags or text
-3d, --stereo	: Select stereoscopic mode
-dec, --decimate	: Half width/height of stereo image
-3dswap, --3dswap	: Swap camera order for stereoscopic
-ae, --annotateex	: Set extra annotation parameters (text size, text colour(hex YUV), bg colour(hex YUV), justify, x, y)
-ag, --analoggain	: Set the analog gain (floating point)
-dg, --digitalgain	: Set the digital gain (floating point)
-set, --settings	: Retrieve camera settings and write to stdout


Notes

Exposure mode options :
off,auto,night,nightpreview,backlight,spotlight,sports,snow,beach,verylong,fixedfps,antishake,fireworks

Flicker avoid mode options :
off,auto,50hz,60hz

AWB mode options :
off,auto,sun,cloud,shade,tungsten,fluorescent,incandescent,flash,horizon

Image Effect mode options :
none,negative,solarise,sketch,denoise,emboss,oilpaint,hatch,gpen,pastel,watercolour,film,blur,saturation,colourswap,washedout,posterise,colourpoint,colourbalance,cartoon

Metering Mode options :
average,spot,backlit,matrix

Dynamic Range Compression (DRC) options :
off,low,med,high
Conclusion
The use of a camera on the Raspberry Pi is very easy. Raspbian has provided complete commands for shooting and video recording. Raspberry Pi camera applications can be used for CCTV cameras, publish to YouTube with RSTP, and can even be created as smart cameras for object recognition and face recognition.
Follow TeknoTut to get quality technology articles.