Suppose you are an application developer, of course. In that case, you are no stranger to hearing the term PaaS (Platform as Services), where you can develop applications without having to bother with server infrastructure. Take, for example, Heroku or AWS Elastic Beanstalk from AWS; they are well-known senior PaaS service providers.
Before further discussing CapRover, let's first deepen our understanding of PaaS.
What is PaaS (Platform As Services)?
PaaS (Platform as a Service) is a cloud computing service that provides a platform for building, running, and managing web applications without manually managing server infrastructure. PaaS provides tools, technologies, and services to build and manage web applications, including databases, operating systems, middleware, and more.
By using PaaS, web developers can focus on building applications without the hassle of managing server infrastructure. PaaS also makes it easy to deploy applications to production by providing features such as continuous integration and delivery, scaling, and monitoring.
Some examples of popular PaaS services are Heroku, AWS Elastic Beanstalk, Google Cloud Platform, Microsoft Azure, and now even Digital Ocean provides PaaS.
The service has server and network infrastructure managed by each PaaS provider. Therefore, even though their prices are relatively lower, they still feel expensive if our applications are growing and require more extensive resources.
Well, of course, we will think, what if we have our own PaaS in our server infrastructure, so we only have to pay for the server? The solution is CapRover!
What is CapRover?
CapRover is a platform that allows you to easily manage web and server applications on VPS (Virtual Private Server), dedicated servers, and cloud hosting such as Digital Ocean, Amazon AWS, Google Cloud, and others.
CapRover provides an intuitive web interface that allows users to set up and manage web applications, including installing, starting, stopping, and removing applications. CapRover also provides features such as a load balancer, reverse proxy, auto SSL, and integration with Git, making it easier for you to manage web applications more quickly and efficiently.
CapRover is the perfect platform for web developers or users who want to easily manage web applications on cloud hosting without manually managing server infrastructure. CapRover can install on various cloud hosting such as DigitalOcean, Linode, AWS EC2, and Google Cloud.
In other words, CapRover is a free and self-managed PaaS because it is open-source. There are modern applications ready to be installed easily with just one click.
Domain settings have also been provided, which are integrated with automatic SSL. So you no longer need to remember when renewing your SSL Certificate because everything is automated.
Interesting right?
Some examples of applications available on CapRover are as follows;
Databases
- MongoDB
- MongoExpress
- MsSQL
- MySQL
- Redis
- PhpMyAdmin
- PostgreSQL
- Adminer
- Apache CouchDB
- Gitea
- ElasticSearch
- And many more.
Blog and Connet
- WordPress
- Ghost
- Prisma 1
- Strapi
- Minio
- And more.
Dev Tools
- Jenkins
- Drone.io
- Hasura
- Nexus3
- And more
Aplikasi Lainnya
- Parse
- NextCloud
- Rainloop
- Thumbor
- OhMyForm
And actually, there are many more; if your CapRover is installed, you will see all the applications we are ready to install with just one click.
Why should CapRover?
Here are some of the advantages that you can find on CapRover, a PaaS (Platform as a Service) service that allows you to manage web applications and servers on a VPS (Virtual Private Server), Dedicated Server, or cloud hosting:
- Intuitive interface
CapRover provides an easy-to-use web interface that allows you to manage web applications quickly and easily. - Complete deployment features
CapRover provides features such as continuous integration, delivery, and rollback, making it easier for you to manage web applications on the production stage more efficiently. - Scalability
CapRover provides a scaling feature that makes it easy to adjust the number of application instances according to your needs. - Monitoring and logging
CapRover provides a monitoring feature that makes it easier to find application performance and identify possible problems. CapRover also provides a logging feature that makes it easier to analyze application activity. - Active documentation and community
CapRover has extensive documentation and an active community that can help you manage your web applications more efficiently.
Installing CapRover on a VPS or Dedicated Server is like having our own PaaS, so we don't have to worry about cost overruns caused by excess server resources.
Install Cap Rover
CapRover installation is relatively easy because DigitalOcean has prepared One Click Install on the Digital Ocean marketplace. You must choose your server specifications and continue the installation; CapRover is ready to use.
However, we will try to install CapRover step by step so that we understand better, and if one day a problem occurs, we will easily find a solution.
This article will use a VPS from Digital Ocean with 1GB RAM and Ubuntu 20.04 Operating System.
Precondition
Before proceeding, here are some things needed to install CapRover.
- VPS or Dedicated Server: Minimum 1GB RAM with Ubuntu 18 and above operating system. In this article, we use Ubuntu 20.04
- Domain name: You must have a domain name. First, it doesn't matter if the domain is already in use because we will only use the subdomain set on the DNS server. This article will use the teknotut.com domain with the app.teknotut.com subdomain.
- DNS Server: If you have purchased a domain, a DNS server is usually provided; you can use the provider's default DNS server or another provider, such as Cloudflare. In this article, we will use DNS from Cloudflare.
Installation Process
If all the prerequisites above have been met, please access your server using SSH and follow the CapRover installation process below.
Step #1: Firewall Configuration
Usually, using Ubuntu fresh install will block some ports that are generally not used. Please type the command below to open the required port on CapRover;
ufw allow 80,443,3000,996,7946,4789,2377/tcp; ufw allow 7946,4789,2377/udp;Step #2: Swap Configuration
Because in this article we are using 1GB of RAM, we will set up a swap of 2GB (recommended swap amount is 1.5x or 2x the amount of RAM). Type the command below to configure a Swap Memory of 2GB.
sudo fallocate -l 2G /swapfile
sudo chmod 600 /swapfile
sudo mkswap /swapfile
sudo swapon /swapfile
echo '/swapfile none swap sw 0 0' | sudo tee -a /etc/fstab
sudo sysctl vm.swappiness=10Step #3: Install Docker
On the CapRover platform using Docker, you need Docker on your Ubuntu. To install Docker, please type the following command;
apt update
apt install -y apt-transport-https ca-certificates curl software-properties-common
curl -fsSL https://download.docker.com/linux/ubuntu/gpg | sudo apt-key add -
sudo add-apt-repository "deb [arch=amd64] https://download.docker.com/linux/ubuntu bionic stable"
sudo apt update
sudo apt -y install docker-ce
sudo systemctl start docker
sudo systemctl enable dockerStep #4: Install the Docker CapRover Image
Next, we will install CapRover on Docker from the latest CapRover main image. Type the following command to install CapRover;
docker run -p 80:80 -p 443:443 -p 3000:3000 -v /var/run/docker.sock:/var/run/docker.sock -v /captain:/captain caprover/caproverTo see other versions of CapRover, you can visit the Docker Hub page.
Next, wait until the installation process is complete. When finished, the display on your terminal screen will look something like this;
December 29th 2022, 9:03:16.088 am    Fresh installation!
December 29th 2022, 9:03:16.090 am    Starting swarm at 157.230.47.xx:2377
Swarm started: tfas8le4csrgu84b7h8femevr
*** CapRover is initializing ***
Please wait at least 60 seconds before trying to access CapRover.
Wait about 1 minute before going to the following process (Step #6).
Step #5: Install CapRover CLI (Optional)
The CapRover CLI (Command Line Interface) is required for initial setup in the main CapRover domain and SSL settings. However, this step is optional, so you don't need to do this step because domain and SSL settings can be done directly on the main CapRover interface. However, if you are comfortable using the command line, you can continue at this stage.
CapRover CLI is written using Node.js, so please first install Node.js on your system. To install Node.js, please follow our article on How to Install Node.js. After successfully installing Node.js, please type the following command to install CapRover CLI;
npm install -g caproverThen use the command below to start the domain and SSL configuration and follow the prompts;
caprover serversetupStep #6: Domain and SSL Configuration
Go to your domain's DNS server to configure a subdomain to your server's IP address. In the DNS configuration in this example, we will configure *.app.teknotut.com to point to the IP server. The * sign in the subdomain is a DNS wildcard, which means that any text before .app.teknotut.com will be redirected to the destination server IP.
This article uses Cloudflare as the domain's DNS server, so the settings are below.

When finished, ensure the DNS is running perfectly by pinging the host app.teknotut.com; if it responds with the IP server, it means the domain is leading correctly. If you haven't waited a while, maybe your DNS settings are in DNS propagation.
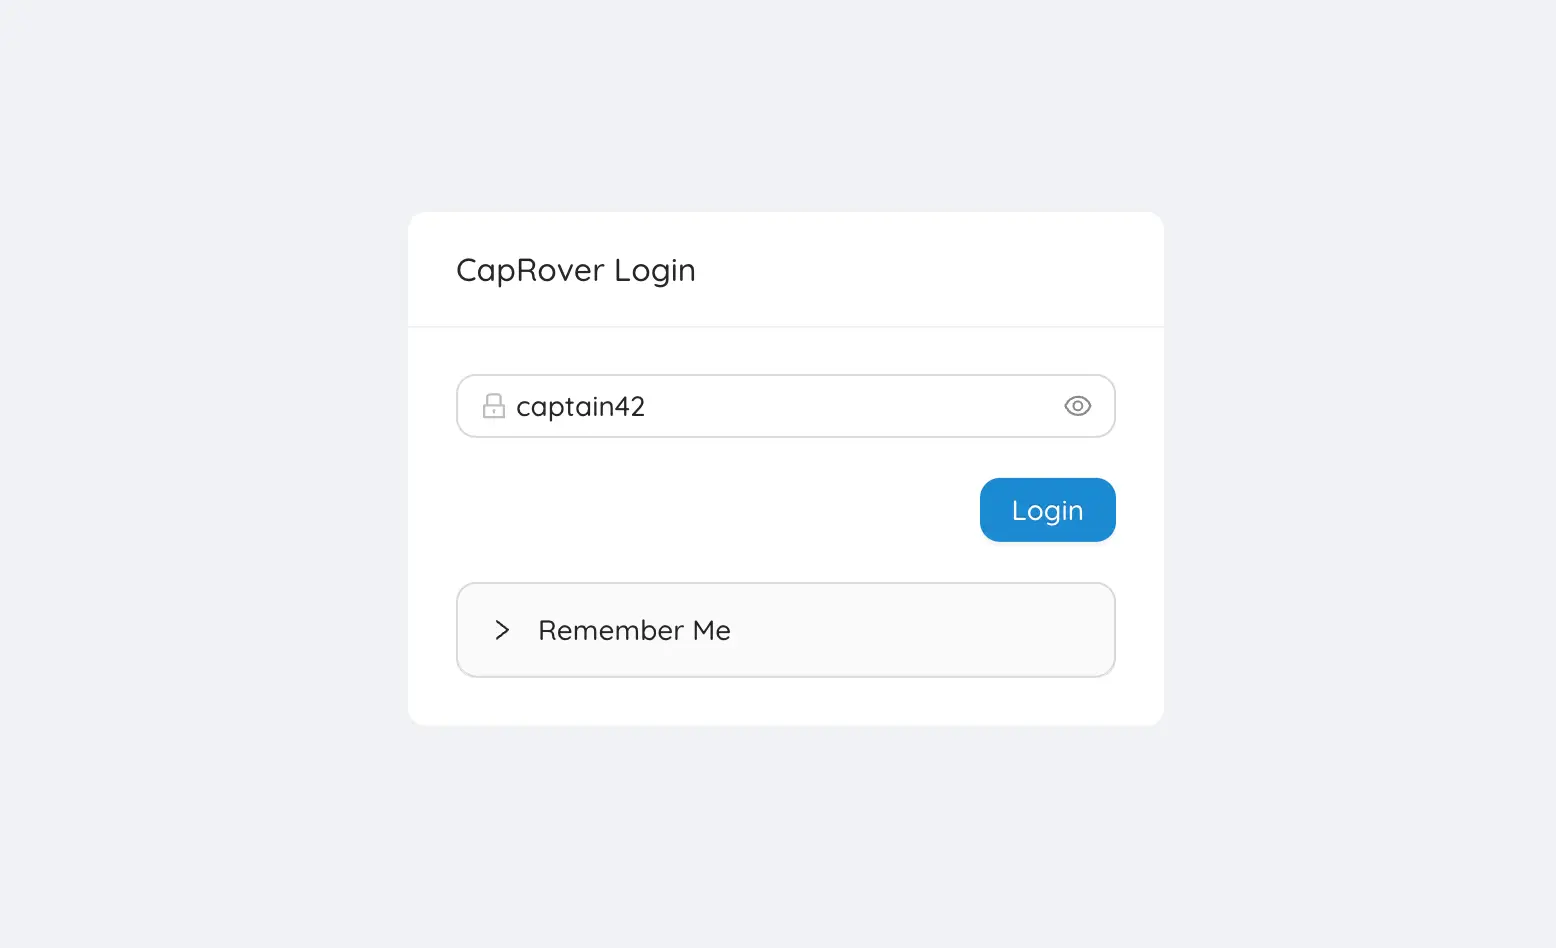
Now, open your browser and go to the page http://<Server IP>:3000; for example, in this case, our server is 157.230.47.xx, then we will go to http://157.230.47.xx:3000. You will enter the main CapRover login page and the default CapRover password, captain42.
After logging in, you will immediately enter the CapRover dashboard, and the subdomain configured earlier in the CapRover root domain, as shown below.
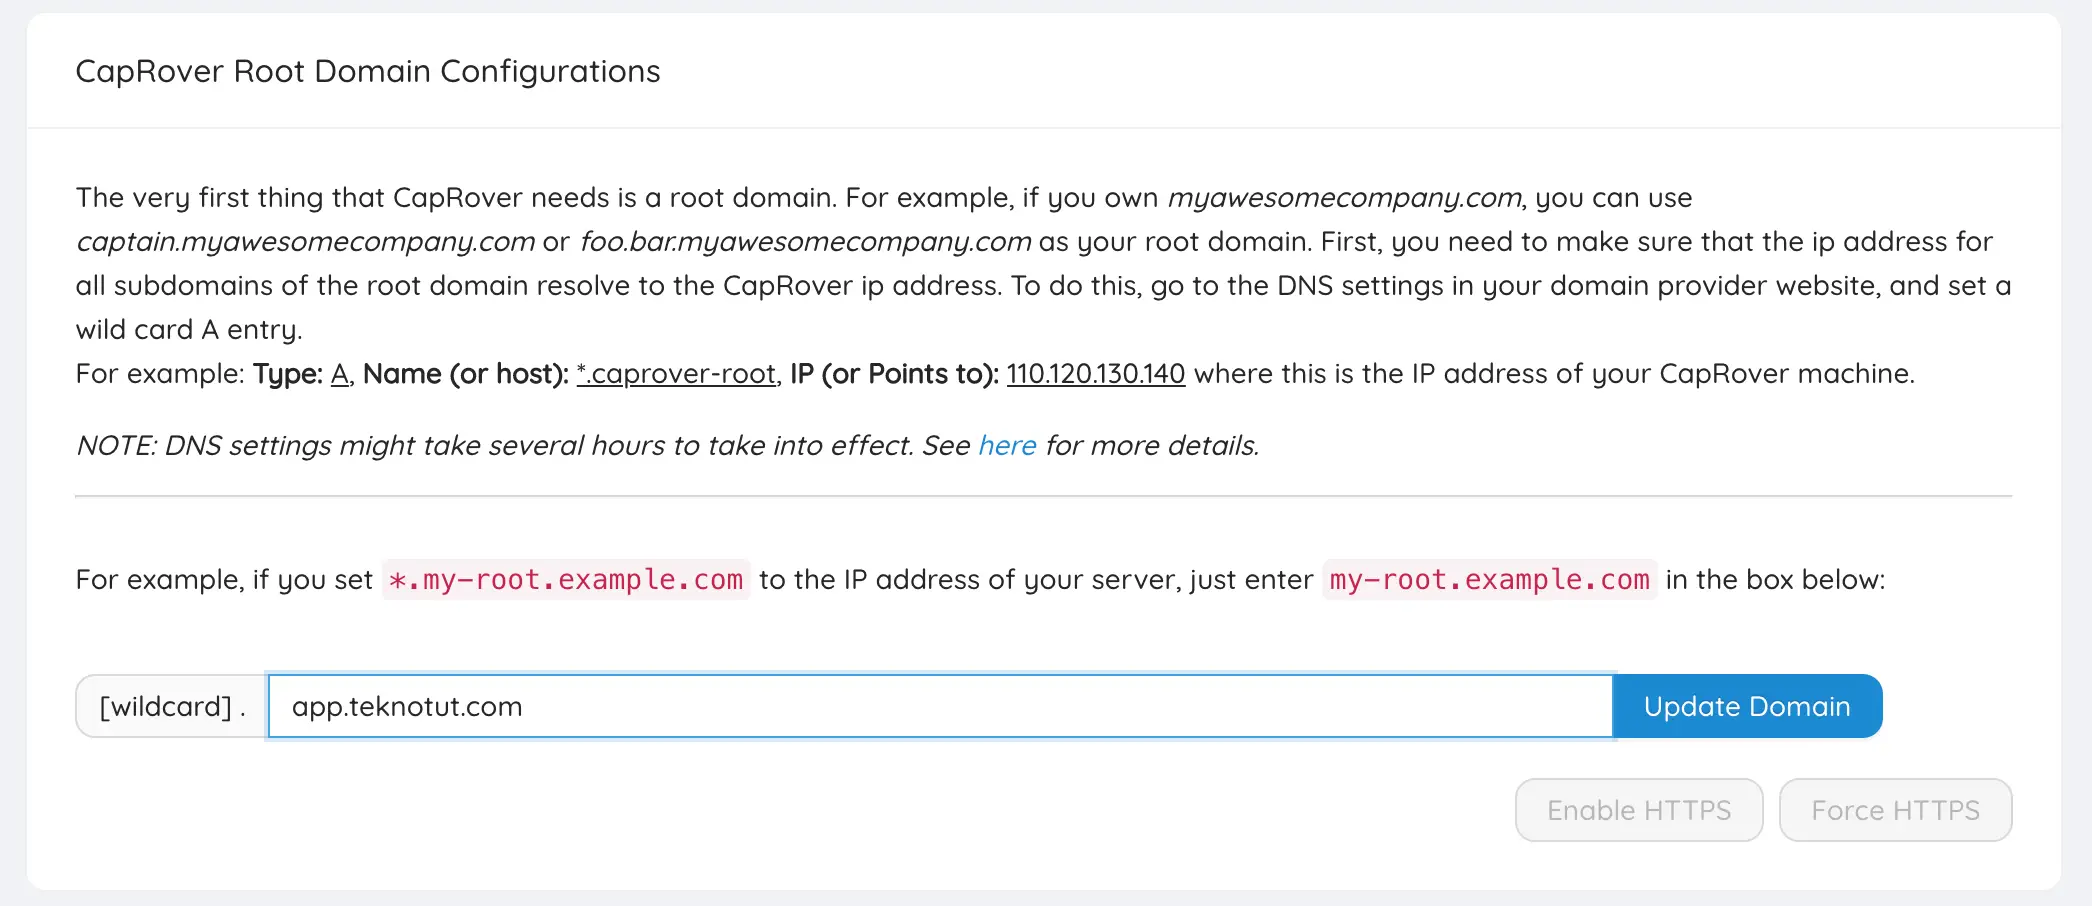
Click on the Update Domain button, and the page will automatically redirect to captain.app.teknotut.com, and you will be asked to log in again. After logging back in, click on Enable HTTPS, and enter your email address (for Let's Encrypt accessible SSL data); after success, click on the Force HTTPS button so that every time you access CapRover, you will be redirected to HTTPS.
Step #7: Change Default Password (Important)
When you activate Force HTTPS, you will be redirected to the HTTPS page and have to log in again. Login again with the default password, then enter the Settings menu.
Enter your default password in the Old password and your new password in New Password.
Hooray, until your CapRover installation process is complete, we will try to install one of the applications on this new CapRover.
Test Install Application (WordPress)
OK, now let's try to install one of the ready-to-use applications; in this case, we will try to install WordPress 6.0.1. When this article was written, the latest WordPress version was version 6.0.3, but we will try to install version 6.0.1. Later we will upgrade to 6.0.3, and we will simulate a rollback to version 6.0.1 again, so we can understand how to upgrade and roll back if the upgrade is unsatisfactory.
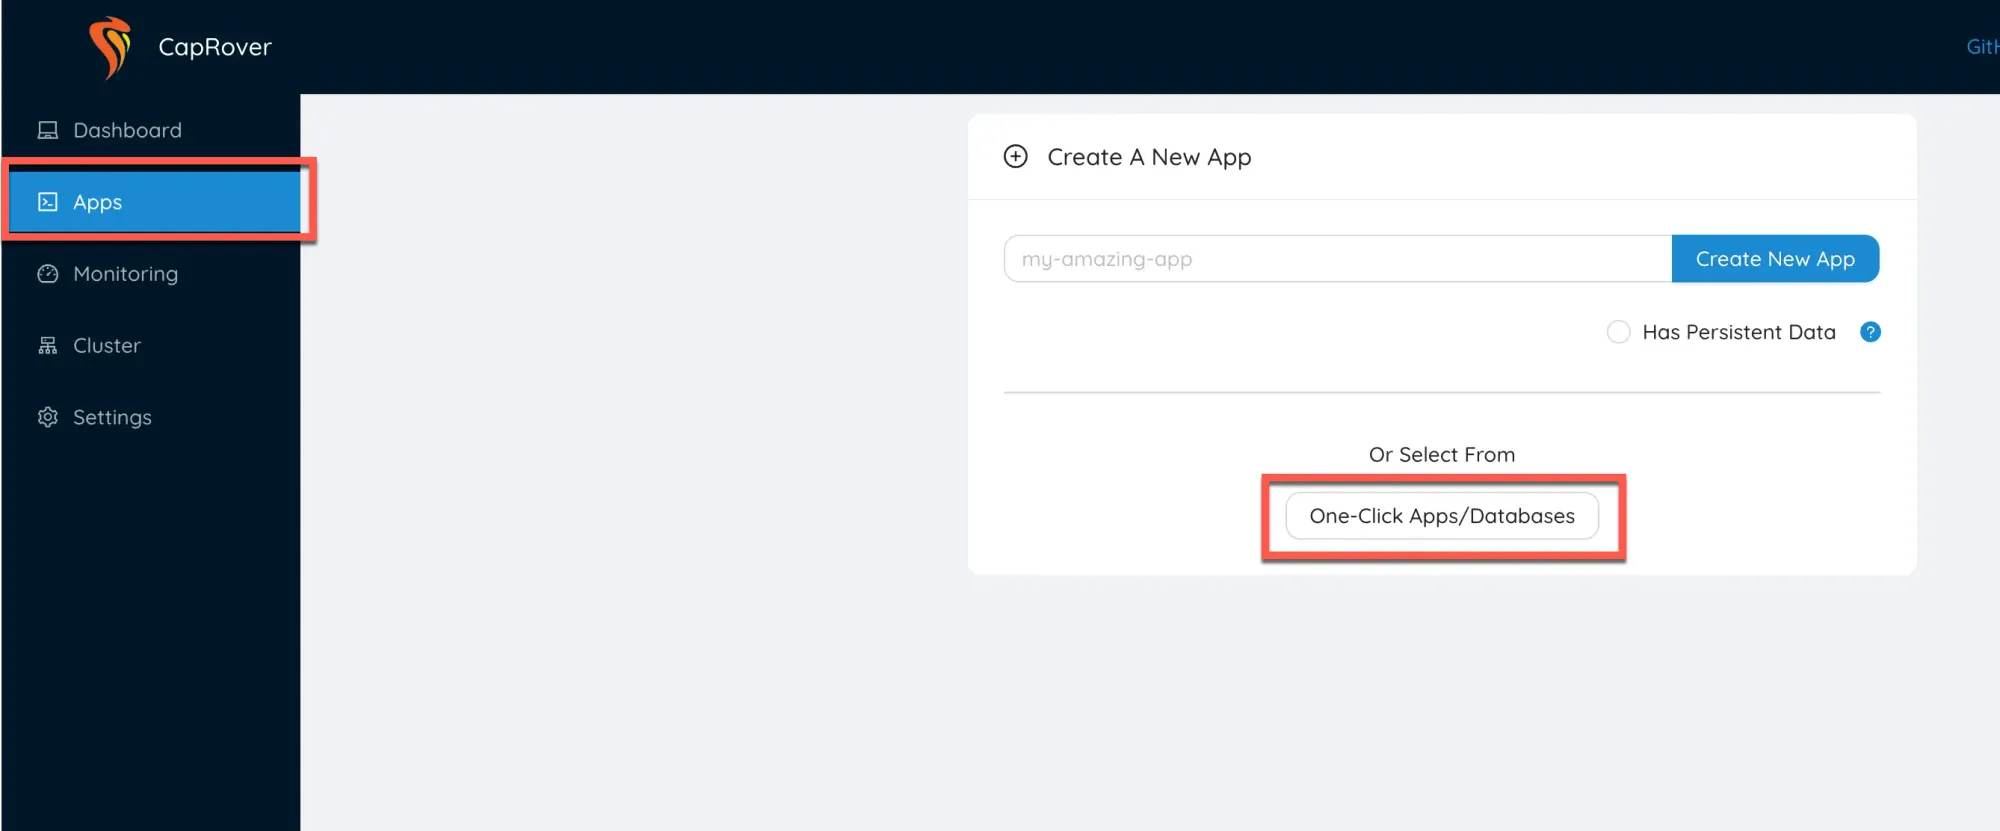
On your CapRover dashboard, click on the Apps menu, then click on One-Click Apps/Databases.
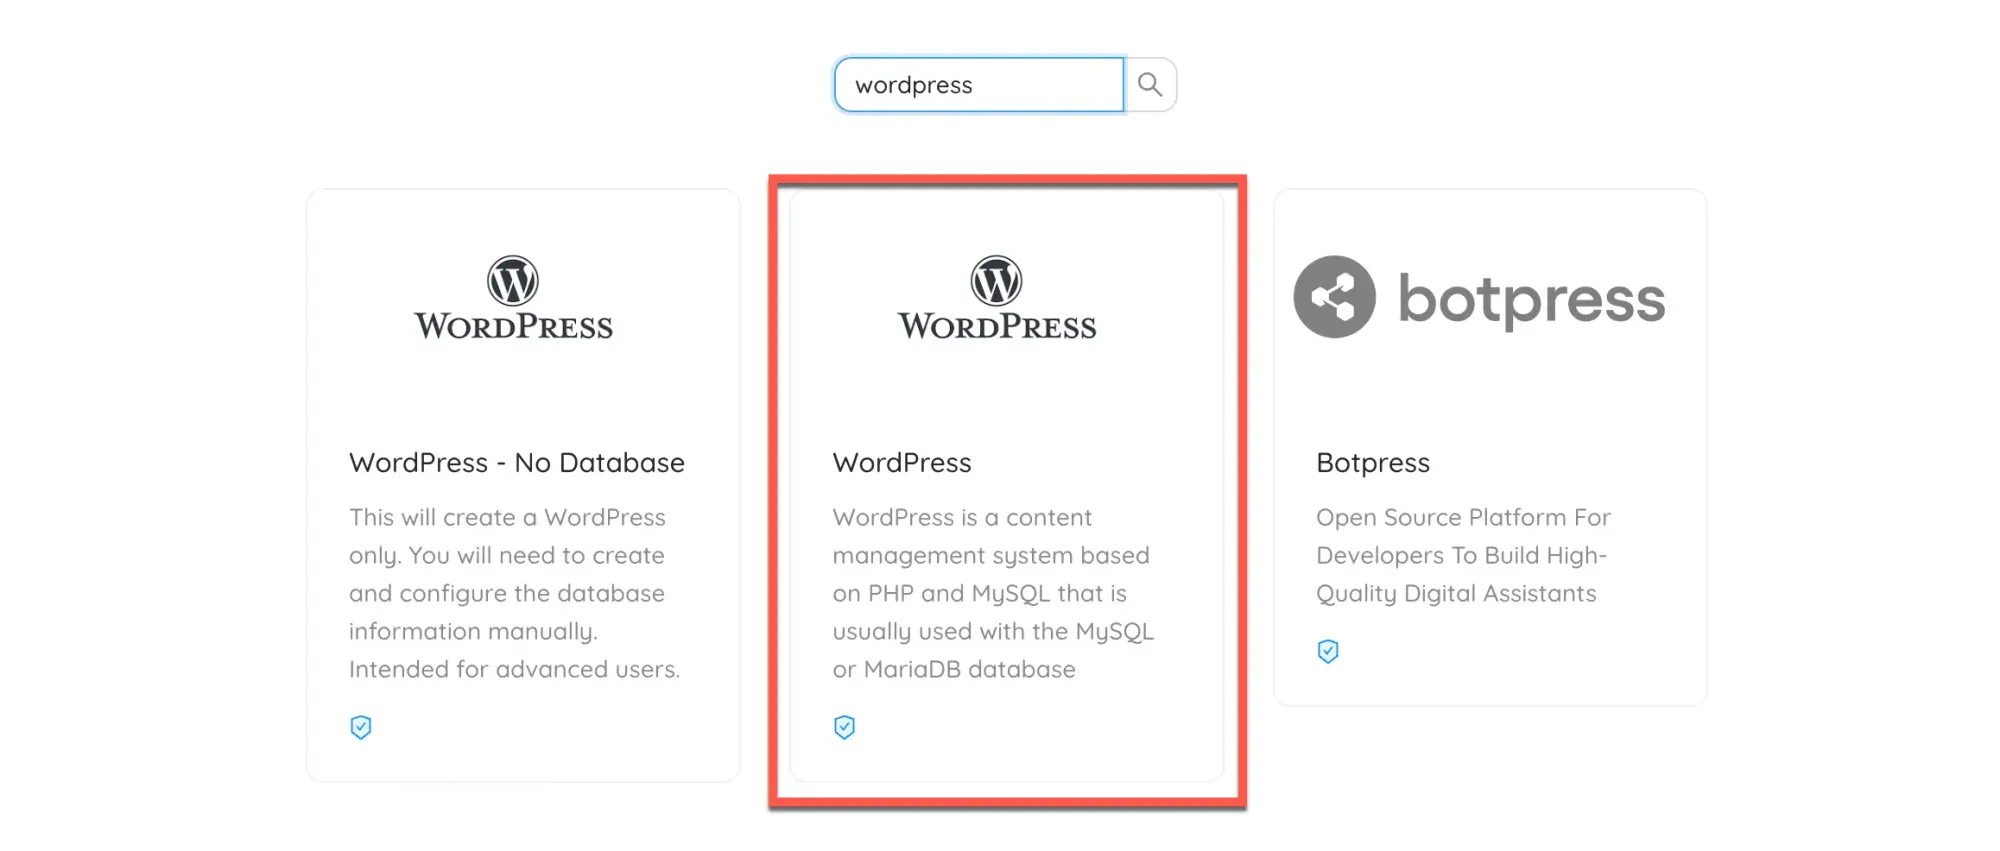
The next page will cover all applications installed on CapRover; type WordPress in the search field, then select WordPress.
Next, an installation configuration will appear, such as the application name, MySQL password, and the database version used; in this article, we will install WordPress version 6.0.1.
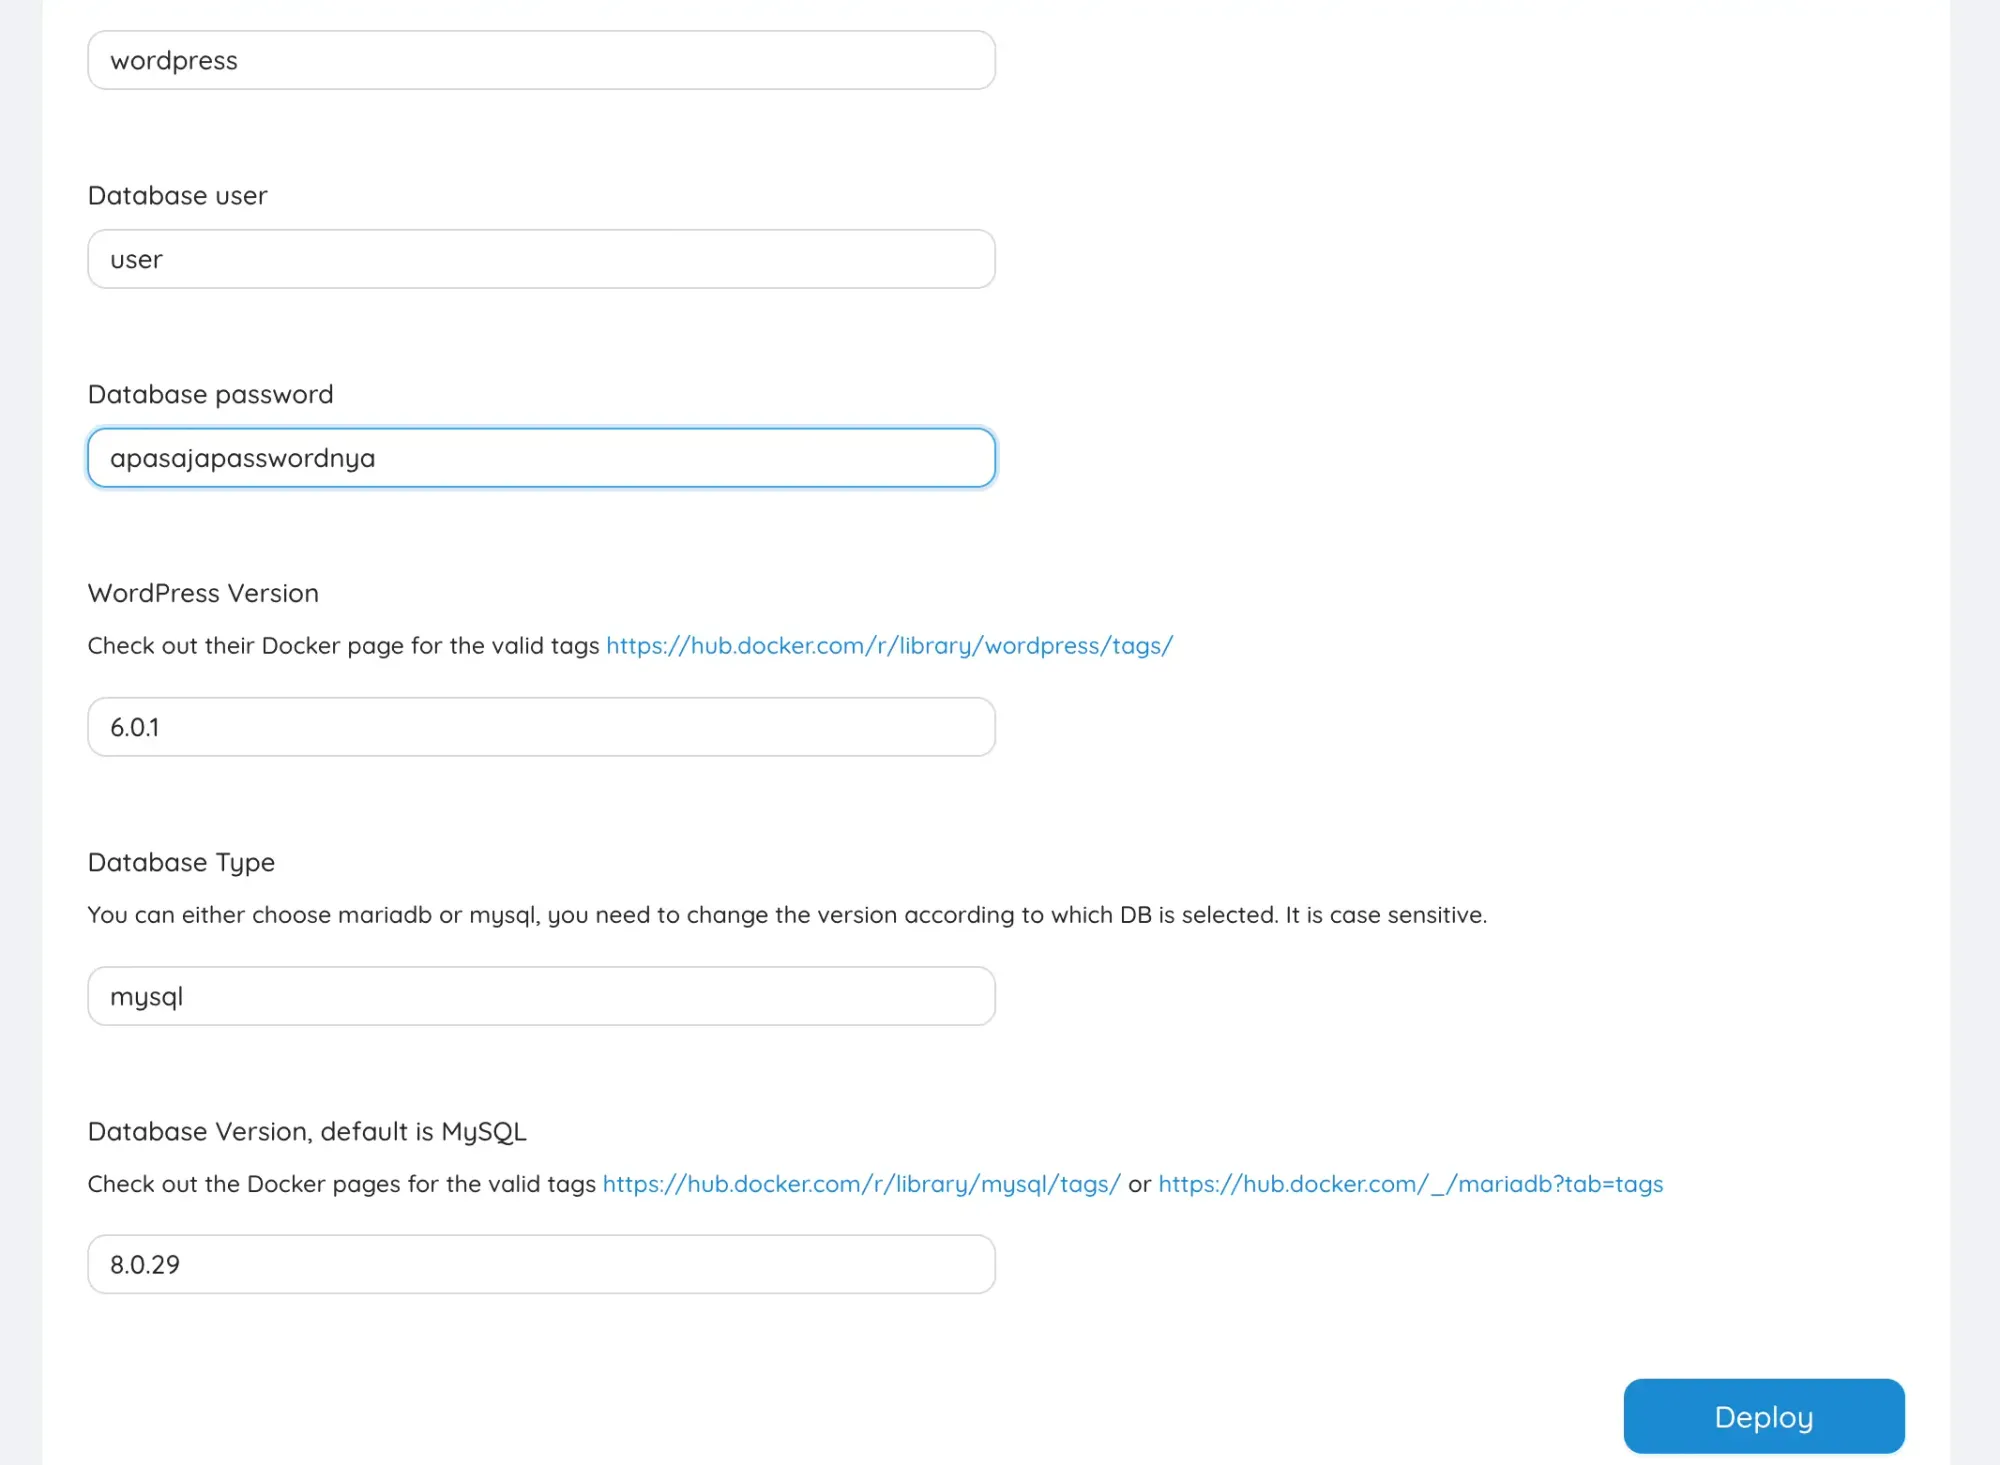
After the configuration is filled, click on the Deploy button!
CapRover will complete WordPress installation processes such as WordPress core, Nginx, PHP, and MySQL in one click.
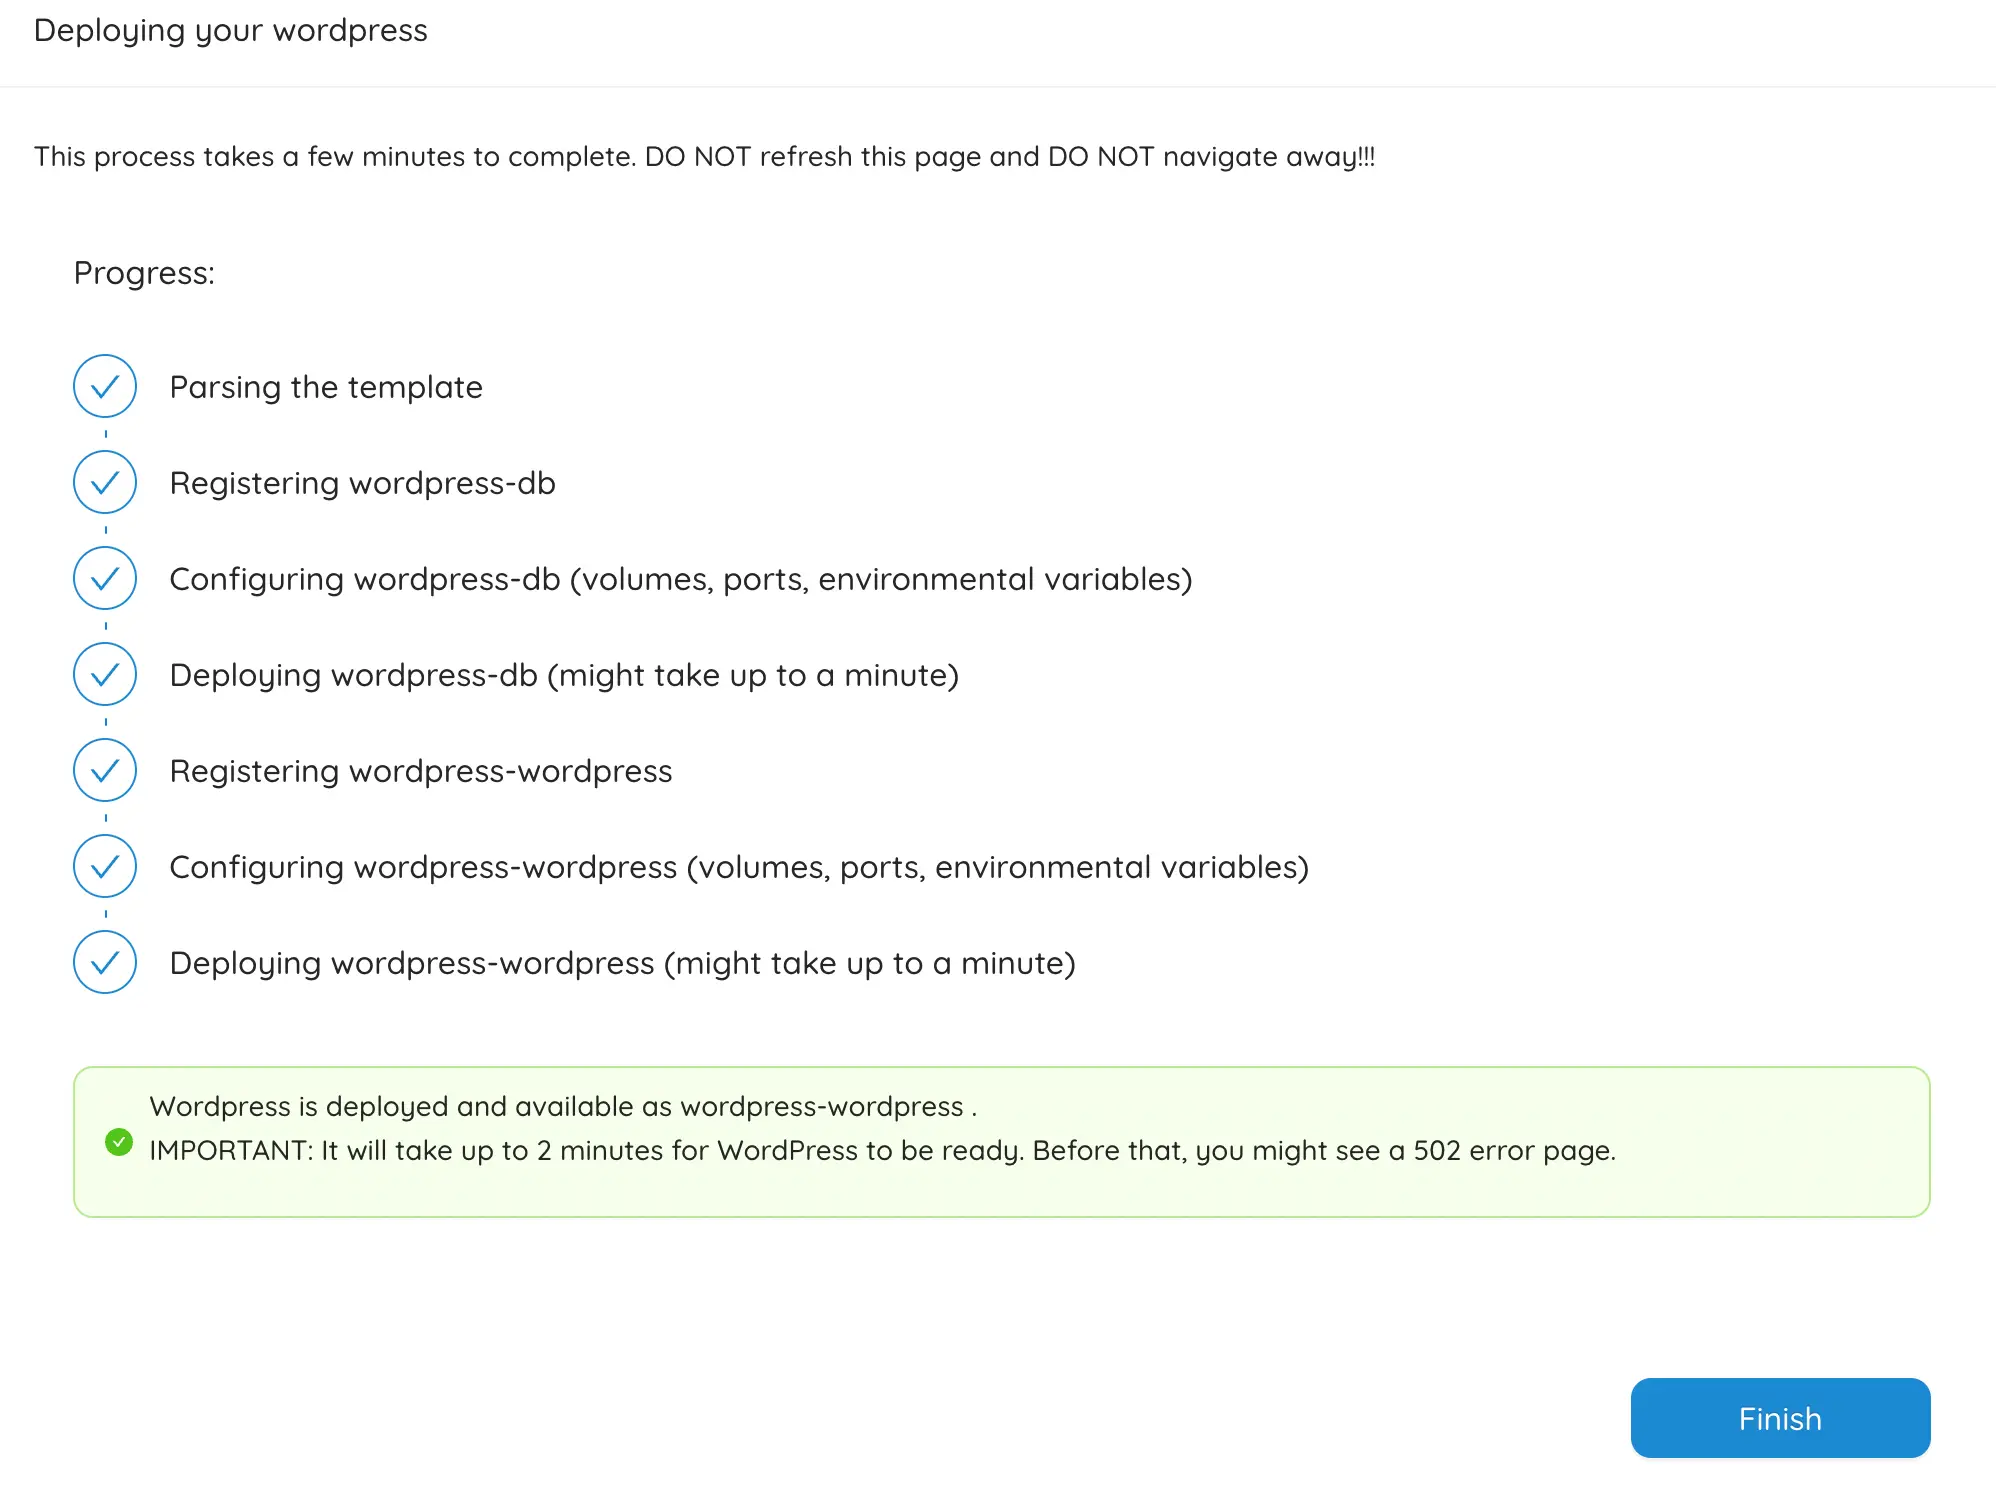
Installing WordPress is complete; then, we will configure the WordPress we have installed.
When you click the Finish button, you will return to the Apps menu, where you can see that there are two installed applications, namely WordPress and its database. Then, click on the wordpress-wordpress Application.

Click on the Enable HTTPS button to activate the free SSL Certificate. If you already have a domain for your new WordPress, enter the domain name in the domain form, click the Connect New Domain button, and click Enable HTTPS again. Select the Force HTTPS by redirecting all HTTP traffic to the HTTPS option, all traffic is redirected to HTTPS. Then click Save & Update.
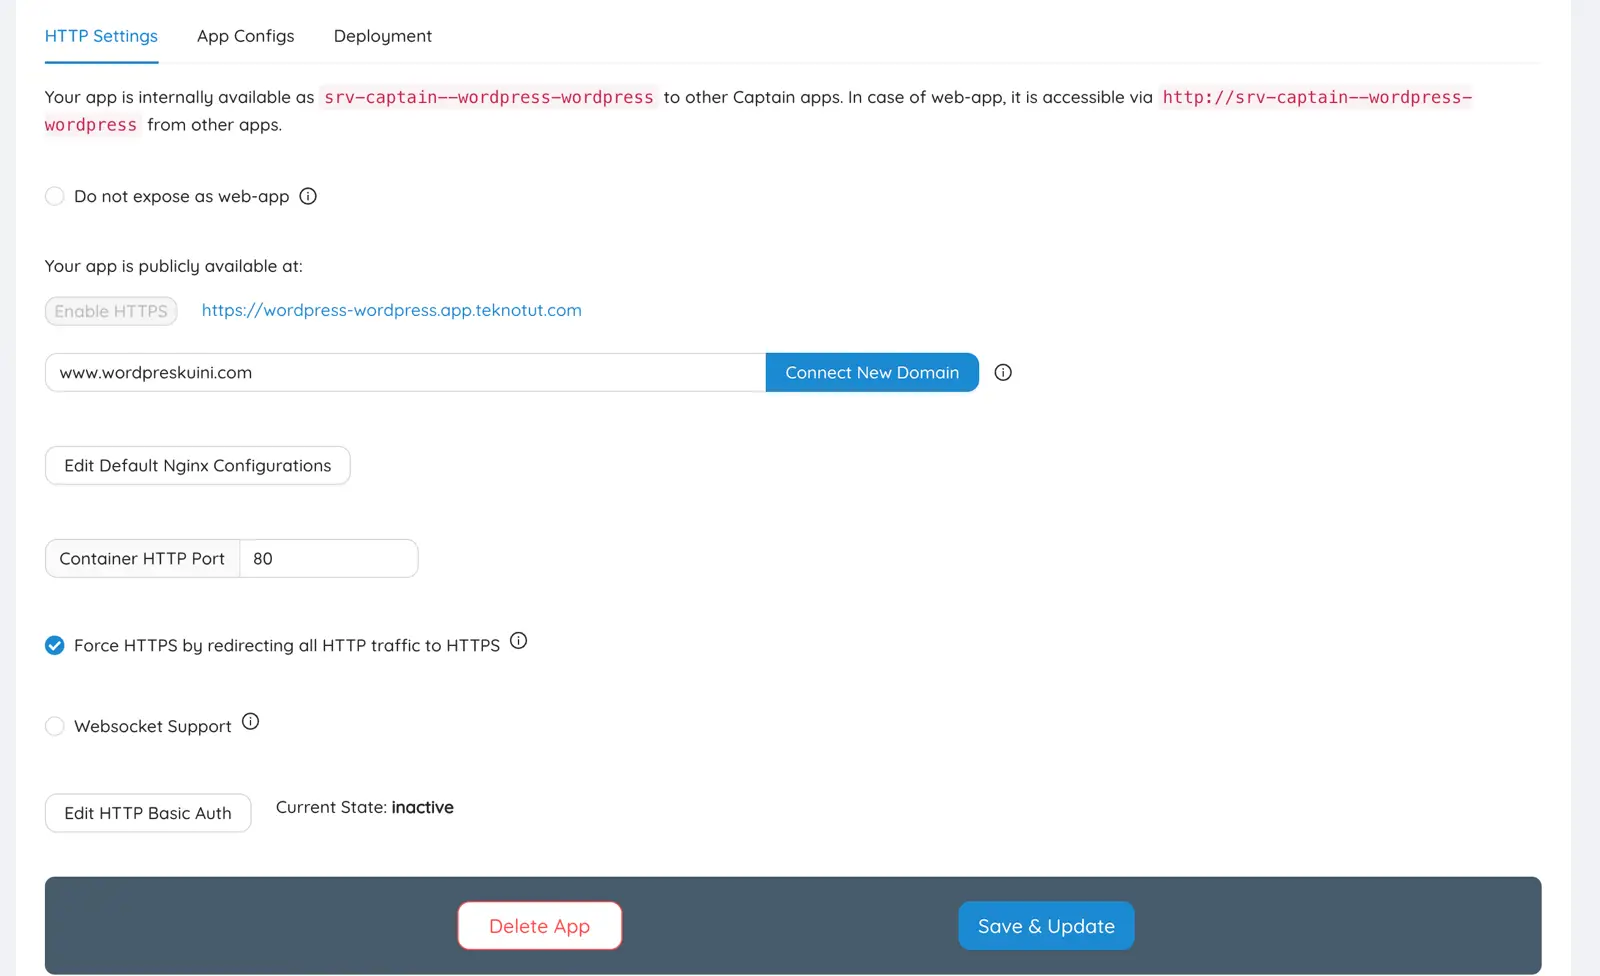
Next, we will configure WordPress at the URL https://wordpress-wordpress.app.teknotut.com or you're domain name if you have entered a domain name in your new WordPress. This article only uses wildcard domains and does not use the main domain. Follow the installation steps according to the wizard instructions on your WordPress page.
Done; you can log in to your WordPress WP Admin now. When you log in to the WP Admin, it turns out that the WordPress version is immediately upgraded to version 6.1.1; you can upgrade WordPress directly from your WP Admin.
Install NetData Engine (Optional)
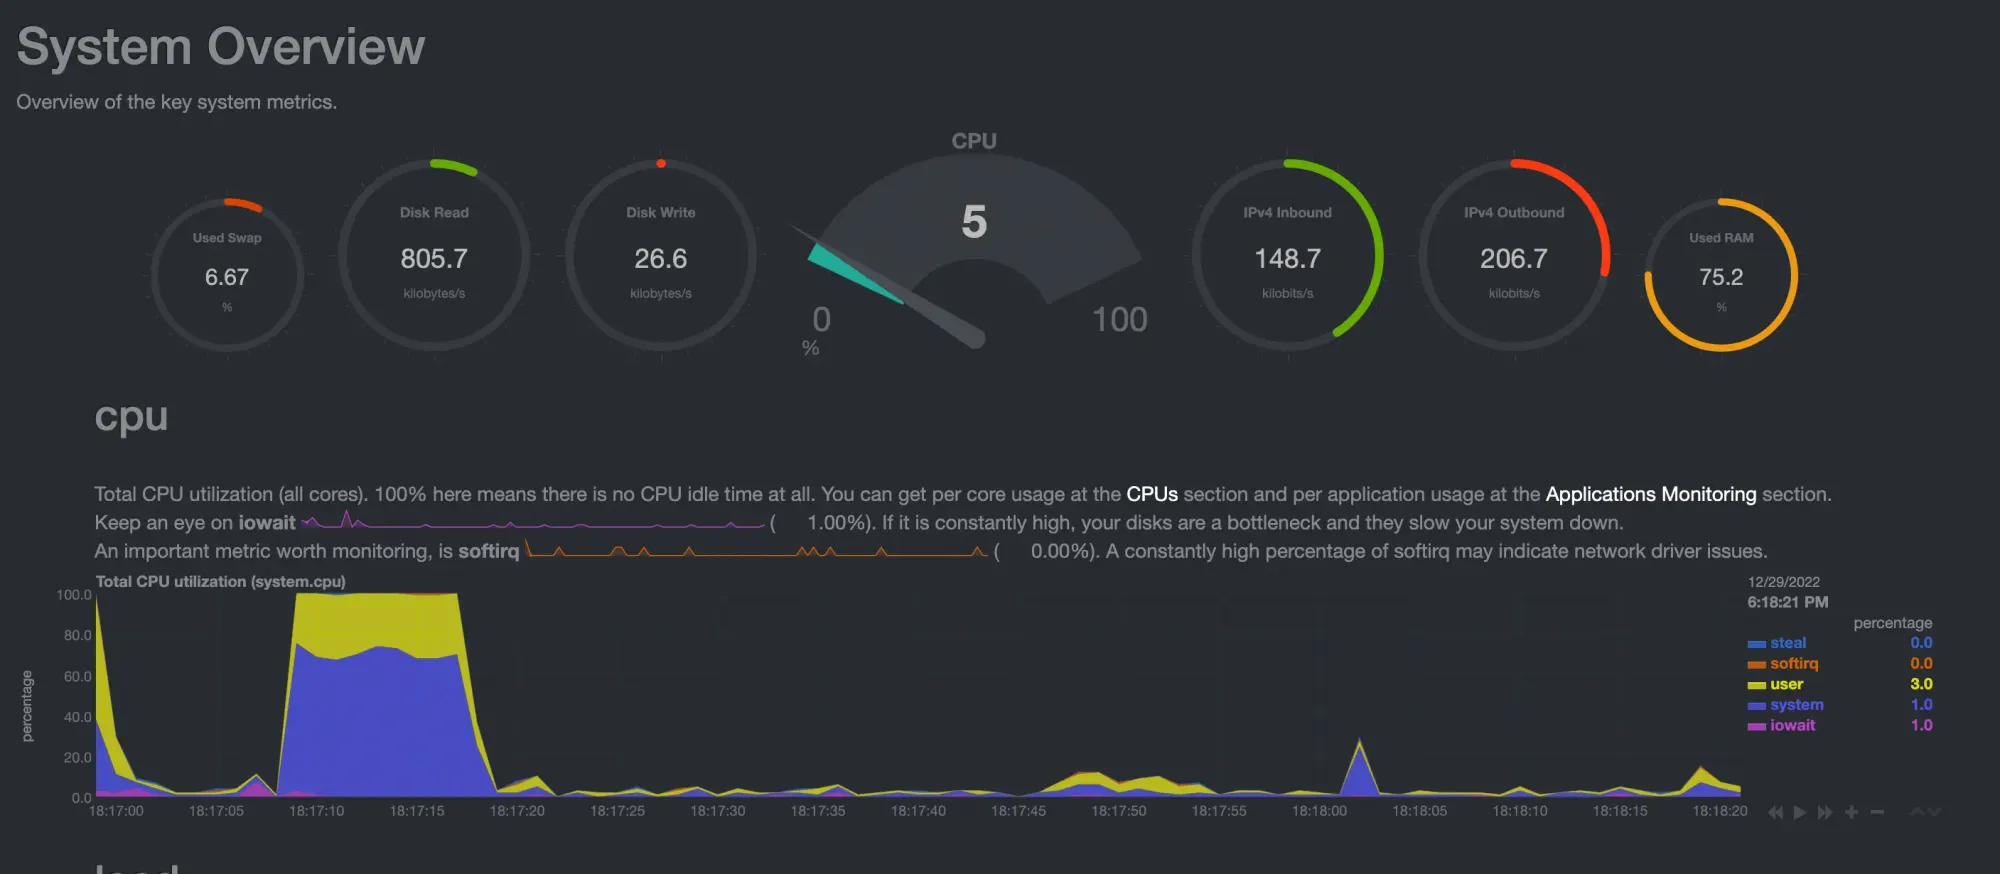
CapRover is equipped with a server monitoring system, but only simple monitoring. If you want to install a monitoring system with beautiful GUI (Graphical User Interfaces) and complete data, you can install NetData Engine on your CapRover. The installation method is straightforward, click on the Monitoring menu, then click the Start NetData Engine button.
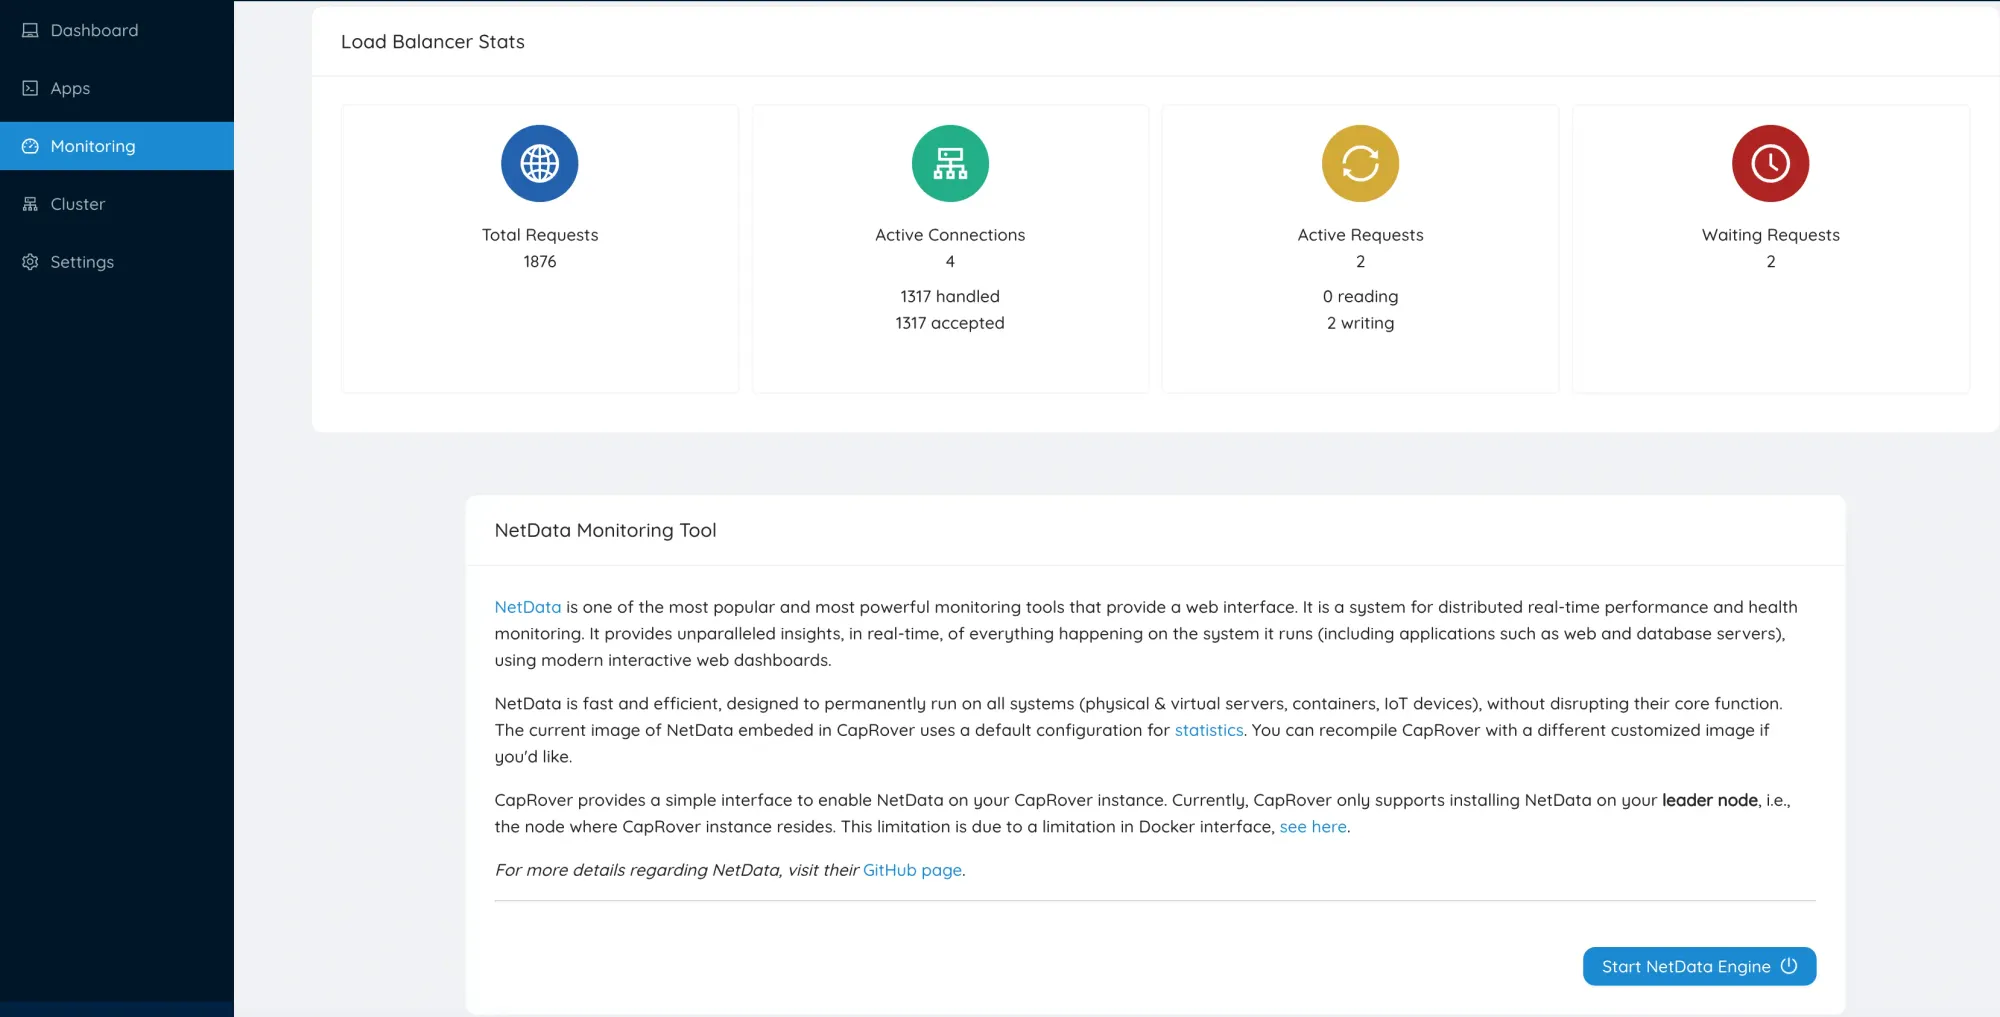
Please wait for the installation process to finish; when it's finished, an Open NetData button will appear, click on the button, and you will be redirected to /net-data-monitor/.
So, your server monitoring system is now complete, as shown in the image below.
Nice!
Conclusion
Based on this article, it can be concluded that How Install CapRover on a VPS or Dedicated Server is a relatively straightforward process because it only requires a few simple steps to complete the installation, such as preparing the server, downloading CapRover, configuring and activating it.
After that, you will be ready to manage your applications with CapRover and enjoy its benefits.
In this article, we have also tried to install an application, namely WordPress; the installation process is straightforward, fast, and easy to understand. In the following article, we will try to install and explain other applications that can make our daily work easier. Keep monitoring the Teknotut website!
I hope this article helps.
]]>One of the strengths of a computer or server lies in its amount of RAM (Random Access Memory). RAM is a type of computer memory used to store data used by the operating system and running applications. RAM is a volatile type of memory, meaning data stored in it will be lost when the computer is turned off.
In contrast to the hard disk, which can store data even though the computer has been turned off. However, the RAM access speed is greater than the hard drive, which causes the server or VPS rental price to be more expensive for more RAM.
The primary function of RAM is to store data used by the operating system and run applications so that the operating system can access this data quickly. If the operating system or application requires data not stored in RAM, then the data must be retrieved from the hard disk, which is much slower than accessing data in RAM.
Therefore, RAM is essential for the performance of a computer system. The more available RAM, the more data can be stored in RAM, so the operating system and applications can run faster. This happens because the RAM has no queue process (bottleneck).
However, of course, larger RAM costs more to spend. If you want to save money with small RAM but good performance, the solution is to tweak it by adding Swap memory, often called virtual memory.
What is Swap Memory?
Swap memory is an area on the hard disk used as a substitute for RAM when the RAM capacity is total. Swap memory is used by the operating system to store data that is not currently being used so that the RAM can be used to run the currently running application.
However, as previously explained, the read and write speed of RAM is far above the speed of the hard disk, so the performance of swap memory cannot match the performance of actual RAM (physical RAM).
To manage swap memory, the operating system uses a paging algorithm that allows data not currently in use to be moved to swap so that the RAM can be used to run the currently running applications. This paging algorithm divides currently unused data into small blocks called pages, then stores those in the Swap.
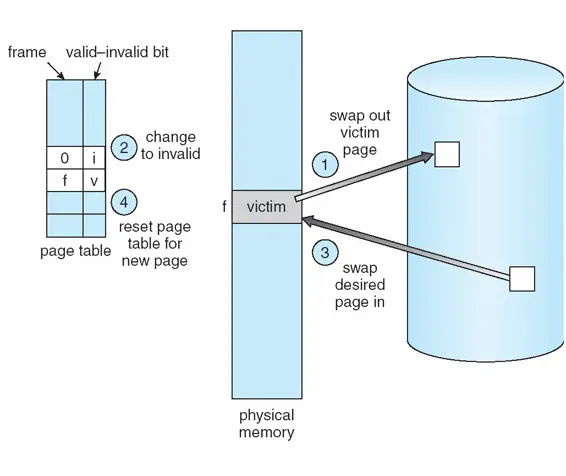
When the operating system needs data stored in the Swap, it will read the page back to RAM to be used by the application currently running.
But keep in mind using a swap can reduce system performance because the hard disk is slower than RAM. Therefore, the operating system will try to use as much RAM as possible and only use a swap when the RAM is already full.
In addition, Swap memory can interfere with complex drive performance because the capacity for read and write speed will be used by Swap Memory. Therefore, the Swap memory must be adjusted to the application's needs to be run.
Advantages of using Swap Memory
Here are some of the advantages that you can get by using swap memory on Linux:
- Improves system performance: By using swap memory, the operating system can manage memory more efficiently and prevent application crashes due to memory shortages. This will improve overall system performance.
- Enhances multitasking capabilities: Swap memory allows multiple applications to run simultaneously. This allows users to run multiple applications such as web browsers, media player applications, text editors, and more simultaneously without performance degradation.
- Allows use of systems with limited RAM: Swap memory is very useful for systems with limited RAM capacity. By using swap memory, you are like having additional RAM, but in virtual form.
- Improves system stability: Swap memory can provide additional stability to systems experiencing excessive memory usage. This allows the system to avoid problems such as kernel panics and blue screens.
- Increases computing capability: Swap memory allows the user to add main memory to the system, thus increasing the computing capability of the system. This can help the system to handle a variety of more demanding tasks.
Disadvantages of Using Swap Memory
While swap memory is helpful in increasing system performance and enabling the use of more applications, there are some drawbacks to be aware of in using swap memory in Linux:
- Decreased performance: Swap memory can reduce system performance because the hard disk is slower than RAM. If the operating system uses Swap too often, system performance will be noticeably slower.
- Hard disk space usage: Swap memory uses hard disk space to store data, reducing the available space on the hard disk. If you have limited hard disk capacity, using swap memory can be a problem.
- Lack of swap memory: If the operating system uses Swap too frequently, the available swap memory may run out. This will cause the operating system to crash or freeze due to a lack of memory.
Therefore, it is necessary to pay attention to the disadvantages of swap memory in Linux before using it in the operating system.
What is the recommended Swap amount?
The amount of recommended Swap that is suitable depends on the application's needs and usage to be run on the system. So, for example, if your server uses 1 GB of RAM, the recommended swap size is around 1.5-2 GB. However, the recommended swap size is around 1.5 to 2 times the RAM size.
Configuring Swap Memory on Linux
Configuring Swap Memory on Linux is relatively easy; we only need to type a few commands without installing anything. When this article was written, we tested it on Ubuntu 20.04 and Centos 8 64 Bit operating systems with 1 GB of RAM.
Follow these steps to configure Swap with 2GB capacity.
Step #1: Create a Swap Partition
Create a Swap partition and allocate 2GB to it; use the command below to create a swap partition with the name /swapfile.
sudo fallocate -l 2G /swapfileStep #2: Set Access Rights
Set the permissions of the swap file so that it can only be read and written by the root user.
sudo chmod 600 /swapfileStep #3: Format the File as Swap
Format the file /swapfile to file type Swap with the following command;
sudo mkswap /swapfileStep #4: Enable Swap
Activate the file /swapfile so that it can be read as swap memory by the operating system with the following command;
sudo swapon /swapfileStep #5: Boot Configuration
Add the swap file so that it can always be activated when booting by adding a line to the /etc/fstab file.
/swapfile none swap sw 0 0' | sudo tee -a /etc/fstabStep #6: Manage Swap usage
Next, set how the operating system should use Swap in the sysctl with the following command;
sudo sysctl vm.swappiness=10The number 10 indicates that the operating system will tend to use RAM rather than swap unless the RAM is full.
Done. Now your Linux system already has 2GB of Swap memory. To verify whether the Swap has been read or not, use the following command;
swapon --showIf the output displays the Swap file that has been created, it means that the Swap configuration has been successful.
NAME      TYPE SIZE   USED PRIO
/swapfile file   2G 242.4M   -2
We can also see the use of swap with the free -m command. The output is something like the one below.
              total        used        free      shared  buff/cache   available
Mem:            976         618          85          42         272         160
Swap:          2047         242        1805
Conclusion
Now you understand the concept of Swap memory on the Linux operating system and how to configure it. From the discussion above, we can conclude that swap memory is needed to speed up server performance for specific conditions. However, we still have to adjust to situations when to use Swap and when we don't need to use Swap.
The configuration method is also relatively easy without installing additional applications. With this article, we hope you can understand more deeply the Swap concept and how to configure it to suit the needs of the application that will be used on the server.
I hope this article helps.
]]>If you use Linux, of course, you are familiar with the package manager that is installed by default. For example, apt on ubuntu or yum on all RedHat derivatives like CentOS or others. However, a package manager is not provided by default for the Mac OS operating system because Macs are designed for user convenience.
Instead, Mac OS uses the App Store for fast installation and reasonable update control. However, the App Store feels unsatisfactory for developers who use Mac OS.
For example, you may be more familiar with wget than curl. Well, of course, you have to install wget first. If on Linux, it's straightforward to use apt install wget or yum install wget. But how do you find the install on Mac OS via terminal? The answer is Homebrew.
What is Homebrew?
Homebrew is a free and open-source package manager for Mac OS. It allows Mac OS users to install applications and software not available in the Mac App Store, such as web servers, streaming media, development software, commands commonly used on Linux, and more.
Homebrew provides various options for upgrading, updating, and managing the applications and software installed on a Mac.
Max Howell created Homebrew in 2009, which was written in Ruby. Max Howell, who was a software engineer at Twitter at the time, felt that installing software on Mac OS was very complicated and time-consuming. To make the installation process more accessible, he created Homebrew.
Homebrew simplifies installing software on Mac OS by providing an easy way to install, manage, and update the applications available in packages. With Homebrew, Mac OS users can install applications by running a few terminal command lines.
Homebrew also allows users to easily install various open-source software (in Homebrew, it is referred to as a formula), thus making it the only package manager that can handle cross-platform software management.
Over the years, Homebrew has been the package manager of choice for many Mac OS users. Today, Homebrew is the standard package manager for Mac OS and has become one of the most popular ways to manage applications and software on Mac OS.
Install Homebrew
The homebrew installation process is straightforward, you only need to type one command line, and you don't need to install anything on your Mac as a condition for installing homebrew. To start the installation, open a Mac terminal, then paste the following command.
/bin/bash -c "$(curl -fsSL https://raw.githubusercontent.com/Homebrew/install/HEAD/install.sh)"The script will download and install the latest homebrew and all the necessary dependencies. The process is quite long, depending on your computer's and the internet's speed.
When finished, you can try installing your first application, for example, wget. Type the following command to install wget;
brew install wgetTo see all available packages, you can look at the https://formulae.brew.sh/ page.
Update Homebrew
If you have previously installed homebrew, you can update your homebrew to the latest version by typing the command;
brew updateHomebrew will update to the latest version currently available.
If you want to update all installed packages, type the following command;
brew upgradeReinstalling Homebrew
Under certain conditions, sometimes homebrew experiences an error that we are confused and stuck trying to solve the problem. Don't worry; in this case, it's better to uninstall your homebrew, then reinstall it; this will make your homebrew fresh again.
Uninstall Homebrew using the following command;
/bin/bash -c "$(curl -fsSL https://raw.githubusercontent.com/Homebrew/install/master/uninstall.sh)"Then reinstall!
/bin/bash -c "$(curl -fsSL https://raw.githubusercontent.com/Homebrew/install/HEAD/install.sh)"Done. You have got the latest version of homebrew in new condition.
Conclusion
From this article, we can conclude that Homebrew is a valuable tool for easily and quickly installing applications on Mac OS. Following this article's steps, you can easily install Homebrew on your Mac in minutes.
I hope this article helps.
]]>If you are an old web programmer, you are familiar with JavaScript to beautify or make the web pages you build more dynamic. Javascript is run in the browser to manipulate web pages, and maybe your website's backend is PHP and MySQL.
In that era, AJAX (Asynchronous JavaScript and XML) emerged, and many JavaScript libraries to make programming more accessible, such as Jquery, Angular JS, and others. But all of that can only be run on the client or browser side; web developers must still understand programming on the server side, such as PHP, ASP, and others.
Therefore, the developers are considering whether Javascript can be run on the server side so that web developers only need to master one programming language, namely Javascript. Then came Node.js, which is currently very popular and has built thousands of websites and applications that can run on multiple platforms.
What is Node.js?
Node.js is an open-source JavaScript runtime environment that allows developers to write server-side code using JavaScript. Node.js is gaining popularity due to its performance, scalability, and cross-platform capabilities, making it even more ideal for developing web applications that run on multiple platforms.
Ryan Dahl first released Node.js in 2009 as an open-source project on GitHub. It incorporates a program interface between JavaScript and the operating system that is non-blocking, allowing it to handle higher requests in less time and with fewer resources.
Node.js is currently the most popular platform for building fast, responsive, and scalable web applications. This allows developers to build applications in the same JavaScript environment they use to create web pages. It also helps developers build applications with increased performance and high productivity.
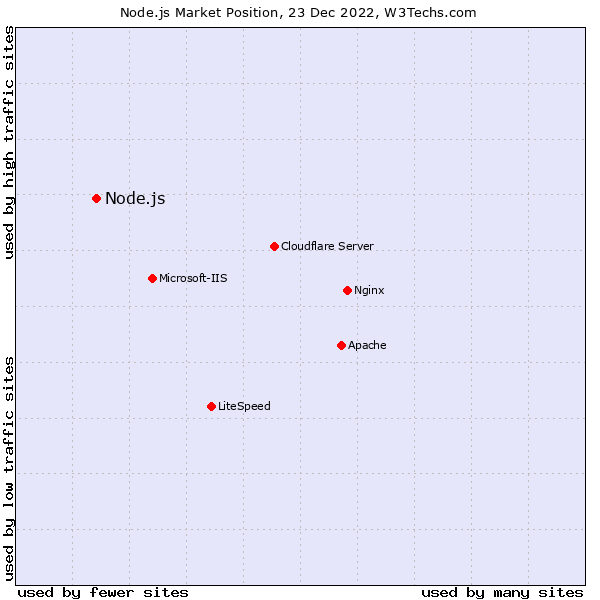
Node.js has been used by many large companies such as Netflix, Walmart, and LinkedIn to build their web applications. Developers have also used Node.js to create mobile applications using platforms such as React Native and Cordova. So with Node.js, application developers don't need to learn various programming languages; just Javascript is enough, isn't it interesting?
Node.js has become one of the most popular web and mobile application development platforms. It has become an essential part of the JavaScript ecosystem and is considered one of the most important technologies for developing web-based applications.
Install Node.js on Linux
Installing Node.js on Linux is relatively easy; there are several ways to install Node.js; please choose the easiest way.
Install Using Default Package System.
In the latest operating system version, Node.js has entered the package system; for example, in this case, we are using Ubuntu 20.04 to install and type the following command.
sudo apt update
sudo apt install nodejs
sudo apt install npm
Install With NodeSource PPA
If Node.js is unavailable in the repository, you add the source to your operating system; in this example, we will use the NodeSource PPA.
Type the following command in your Linux terminal;
curl -fsSL https://deb.nodesource.com/setup_19.x | sudo -E bash - &&\
sudo apt-get install -y nodejs
sudo apt-get install -y npm
Version 19.x It is the latest version of this article; if you want to use an earlier or a newer version, please look at the official NodeSource documentation.
Install Using NVM (Node Version Manager)
Installing using NVM is a bit difficult, but we are given the freedom to choose the Node.js version easily. Type the following command to download the NVM source.
curl -o- https://raw.githubusercontent.com/nvm-sh/nvm/v0.39.2/install.sh | bashwhen finished, edit the ~/.profile file using nano.
nano ~/.profilePaste the code below in the ~/.profile file.
export NVM_DIR="$([ -z "${XDG_CONFIG_HOME-}" ] && printf %s "${HOME}/.nvm" || printf %s "${XDG_CONFIG_HOME}/nvm")"
[ -s "$NVM_DIR/nvm.sh" ] && \. "$NVM_DIR/nvm.sh" # This loads nvm
When finished, save the file by pressing the hotkey CTRL+X and pressing button Y to save. Then make the ~/.profile file as a source by typing.
source ~/.profileAt this stage, your NVM should be running; you can verify it by checking the version of NPM with the following command;
nvm --versionIf the output from the above command is the nvm version, your nvm installation was successful. Next, we have to install Node.js and npm. To see the available versions of Node.js, type the following command.
nvm list-remoteAll available versions will come out, sample output as below;
   ......
        v17.7.0
        v17.7.1
        v17.7.2
        v17.8.0
        v17.9.0
        v17.9.1
        v18.0.0
        v18.1.0
        v18.2.0
        v18.3.0
        v18.4.0
        v18.5.0
        v18.6.0
        v18.7.0
        v18.8.0
        v18.9.0
        v18.9.1
       v18.10.0
       v18.11.0
       v18.12.0   (LTS: Hydrogen)
       v18.12.1   (Latest LTS: Hydrogen)
        v19.0.0
        v19.0.1
        v19.1.0
        v19.2.0
        v19.3.0
So, we will try to install the latest Node.js, namely version 19.3.0; type the following command to install;
nvm install v19.3.0Wait until the process is complete.
To verify the installation results, you can check the version of Node.js installed with the following command.
node -v
npm -v
The output is the version of Node.js and npm that was successfully installed on your Linux system.
Install Node.js on Windows
Installing Node.js on a Windows operating system is very easy because Node.js already provides a GUI (Graphic User Interface) installation file, so you can download the installation file on the Node.js download page, select Windows, then download according to the Windows architecture. For example, 64-bit.
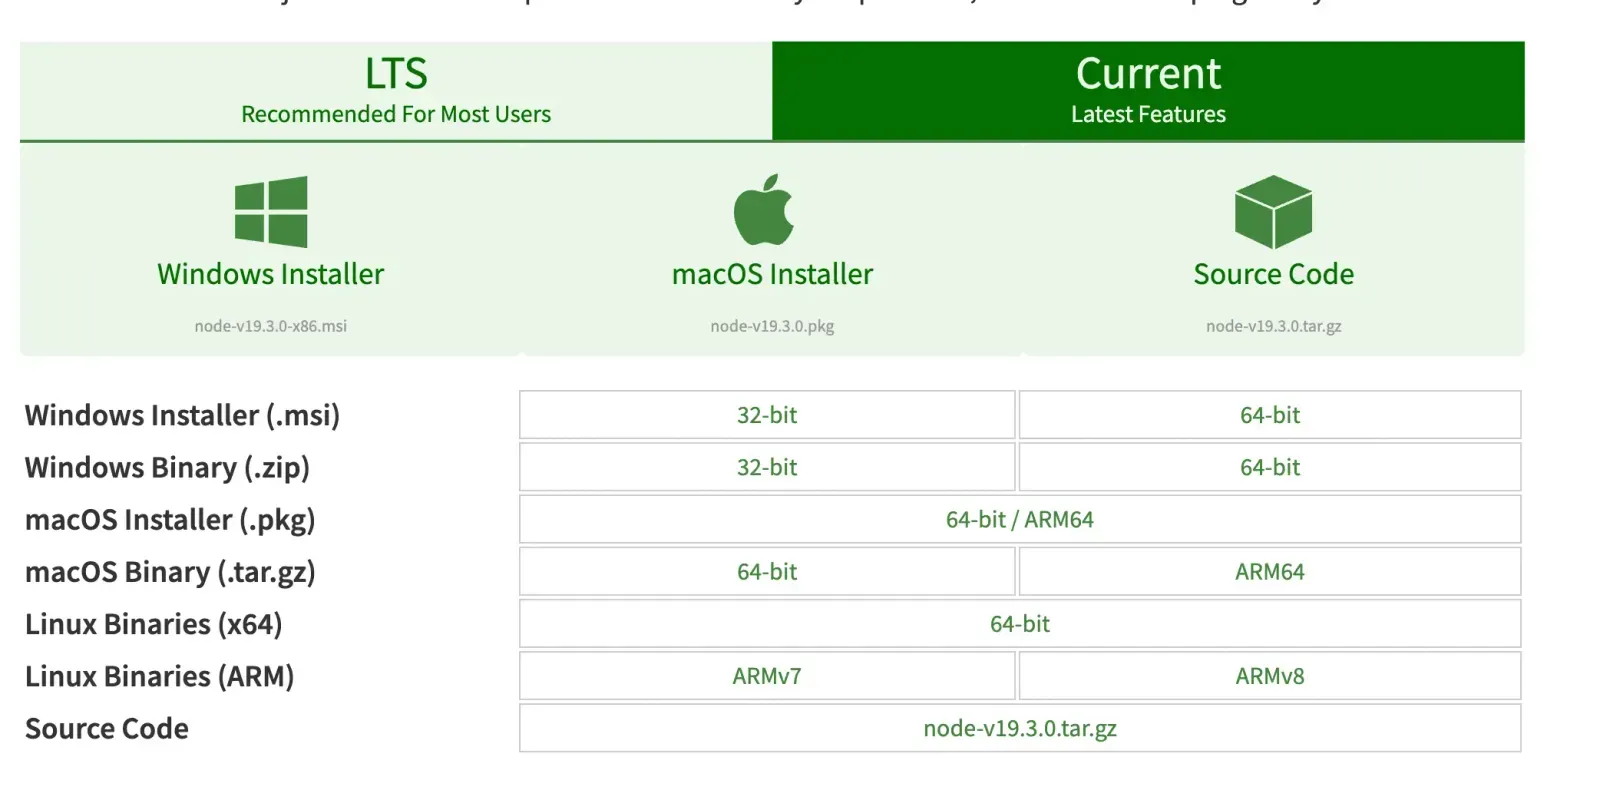
After the file has been successfully downloaded, open the file by double-clicking, then follow the instructions in the installation process. The installation process will take a while, depending on your computer's and the internet's speed. Check the "Automatically install the necessary tools" option so that the installer can install all the packages needed.
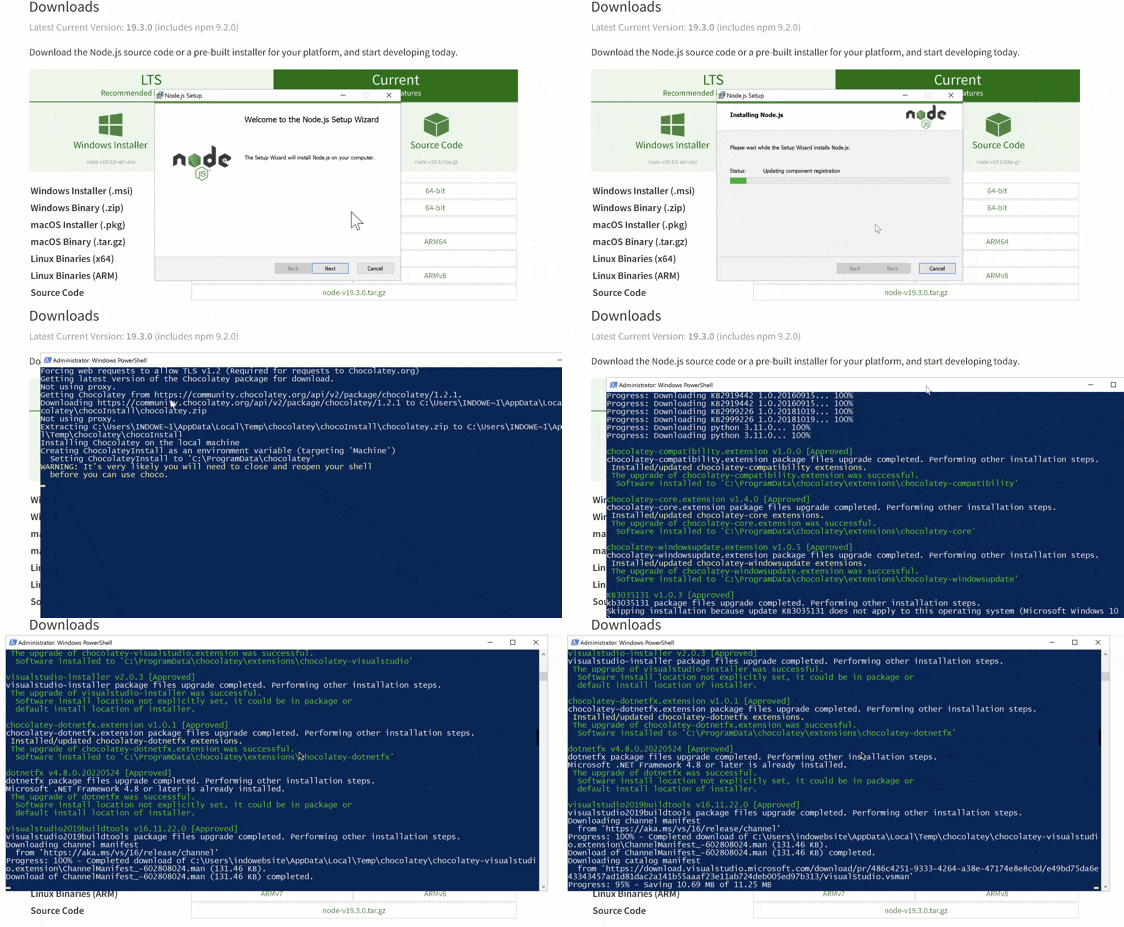
When finished, you can verify the installation results by checking the Node.js version via Command Prompt or Windows Power Shell. By typing;
node -v
npm -v
If the Node.js and npm versions have been released, then the Node.js installation process on Windows has been successful.
Install Node.js on Mac
Installing Node.js on a Macbook is relatively easy because it can be done using homebrew; if your Macbook doesn't have homebrew installed, please do the homebrew installation first. Please type the following command in your Macbook terminal if it's already installed.
brew install nodeThis command will install the complete Node.js package. The process will take a long time. Please wait until the process is complete; when finished, please verify the installation results by checking the version.
Create the First Node.js Application
Next, we will test the results of the Node.js installation that we have done by creating a simple server program, which will display the words 'Hello Teknotut' in the browser sent via the Node.js server.
Make your project directory, then create a file, for example, server.js, and fill the file with the following code;
//simple nodejs program to display "Hello Teknotut"

//Create server with nodejs
const http = require('http');
const hostname = '127.0.0.1';
const port = 3000;

//Create Server
const server = http.createServer((req, res) => {
  res.statusCode = 200;
  res.setHeader('Content-Type', 'text/plain');
  res.end('Hello Teknotut!');
});

//Run a server
server.listen(port, hostname, () => {
  console.log(`Server running at http://${hostname}:${port}/`);
});
The program above will create a web server running on port 3000, and when accessed, it will respond with status code 200 (OK), sending a header of type text/plain with the contents 'Hello Teknotut'.
When finished, save the file, then in the file directory, type the command;
node server.jsHooray, you have successfully created a Node.js server that displays the text 'Hello Teknotut' in your browser when you access http://localhost:3000.
To stop the server, press CTRL+C in your terminal or command prompt.
Easy enough, right?
Frequently Asked Questions
Here are some frequently asked questions regarding Node.js
What is Node.js?
Node.js is an open-source JavaScript platform that can be used to build web server applications in JavaScript. This allows you to use JavaScript outside of the browser and create applications that run on servers.
What are the benefits of using Node.js?
Node.js offers various benefits, including high performance using an asynchronous I/O model, modules easily imported from the community, and high scalability because applications can run on multiple servers.
How to install Node.js?
Node.js can be easily installed on multiple platforms. Detailed instructions for each platform can be seen on the pages of this article.
What are the advantages of writing JavaScript code with Node.js?
Node.js allows you to create web server applications written in JavaScript, which means you can use the same JavaScript code to build web applications without having to write different codes for each platform. It also makes writing JavaScript code faster and easier.
Conclusion
The article above taught us how to install Node.js on Linux, Mac, and Windows in full and in detail. We've covered how to install Node.js on different operating systems, the stages of installation, and some of the problems that may arise. Thus, we can conclude that the Node.js installation process is not complicated and can be done quickly on all operating systems.
I hope this article helps.
]]>This tutorial will discuss installing Flutter on Windows, Mac OS, and Linux Operating Systems. The first Flutter project will also accompany this tutorial, so we can understand more about the Flutter Framework we will use.
Here you can see the difference: Flutter can already be multi-platform. We can program directly from Android Studio or use Microsoft Visual Studio Code in Fluter programming. Virtual devices can now use AVD (Android Virtual Device); we can use XCode for IOS applications.
Code once, your application can be run directly on Android and IOS. Interesting right?
What is Flutter?
Flutter is a framework for developing mobile applications that are open source. Flutter was acquired by Google and was introduced in May 2017. Because Flutter is Open Source, development is faster. Flutter can create multi-platform mobile applications, making it easier for developers to publish their applications.
The first version of Flutter was named sky, which could only run on the Android Operating System. As a Framework, Flutter is written using the Dart language, which already provides essential functions or classes for building mobile applications.
Dart is a language that supports Object Oriented (OOP) with C-Style syntax (similar to C language), which can be optionally changed to JavaScript.
Widget
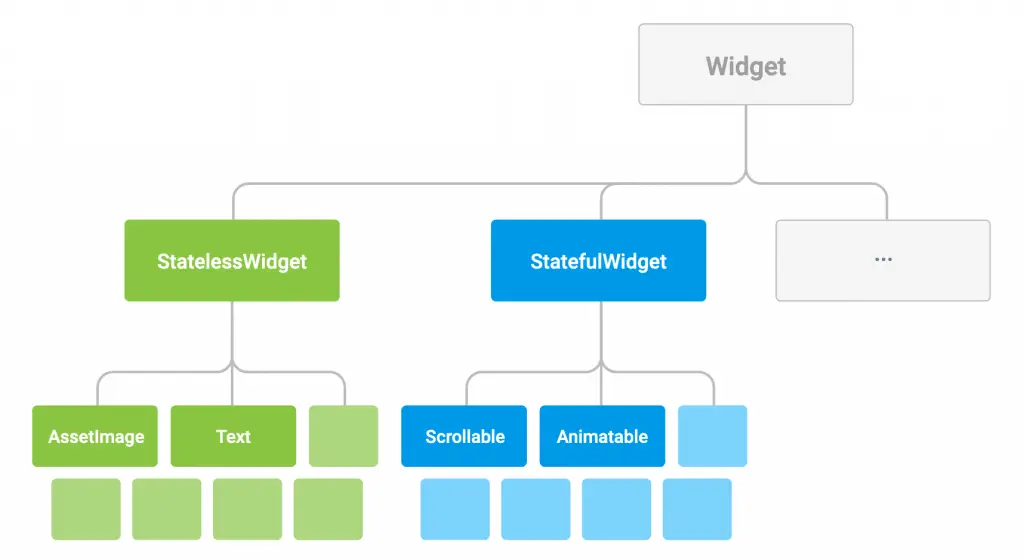
Flutter has a widget system, which makes it more unique than other app builders. The designing system in Flutter uses widgets, which combine simple widgets into more complex ones. With Flutter, you can create different and stable application designs that run on Android and IOS.
This is because Flutter has its rendering engine system. Widgets in Flutter have a hierarchical structure that makes it easier to design applications. This hierarchical class system maximizes the possibilities of design combinations. An overview of the Flutter class hierarchy is shown in the image below.
Stateful Widget
Stateful Widgets are dynamic widgets and require a session. In Flutter, Stateful Widgets generally indicate that the specified component has a state property.
Stateless Widget
Stateless Widgets are static and don't need to use as a session. A stateless Widget can mean the component does not have a state property.
Hot Reload
If you have ever made an application with Android Studio, we will usually rebuild it so that the appearance can change when there is a change. Unlike Flutter, in Flutter projects in Android Studio, there is a hot reload button that will refresh the view instantly without having to rebuild. This is a distinct advantage for developers because it will speed up the application development process.
Advantages of Flutter
Then what are the advantages of Flutter as a material for consideration? We will use this Framework. Here are some of the benefits of Flutter to consider.
More Productive
Flutter uses a modern, expressive and declarative approach. With Flutter, you can create applications that run on Android and iOS simultaneously with the same code. This will undoubtedly save more time and increase productivity. With Flutter, because classes are already available for building mobile applications, you will use very little code in your application, but of course, with full features.
It will be easier for developers to detect program errors on the prototyping and debugging side. At the practical level, for example, trying a specific code, you will see the results immediately. This is because Flutter comes with a hot reload, which shows your code results immediately without rebuilding. You can fix errors on the spot after the app stops.
Easy and More Attractive Application Design
Flutter provides Material Design themes for Android and Cupertino for IOS. With this design framework, developers only need to modify a few application templates. With a widget system and class hierarchy, it will make it easier for developers to design beautiful applications.
Widgets that can be customized will produce a more varied and unique appearance of the application. Flutter indulges developers in making faster, more precise, and more accurate applications.
Flutter Studio
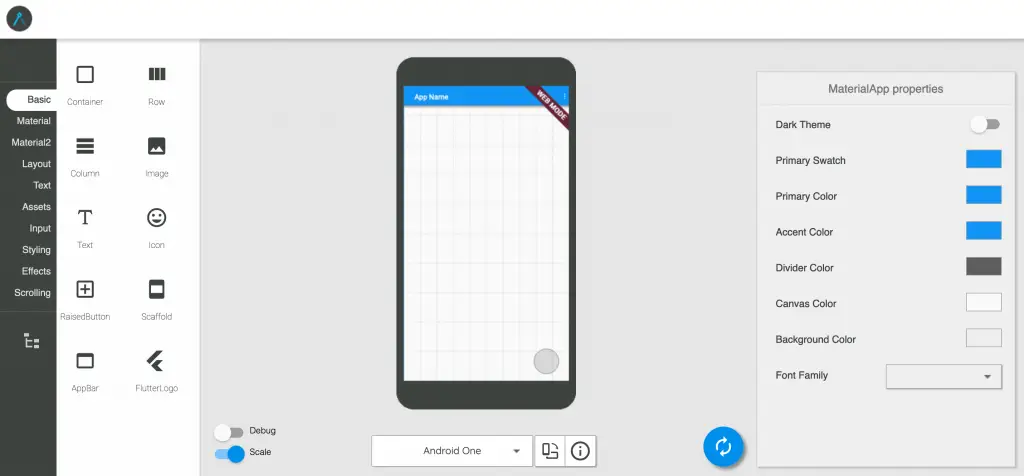
Flutter launches Flutter Studio in a web-based form. Flutter Studio is very useful for those who want to learn Flutter without installing an application. All you have to do is open a web page, and you can immediately modify the application layout and the source code. Please try directly on the page URL https://flutterstudio.app/.
Install Flutter on Windows
Installing Flutter on Windows is relatively easy. But make sure your Windows meets the requirements. Here are some recommendations that are needed.
- Microsoft Windows 7 SP1 or above, recommended Windows 10.
- Disk Space 400MB
- Windows PowerShell 5.0 or above (Already included in Windows 10) If you are using Windows 7 or 8, you must first install Windows PowerShell; please follow the article on the Microsoft Docs page.
- Git for Windows version 2.0 or above
- The complete Android Studio application has been installed, including the AVD. Or, you can use Microsoft Visual Studio Code. I suggest installing both.
This article uses Windows 10 64-bit with Android Studio and Microsoft Visual Studio Code installed.
Install Flutter Plugin
Before the Flutter installation process is carried out, we must install the Plugin on Android Studio and Microsoft Visual Studio Code. Please follow the steps below to install the Plugin.
Android Studio
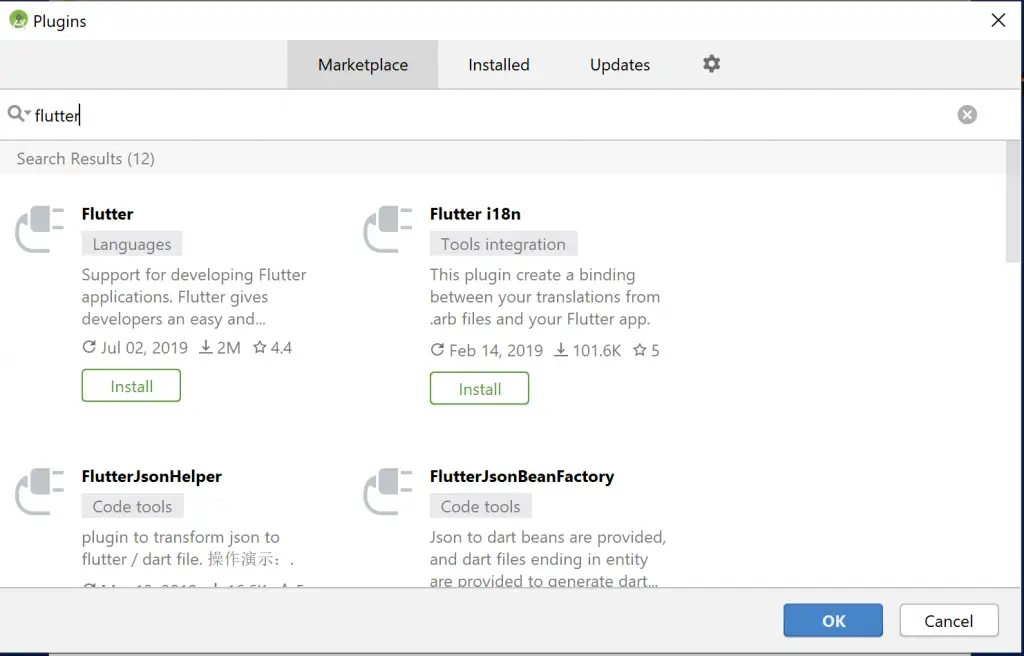
Open your Android Studio application. At the start screen, click Configure, then select Plugin.
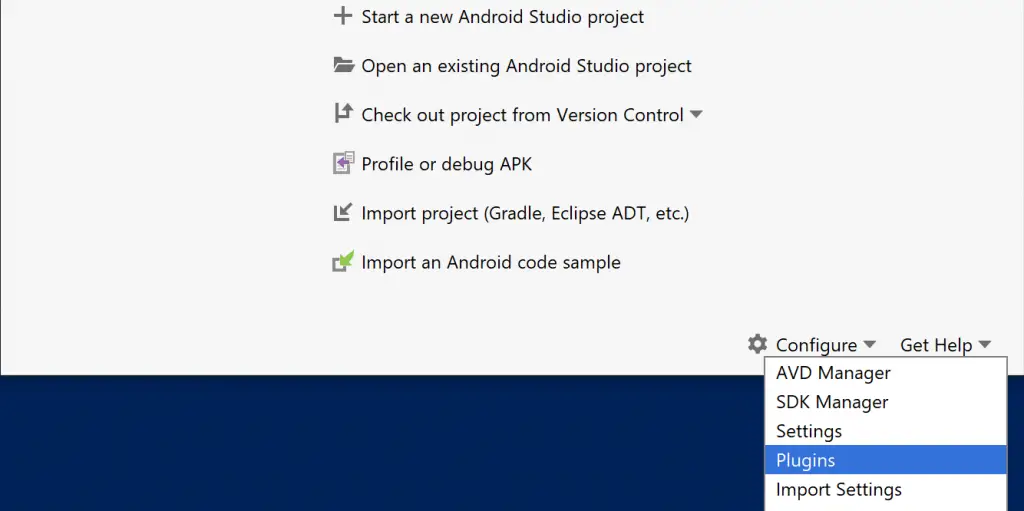
Type the keyword "flutter" in the Search field, then press enter. After the Flutter plugin appears, click Install. Please wait for it to finish. Once done, restart your Android Studio.
Microsoft Visual Studio Code
If you haven't installed Microsoft Visual Studio Code, please download the installation file on the https://code.visualstudio.com/ page, then do the installation as usual.
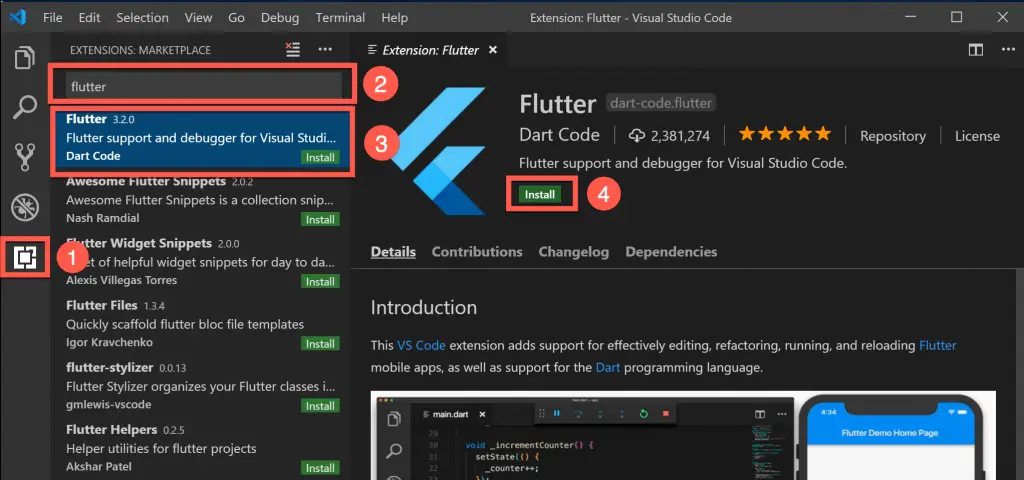
Open your Microsoft Visual Studio Code application. Once open, click on the Extension tab (1), then search for the keyword "flutter" (2), click on the Flutter search results (3), then click Install (4). Wait until the installation process is complete. If necessary, restart your Microsoft Visual Studio Code.
Install Git
Download the latest Git Installer application. You can find the git installation files on the Git Installer page. When this Flutter Tutorial was written, the newest git version was 2.22.0. You can download the git installer for Windows 10 64-bit via the Git 2.22.0 64-bit page.
Install Git as usual. This Git application is an essential component of Flutter. You must successfully install Git before proceeding with installing Flutter.
Next, we will work using PowerShell. Open your PowerShell by searching for search Windows 10, typing the keyword "PowerShell," right-clicking on the PowerShell menu, then clicking on Run as Administrator. We need administrator access because we will do some installations.


We'll work on the C:\src\ directory to keep things more structured and tidy. Create the folder first and enter the directory by typing the command below.
cd /
mkdir src
cd src
Now let's check whether Git has been installed correctly. Type the following command.
git --versionIf the git version appears, the git installation is successful.

If the git command displays an error message, ensure you have successfully installed Git again. Then try closing PowerShell and reopening it. Recheck the git installation with the command git --version.
Install Flutter
Next, we will install Flutter. You can see all Flutter SDK releases directly on the page: https://flutter.dev/docs/development/tools/sdk/releases. When this Flutter tutorial was written, the latest version was v1.7.8+hotfix.3. We will install that version. Enter your PowerShell and type the following command.
wget https://storage.googleapis.com/flutter_infra/releases/stable/windows/flutter_windows_v1.7.8+hotfix.3-stable.zip -Outfile flutter.zip
Expand-Archive flutter.zip flutter
The command above will download Flutter version v1.7.8+hotfix.3 with the name flutter.zip, extract it, and then enter the flutter directory.
The method above is how to use Windows PowerShell; you can use the download method via a browser and extract the zip file to the src folder.
Next, we will enter the Flutter directory and run the flutter_console.bat file.
cd flutter/flutter
.\flutter_console.bat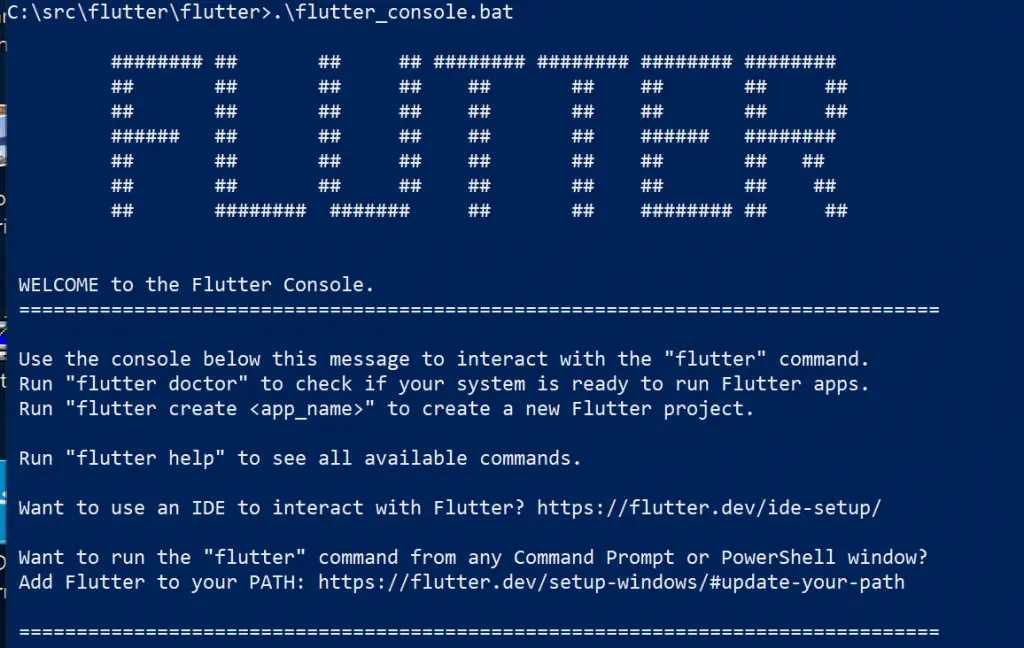
Next, we will approve the Android Studio license by typing the following command.
flutter doctor --android-licensesYou can read the Android Studio license terms, and if you agree, press the y button to finish. When finished, you can verify the installation results by typing the command below.
flutter doctor
As you can see in the image above, the installation process was successful. The exclamation mark identified above is because I didn't turn on the AVD or connect the Android Device. You can depend on the Android virtual device from Android Studio by clicking on the AVD Manager menu, then running the Android Emulator. Once done, type flutter doctor again to verify.
Update Path
The flutter command above can only be executed from the path or folder where the Flutter SDK is located. We need it so that flutter commands can be run from all folders. The solution we have is to add a default path for Flutter. The default path on the Windows Operating System can be set from the environment parameter.
To enter environment settings in Windows 10, in the Search column, type "env" and then select Edit environment variables for your account. Click on the Path variable, click New, and enter your Flutter SDK location.
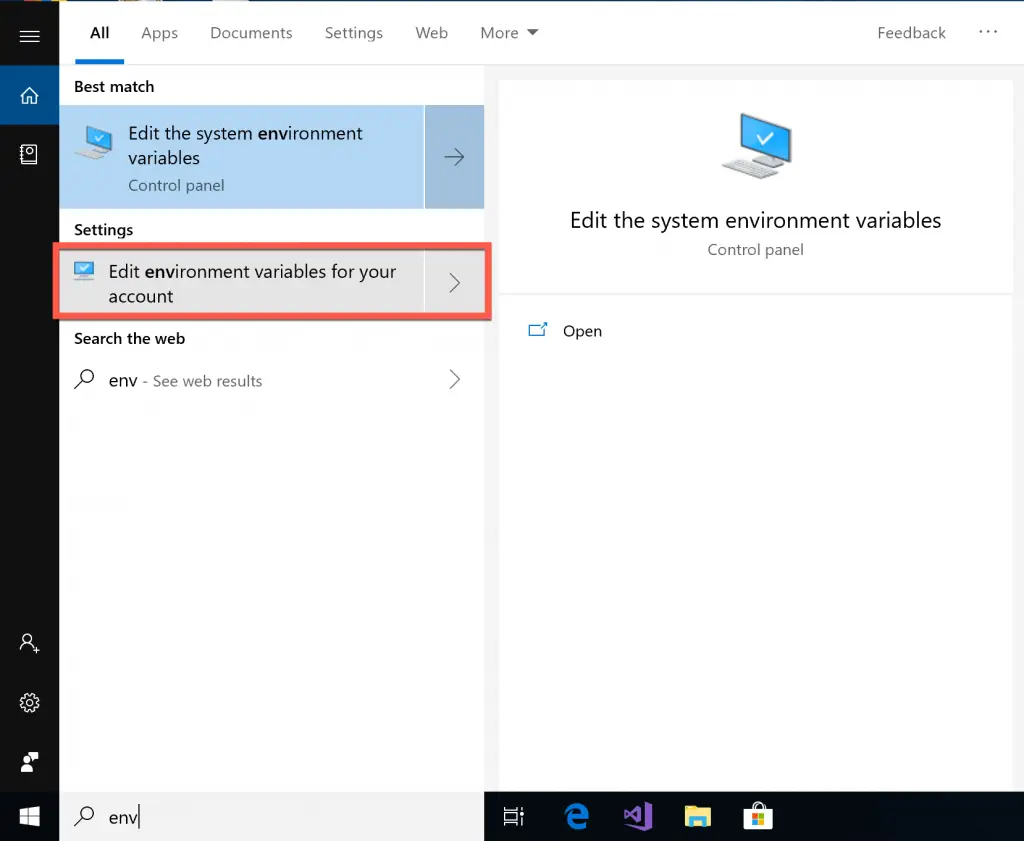
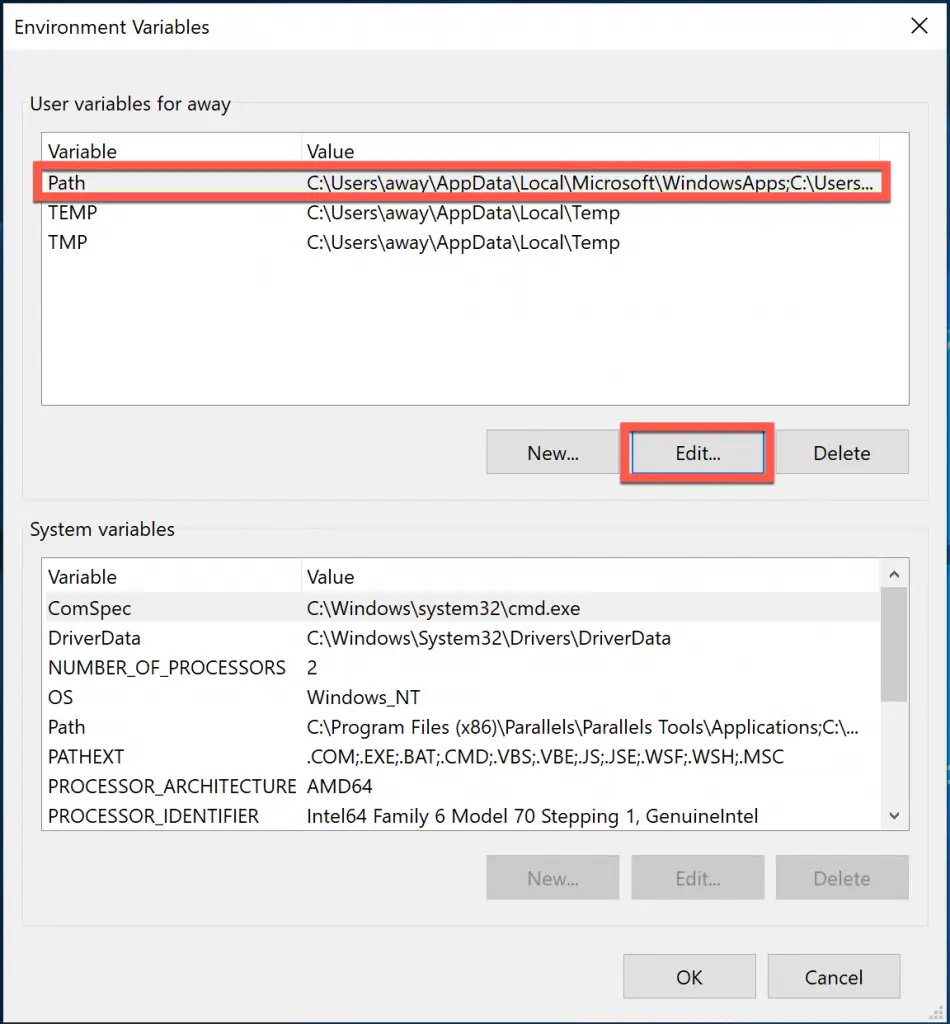
If you followed this Flutter Tutorial, the location of the Flutter SDK is C:\src\flutter\flutter. Then you have to fill in C:\src\flutter\flutter\bin. Examples like in the image below.
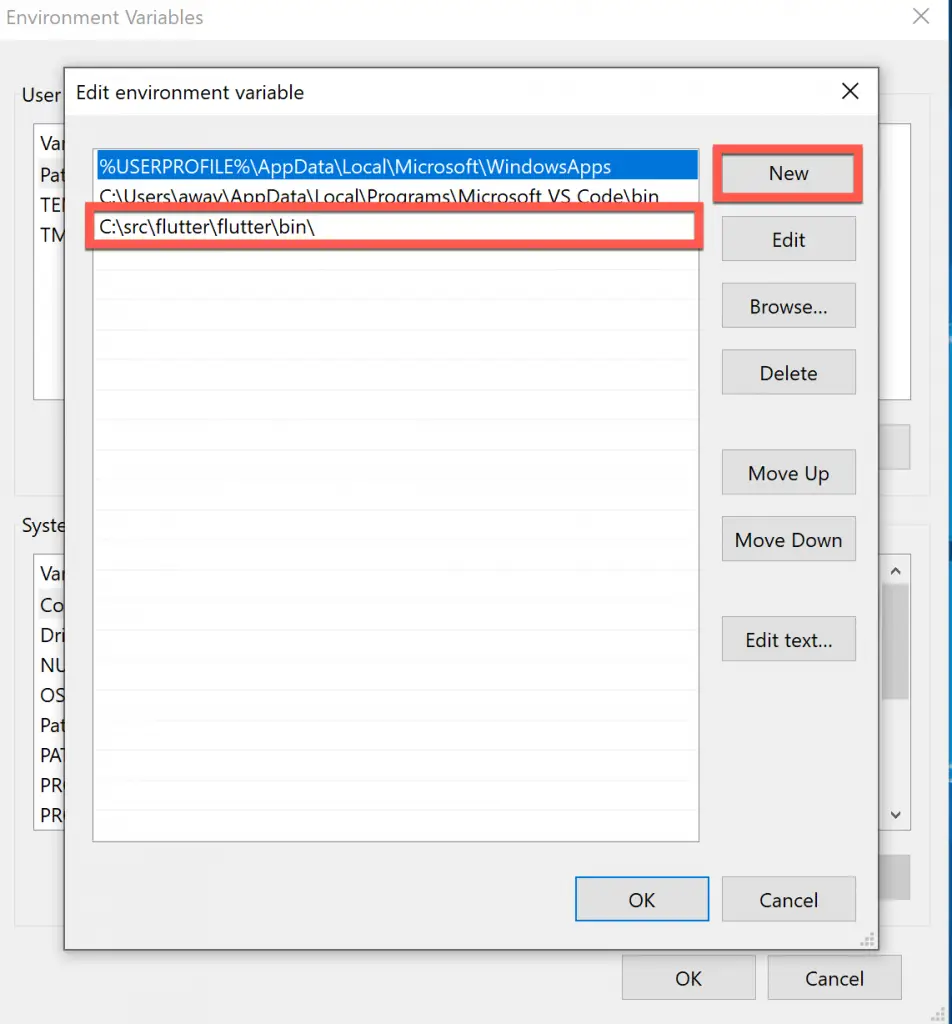
At this point, the flutter installation on your Windows has been completed. You can move on to the Creating Your First App with Flutter section.
Install Flutter on Mac OS
Installing Flutter on the Mac OS is relatively easier than installing it on Windows. This is because Mac OS is built with the terminal and Git; we only need a few extra modules.
In this article, we are using Mac OS Mojave version 10.14.5. It will probably run normally on earlier Mac OS.
Before continuing, ensure you have installed Android Studio, Microsoft Visual Studio, and XCode on your Mac. You can install XCode directly through the App Store for free. If so, you can continue installing the Flutter plugin. To do this, please follow how to install the Plugin on Android Studio and Microsoft Visual Studio on the Windows 10 operating system above. Because the method is the same on Windows, Mac OS, and Linux.
After the plugin installation is complete, we will start installing Flutter.
Install Homebrew and wget
Homebrew is package management on Mac OS. The installation method can use Ruby, which is already included on Mac OS. For complete information about HomeBrew, please read our article on how to install Homebrew.
Type the following command to install Homebrew.
/usr/bin/ruby -e "$(curl -fsSL https://raw.githubusercontent.com/Homebrew/install/master/install)"Once done, make sure your homebrew installation is successful by checking the version. Use the following command.
brew --versionIf the output of the above command is the version of Homebrew, it means your homebrew installation is complete.
Next, we install wget using the Homebrew that we previously installed. Use the following command on your terminal.
brew install wgetWait until the process is complete. Please check your wget by typing the command below.
wget --versionAn example of the output is as follows.
GNU Wget 1.20.3 built on darwin18.6.0.Install and Link the XCode license
Next, we will activate the XCode license; please type the following command.
brew update
sudo xcodebuild -license
sudo xcode-select --switch /Applications/Xcode.app/Contents/Developer
For the sudo command, it requires your Mac password; please enter your Mac password if prompted. The license and XCode links work so Flutter can build iOS apps using XCode.
Install USBMux and IOS Deploy
USB Mux functions so that applications coded using Flutter can be run on the original device connected by USB. How to install it? Please type the following code.
brew install --HEAD usbmuxd
brew link usbmuxd
brew install --HEAD libimobiledevice
brew install ideviceinstaller
brew install ios-deploy
Install CocoaPods
Cocoapods is a dependency manager for Swift and Objective-C for the Cocoa Project in XCode. According to the original site, currently, Cocoapods has 63 thousand libraries and is used by more than 3 million applications. For Cocoapods installation, we will use the pre-installed Homebrew. Please type the following command on your Mac OS terminal.
brew install cocoapods
pod setup
Install Flutter
In this Flutter Tutorial, we will try to install Flutter Version v1.7.8+hotfix.3 for Mac OS. Next, we will immediately install Flutter on Mac OS. You can see all the SDK Releases for Mac OS on the Flutter MacOS page.
Download Flutter
We will work on the ~/development directory; previously, we created and entered that directory. Type the following command.
mkdir ~/development
cd ~/development
Next, we will download Flutter, extract and install it in the ~/development directory.
wget https://storage.googleapis.com/flutter_infra/releases/stable/macos/flutter_macos_v1.7.8+hotfix.3-stable.zip -O flutter.zip
unzip flutter.zip
cd flutter
export PATH="$PATH:`pwd`/flutter/bin"
Precache
Next, we need binaries for IOS and Android. Use the following command.
flutter precacheWhen finished, continue to check the installation.
flutter doctor
Update Path
Like on Windows, flutter commands can only be executed from the path or folder where we extracted the Flutter SDK. We need the flutter command to be run from any path. You do this by updating the environment path on Mac Os.
To change the environment on Mac Os, all you have to do is add a source profile. Edit or create a new file in $HOME/.bash_profile. Use the following command.
nano $HOME/.bash_profileIf the .bash_profile file already contains content, add the code below at the very bottom, but if it is still empty, fill it in with the following line.
export PATH="$PATH:~/developement/flutter/bin"When finished, save by pressing CTRL+X then Enter, and confirm by pressing the Y button.
To make the new environment active, use the source command.
source $HOME/.bash_profileVerify the results of our settings by typing the command below.
echo $PATHIf your new path appears, it means the path setting is complete. Now the flutter command can be executed from any path.
At this point, the Flutter installation process on Mac OS has been completed. You can skip ahead to the Creating Your First App With Flutter section.
Install Flutter on Linux
In this Flutter tutorial, we will try to install Flutter on Linux Ubuntu. When this tutorial was written, we used Ubuntu 18.04, which had Microsoft Visual Studio, and Android Studio installed.
Installing Flutter on Ubuntu Linux isn't much different from installing it on Mac OS. Ubuntu is equipped with Git, wget, and other packages. Some of the requirements and tools that must be met for Flutter installation are as follows.
- Linux 64 Bit
- Remaining disk space above 600MB
- Some of the tools needed:
- Bash
- curl
- Git Version 2
- which
- mkdir
- rm
- unzip
- xz-utils - Shared libraries must be available in environments such as libGLU.so.1 and libglu1-mesa.
The above packages are usually available if you use Ubuntu 18.04 Desktop. So we don't need to install these packages.
Before proceeding with the installation process, please install the Flutter plugin on Android Studio and Microsoft Visual Studio Code, following how to install the Plugin on Windows. The plugin installation process is the same as in Windows 10. Please click on How to Install the Flutter Plugin in Microsoft Visual Studio and Android Studio.
Install Flutter
We'll install it in the ~/development folder to keep things neat and organized. Create the folder and enter it with the following command. Use the terminal on Ubuntu to type this command.
mkdir ~/development
cd ~/development
Download and Install Flutter.
Next, we will download the Flutter SDK for Linux. Please look at the Flutter SDK Linux page for all SDK versions. When this Flutter Tutorial was written, the latest SDK version was v1.7.8+hotfix.3. We will download and install that version.
wget https://storage.googleapis.com/flutter_infra/releases/stable/linux/flutter_linux_v1.7.8+hotfix.3-stable.tar.xz -O flutter.zip
tar -xvf flutter.tar.gz
cd flutter
Add Flutter to Path with the following command.
export PATH="$PATH:`pwd`/flutter/bin"Then run Flutter precache with the following command.
flutter precache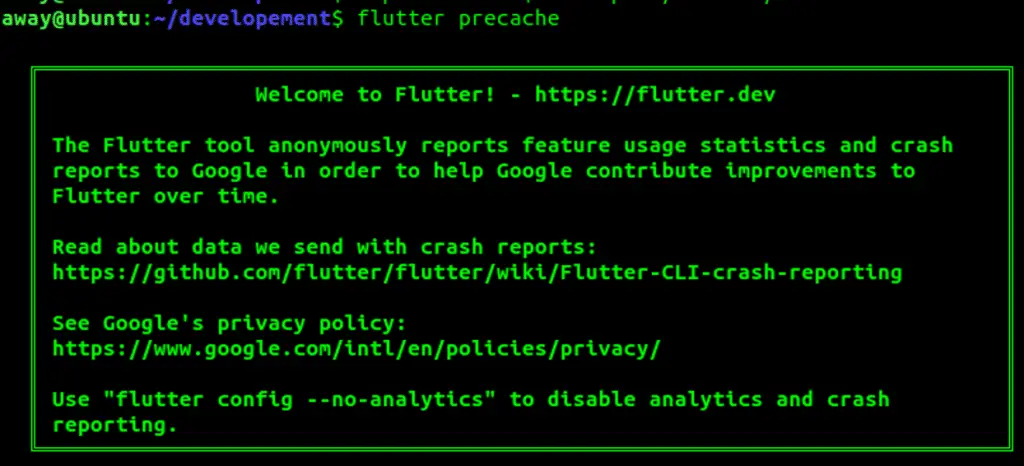
Then run the android license command as below. Accept all requests by pressing the y button at the end.
flutter doctor --android-licensesThen, run flutter doctor.
flutter doctorIf the installation is successful, the output of the flutter doctor command is as shown below.

Update Path
Next, we will set up a profile so the flutter command can be executed from any path on your Ubuntu. Edit or create a new one if the $HOME/.bash_profile file doesn't exist yet.
nano $HOME/.bash_profileFill in or add the following lines.
export PATH="$PATH:~/developement/flutter/bin"Then use the source command.
source $HOME/.bash_profileVerify the result by typing the command below.
echo $PATHUp to this point, the Flutter installation process on Linux Ubuntu has been completed. Next, we will try to create our first application with Flutter.
Creating Your First App with Flutter
Our application can use the Android Studio editor and Microsoft Visual Studio Code. We'll try both to understand Flutter better. Later, please decide whether to use Android Studio or Microsoft Visual Studio Code. I am more comfortable using Microsoft Visual Studio Code because it feels lighter.
Flutter with Android Studio
Open your Android Studio application. Select the button to start a new Flutter project. Because we have previously installed the Flutter plugin, a new option will appear on the Android Studio Start Screen: Start a New Flutter Project.
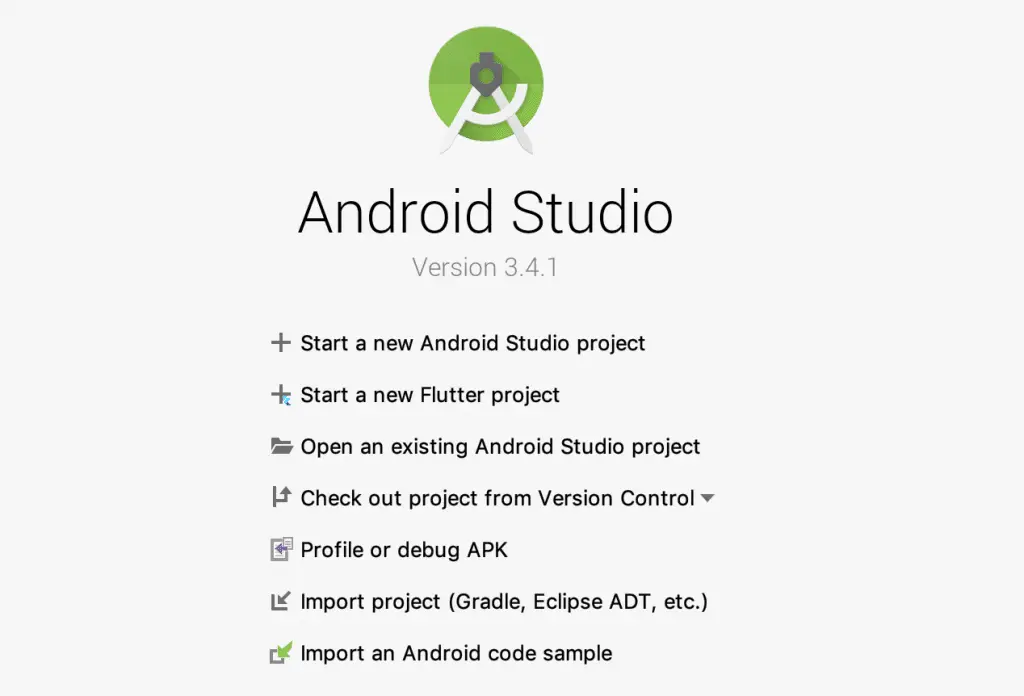
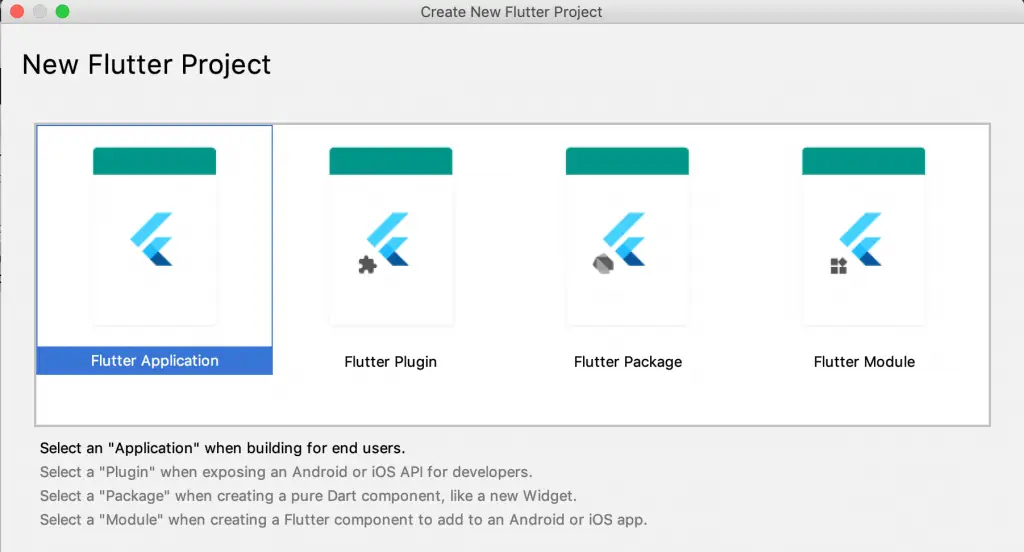
Select Project Type
Next, a new window will appear in the form of application options. Select the Flutter Application, then click the Next button.
Application Configuration
The window that will appear next is the Application configuration window. Fill in the application according to what you want, for example, as in the image below.
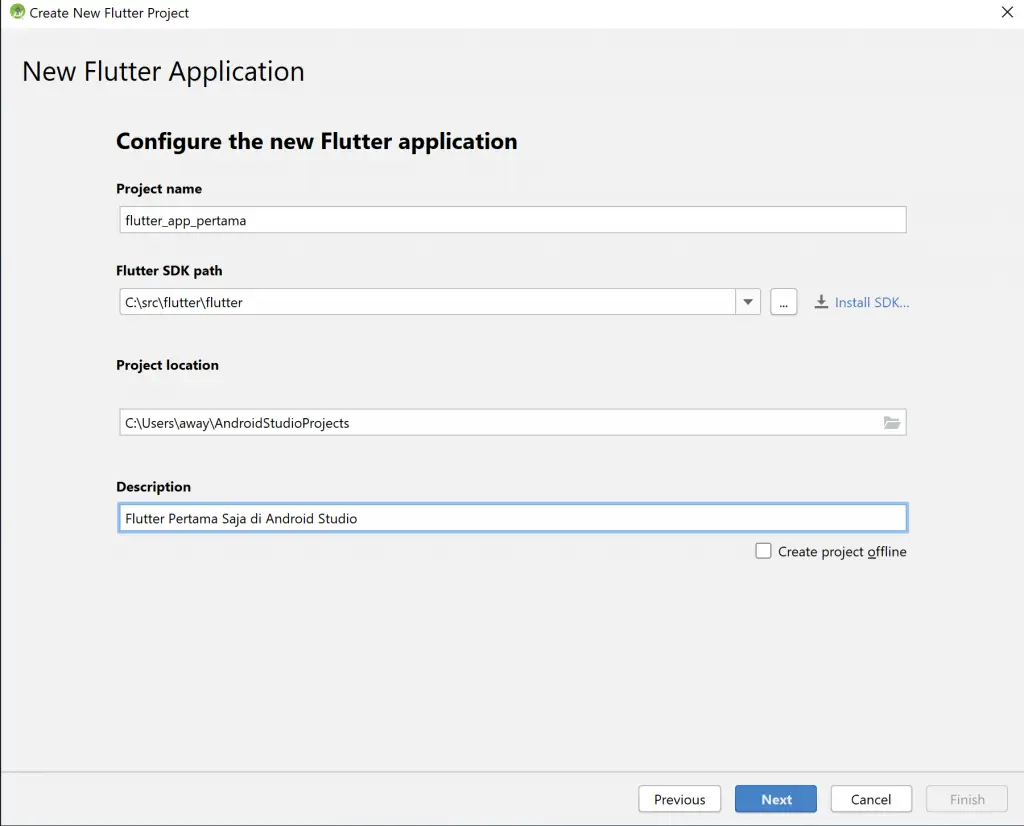
In the Flutter Tutorial during the installation above, fill in the path according to your operating system. For the Flutter SDK Path, fill in according to when we download Flutter. The details are as follows.
- Windows:
C:\src\flutter\flutter - Mac OS:
~/development/flutter - Linux:
~/development/flutter
Especially for Mac OS and Linux, if there is an error in the SDK directory that is not found, use the full path. You can use the following command.
which flutterAn example of the result is as below.
/Users/away/development/flutter/bin/flutterThen, fill in the Flutter SDK Path with /Users/away/development/flutter. Usually, you can't use the home path with a ~ sign on macOS.
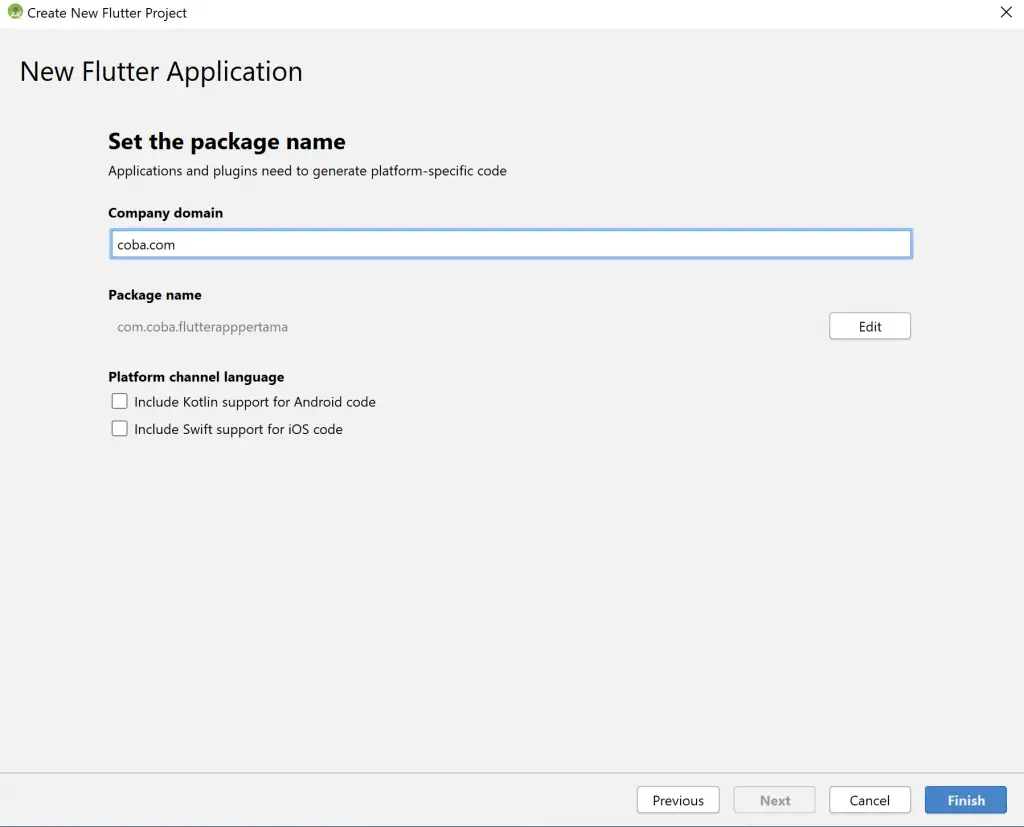
Setting PackageName
After completing the project configuration, press the Next button. The following window will appear in the package name window. Try filling in, for example, with coba.com, as in the image below. Once done, click on the Finish button.
Running Programs
When finished, the main window will appear. The first file to open is the main.dart file. We will try to run the program with the AVD. Or you can connect your mobile phone to a USB device. To use an AVD, activate the AVD by pressing the AVD Manager button. Then, run one of the simulators of your choice.
After the simulator appears, click the Run button, and wait for Initializing Gradle to finish. When finished, your first application will immediately appear in the simulator.
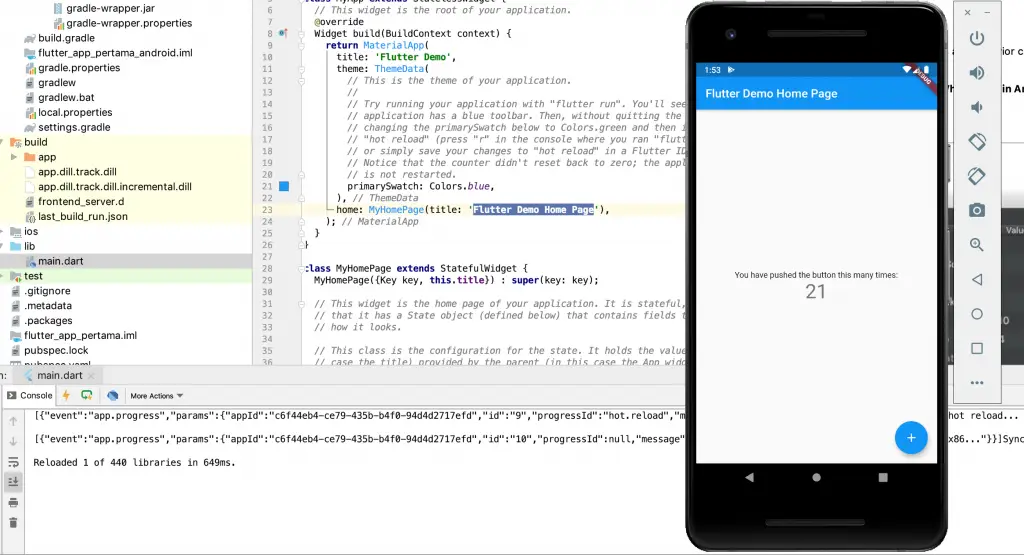
On the simulator, try pressing the + (plus) button on the bottom right, and see what happens to the numbers. This happens because the class code is in the loop when pressing the button.
int _counter = 0;
  void _incrementCounter() {
    setState(() {
      // This call to setState tells the Flutter framework that something has
      // changed in this State, which causes it to rerun the build method below
      // so that the display can reflect the updated values. If we changed
      // _counter without calling setState(), then the build method would not be
      // called again, and so nothing would appear to happen.
      _counter++;
    });
  }
If we look at the code above, it looks straightforward to read. This is because Flutter uses the Dart language, which is C-Style.
Modifying Application Code
Next, we will try to modify the code. We do the essential thing: changing the title text and the application theme color. Try making changes to lines 21 and 23.
primarySwatch: Colors.blue,
menjadi
primarySwatch: Colors.green,
dan
home: MyHomePage(title: 'Flutter Demo Home Page')
menjadi
home: MyHomePage(title: 'Aplikasi Pertamaku'
Try saving the project by pressing CTRL+S. Pay attention to your Android Emulator or device. After you save the changes, the simulator screen will immediately change to the latest update without doing a rebuild at all. This is how great Flutter is with the hot reload feature. If it's like this, application programming will be faster, correct?
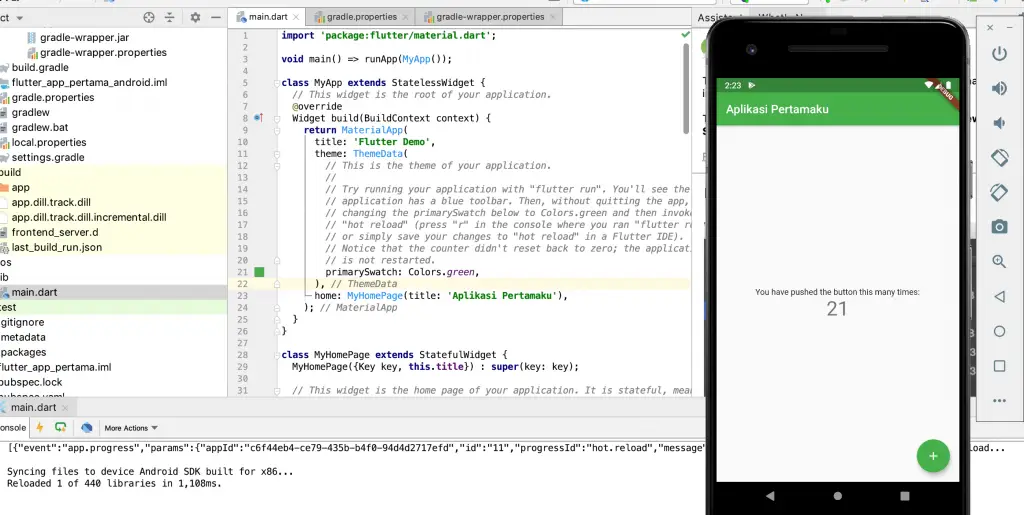
OK, the first Flutter application development with Android Studio was successful. Next, we will try to create an application using Microsoft Visual Studio Code.
Flutter with Microsoft Visual Studio Code
Please open your Microsoft Visual Studio Code. We will start a new Flutter project with Microsoft Visual Studio Code. Once open, go to the View menu -> Command Palette. Or you can use a shortcut by pressing CTRL+SHIFT+P on Windows and Linux, andCOMMAND+SHIFT+P Mac OS.
Create New Project
In the Command Palette, type Flutter and select Flutter: New Project. For the first time, if there is a warning that the SDK is not found, we point the SDK to the Flutter download folder like in Android Studio. Then restart your Microsoft Visual Studio Code.


After restarting, repeat by going to the Command Pallete and selecting Flutter: New Project; if the SDK is OK, the application name input field will immediately appear. Enter your application name, then press Enter.

Next, a storage location request will appear. Please select the storage location for your project, then click select folder. When finished, an editor window will appear as below.
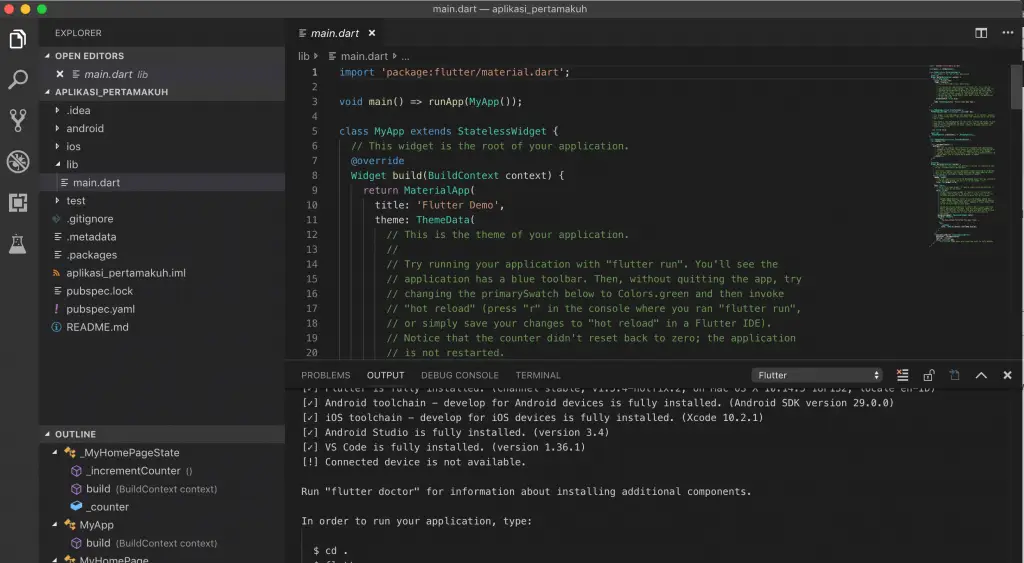
Running Applications
To run the application, you can use the Android AVD or IOS simulator if you use Mac OS. Or you can connect your mobile phone device directly with USB. To select which device to use, we enter the Command Palette by pressing CTRL+SHIFT+P. Type Flutter and select Flutter: Launch Emulator.
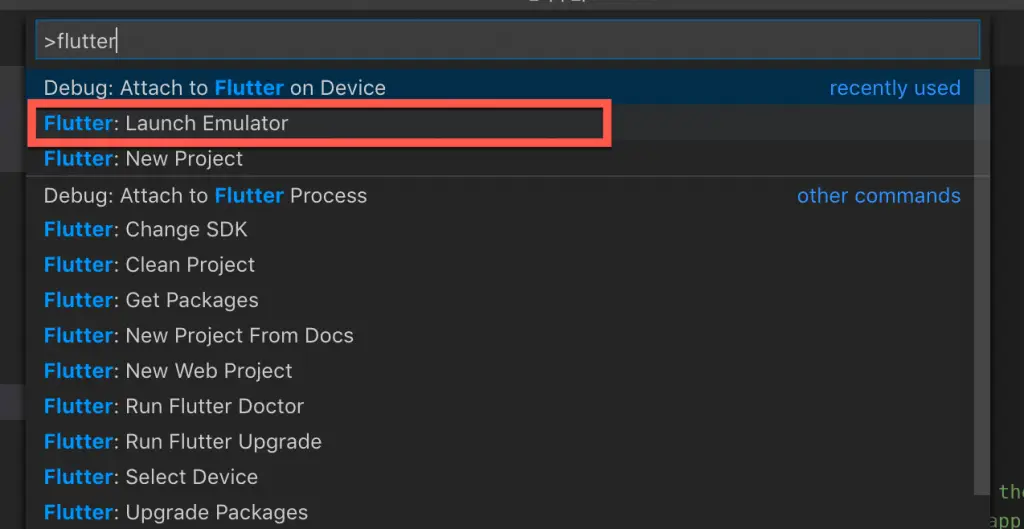
In this tutorial, I will use the Emulator from AVD. Because I use the Pixel 2 Emulator, I chose the Pixel_2 option.

The AVD emulator will appear, but the program is not running yet. To run the program, we will use the console. Visual Studio is equipped with a terminal to make it easier to access applications. In the main.dart editor window, click on the terminal tab, then type:
flutter runWait for your application to appear in the Emulator.
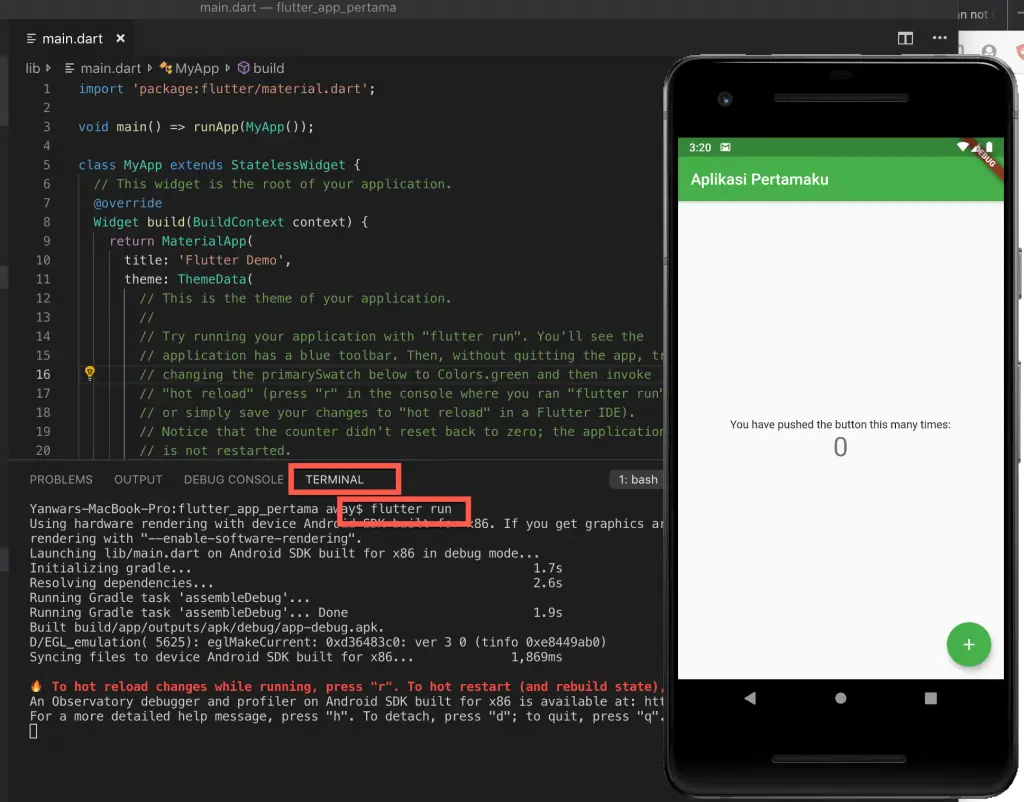
Well, now your application has appeared. Easy isn't it?
Another alternative to running Flutter, you can use the debug button. In Microsoft Visual Studio Code, you click on the Debug icon (1), then click the Play button (2).
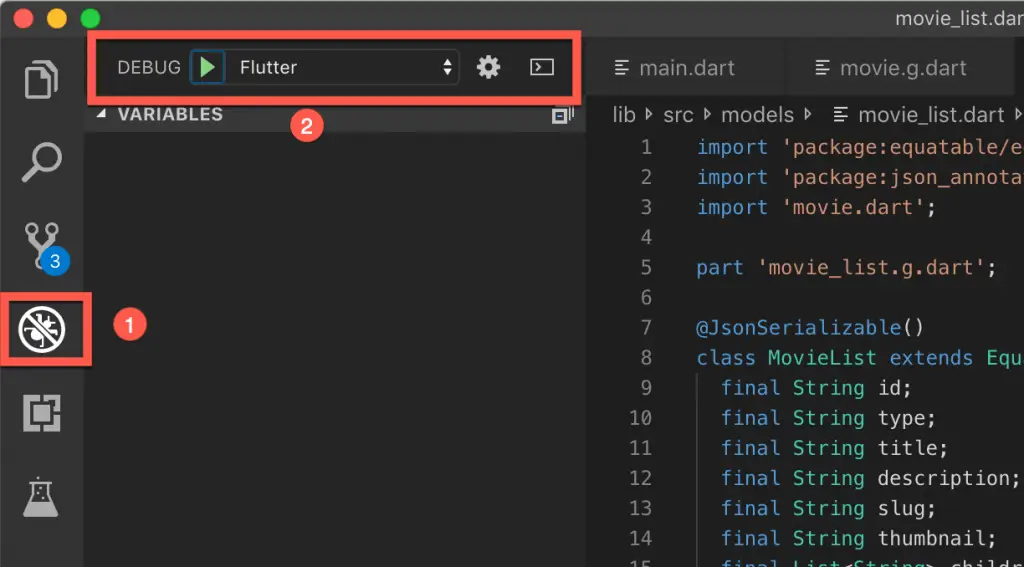
Or you can directly access the Debug -> Start Debugging the menu to run the application. If you want it faster, you can use a hotkey by pressing the F5 key.
Application Modification
To modify the app, it's the same as in Android Studio. Try changing the color; for example, change the color to red and change the text. When finished, press CTRL+S to save and see the results in the Emulator.
Views change immediately when we save program changes. This is the power of the hot reload feature from Flutter.
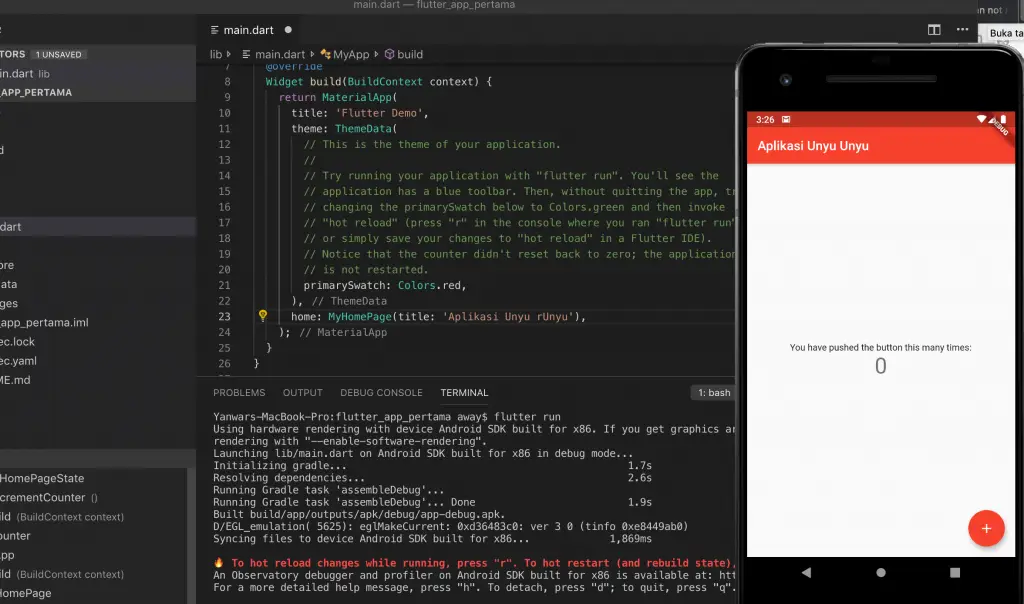
Flutter's First Application with Microsoft Visual Studio Code is a success. You can explore other features by experimenting with changing the code in main.dart.
Try Ready-made Flutter Apps
Flutter is Open Source. You can find it on GitHub. Many developers create Flutter applications that are published publicly.
One GitHub user put together a Flutter Open Source app that you can try. You can take a look at this page https://github.com/tortuvshin/open-source-flutter-apps. Lots of great apps on that page. You click on the link provided to open the relevant GitHub page.
In this experiment, we will try the tubi_tv_flutter application from the GitHub page https://github.com/xieweizhi/tubi_tv_flutter which is an online movie player application.
To start trying this application, we will clone it with Git. Prepare your terminal or PowerShell. We'll create a ~/Project folder and work in that folder.
Create a Project Directory
For Windows, use PowerShell, then type the following code.
cd /
mkdir Project
cd Project
For Mac OS or Linux, use the following command.
mkdir ~/Project
cd ~/Project
Clone and Open Project
Next, we will clone from GitHub and use the following command from your Project directory.
git clone https://github.com/xieweizhi/tubi_tv_flutter.git
cd tubi_tv_flutter
Open your Microsoft Visual Studio, select file -> Open, and select the cloned project folder above. If you get a warning that some packages must be downloaded, click on Get Package.
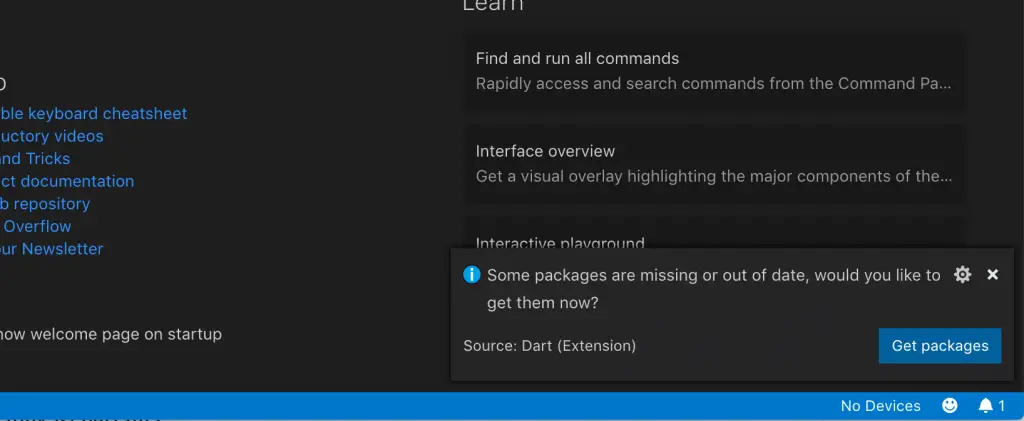
Do Launch Emulator as in trying to create a new application with Visual Studio Code. On the terminal tab, type the flutter run command. And wait for the results in your Emulator.
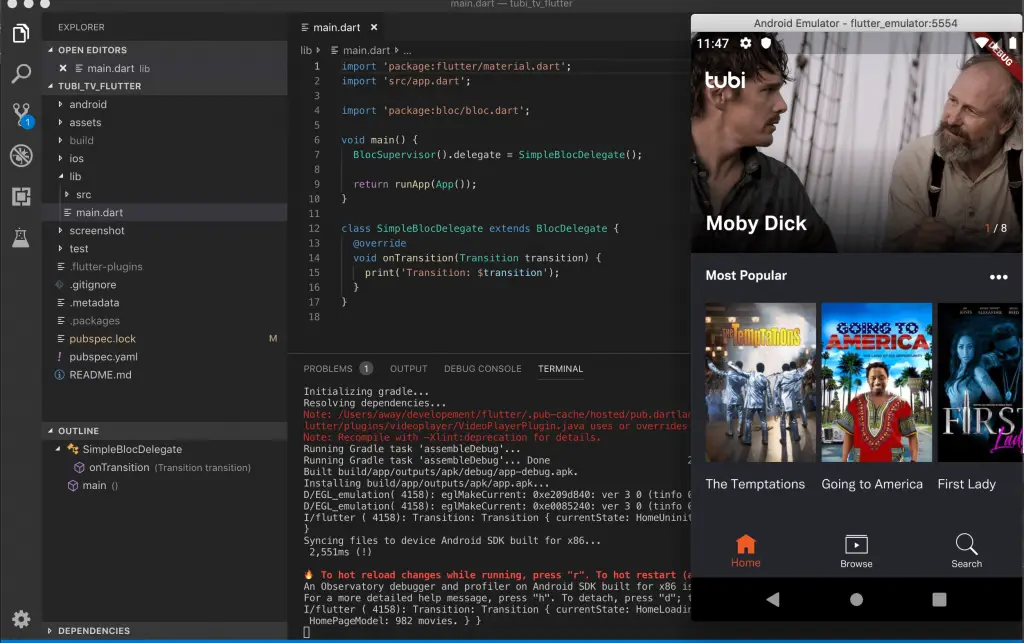
The application is running well; try to open the menus. With the ready-made application, you can explore the code created by Flutter experts. This will help your understanding of the structure of applications with Flutter.
Then you can try other applications with the steps above.
Possible Errors
On Mac OS Error: RPC failed
On Mac OS, when you want to run on the IOS emulator if you get the error "error: RPC failed; curl 56 LibreSSL SSL_read: SSL_ERROR_SYSCALL, errno 54". This is because Git experienced a timeout during Cocoapod's setup. The solution is to change the value of the git buffer globally, then do a pod setup.
git config --global http.postBuffer 524288000
pod setup
Conclusion
Now, you can create your first Flutter app using Android Studio and Microsoft Visual Studio Code. The Flutter Tutorial is complete this time, starting from understanding Flutter, installing it, creating the first application, and trying the finished application.
You can already choose whether to use Android Studio or Visual Studio Code. Please try both, and choose the most comfortable platform.
With Flutter, app creation is faster. Because Flutter is equipped with default classes commonly used in mobile applications, we'll try to create a simple application with Flutter in the following tutorial. Keep following TeknoTut for quality articles and tutorials.
I hope this Tutorial helps.
]]>In this Android Studio tutorial, we will try to make the first Android application using the default application, namely Android Studio. Because this is the first application made, we will simultaneously learn android studio, both from the interface side, essential functions, constraint layouts to the project directory structure.
What is Android
Since it was first launched around the fourth quarter of 2009. Android is the main attraction. This makes sense because the Android Operating System is open source. Developers can freely develop applications, so the apps available for Android are more varied.
So is the smartphone vendor. They can enjoy Android licenses and develop them. As a result, many smartphones at lower prices. Consumers, of course, turn to Android, which has lower prices and more complete applications. A few years after it was launched, direct Android rocketed to dominate the market share for smartphone operating systems.
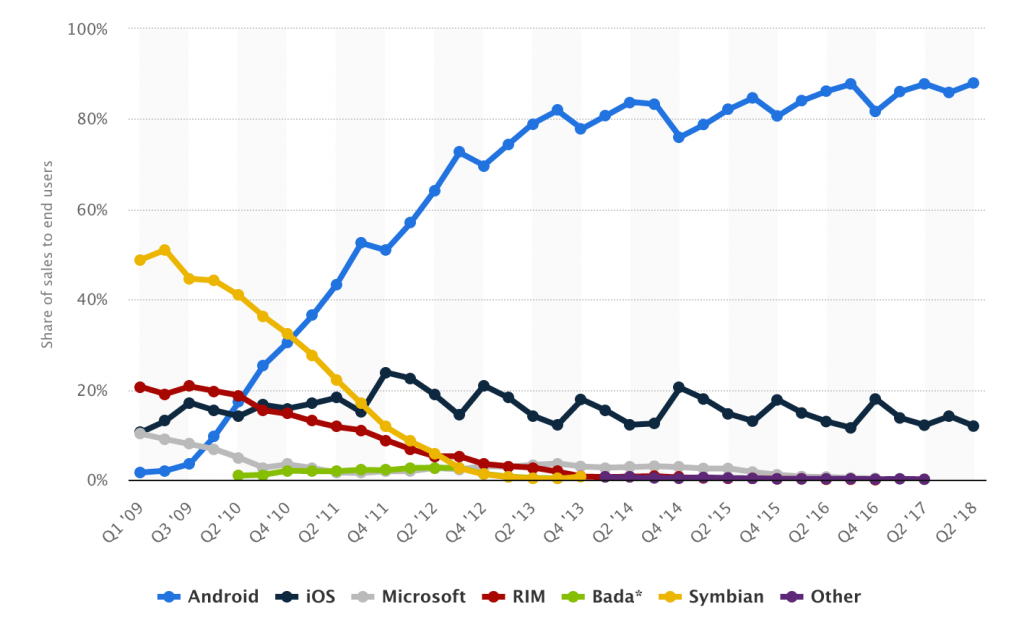
Android's fame is a breath of fresh air for software developers. Until now, Android-based software developers are in high demand. Even if it is not recruited or given an application creation project by the company, developers can work on their own by creating creative applications. Earnings can be from the AdMob network or other revenue from the app.
Since that time, many StartUps have started to appear. How not, statistics say that more than 90% of internet users use mobile devices. And remember, 88% of mobile users use Android.
Android Studio Tutorial
Android Studio is the official software for making Android applications. Android Studio is an IDE (Integrated Development Environment) software which was officially introduced in 2013. Built by JetBrains' IntelliJ IDEA and specialized only for making Android applications. Android Studio offers easier and structured programming features. You can program an Android app with just one software. In this Android Studio tutorial, you will begin to understand the project interface and directory structure.
Many complain about the weight and resources that have to be downloaded so much. Yes, it's true, because Android Studio is an Integrated Development Environment. Developers only need one application, to build, program, until the simulation runs on the Virtual Device. You don't even need an Android phone to start creating apps.
Interface
When you do a project or open an existing project. You will be faced with a fairly complicated interface. But it's not complicated if you begin to understand the project directory structure and the use of each part of the interface.
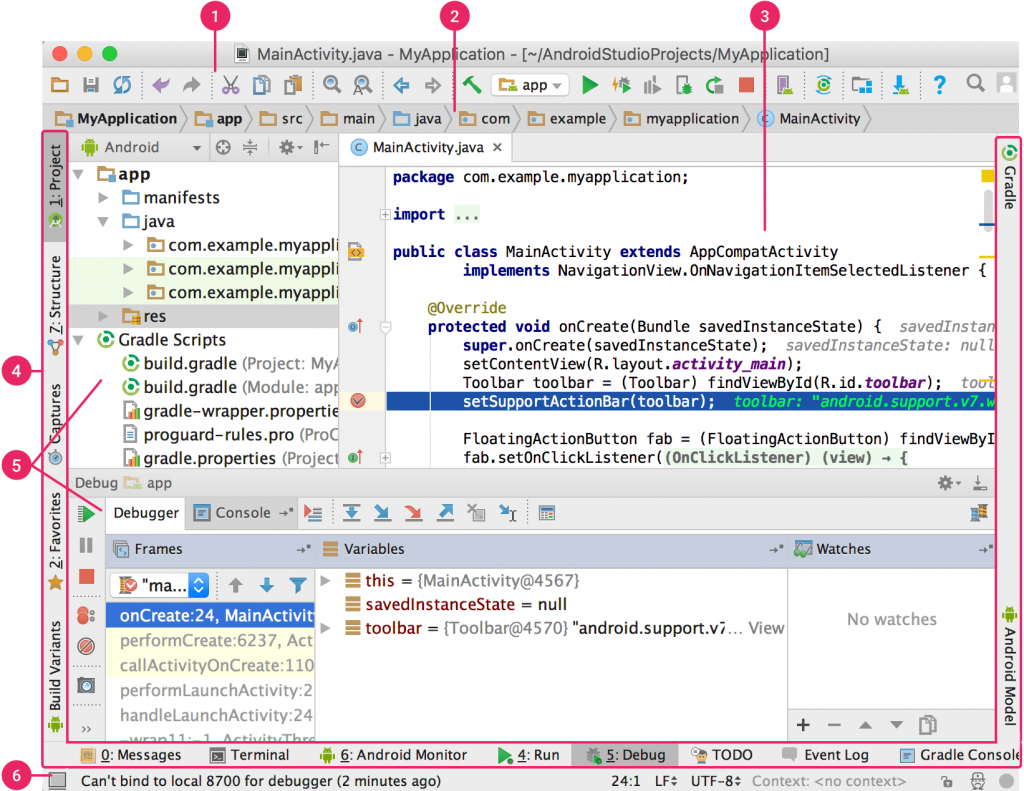
- Toolbar, display to perform or execute actions quickly. In this window, you can set SDK Manager, AVD Manager, run program results, build programs, and debug. This section is made as simple as the familiar icons that make it easier for developers to execute actions.
- Navigation Bar, this view serves to explore all actions. Here you can take actions such as creating a new project, editing a project, or opening an existing project. Several navigation functions are available on the toolbar in number 1.
- Windows Editor, in this view, the developer can modify or create code. All code in the project directory structure can be adjusted in this window.
- Windows Toolbar, in this section, you can shrink or enlarge the window. Or you can choose which window to display, and which window to hide.
- Windows Tool, in this window, you can do project management, search, and version control correction. You can zoom in or out of the window. And choose which window to display.
- Status Bar, in this view, you can see the status of the Project, whether it can run normally, there is an error, or there is a warning.
Project Directory Structure
When you create the first Android application, the directory structure will be formed automatically. Each directory has a different function. This is the advantage of Android Studio, where our projects will be neater and simplify the debugging process.
To see the complete directory structure, select Project in the top bar on the left. By default, Android Studio will choose Android to summarize the appearance of the structure.
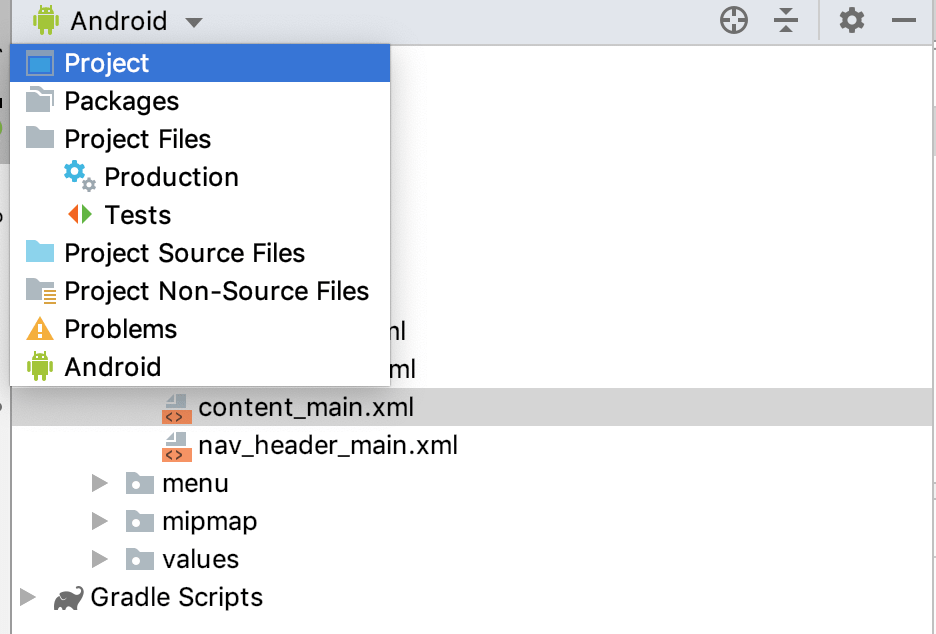
After Project is selected, the directory structure will be different. What is displayed is the same if you view it in Windows Explorer or Finder. It will be easier to understand more about the directory structure. And it's easier to learn about Android Studio even deeper.
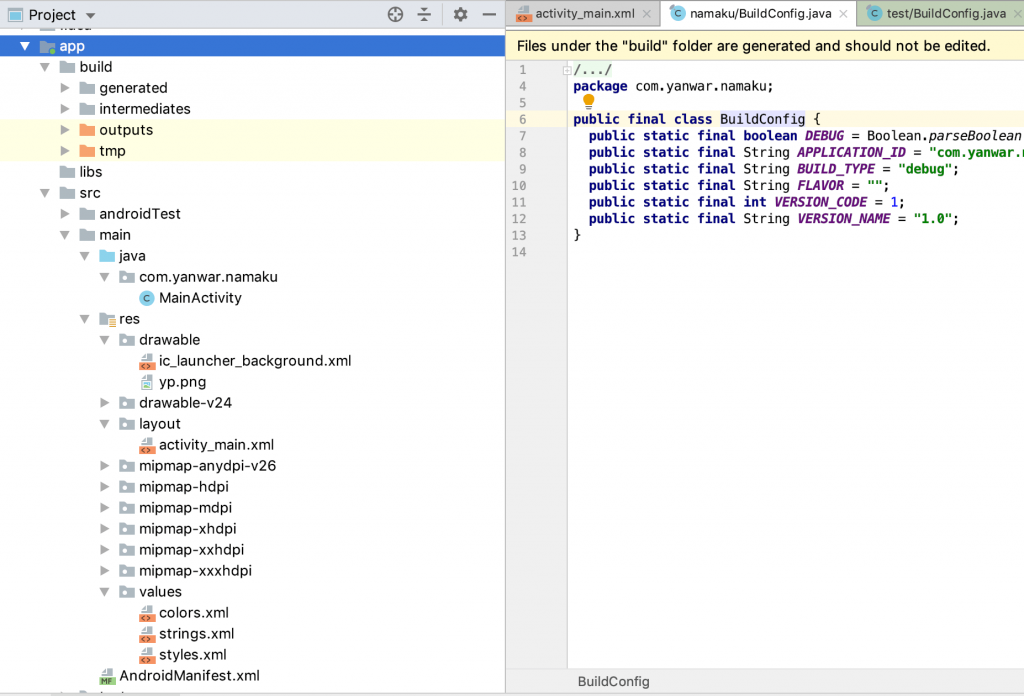
Android Studio Project Directory Structure
Here is a simple description for each folder in the /app/ directory.
build/this folder contains the output of the program that was previously built. The contents in this folder cannot be edited, because they are formed automatically by the Android Studio system. The .apk file and the program run in the simulator or directly on your Android device will be run from this folder.libs/this folder contains a private library. If the program that we make is long enough, it must be made a personal library so that the main program becomes more concise.src/in this directory contains all source code to build an android application. In this directory, there are several separate directories to classify structures.androidTest/directory contains code for testing instrumentation that is run on an Android device.main/directory of source code that can be used in all Android application programs. Themain/directory has several subdirectories and files, including:java/in this directory contains java source code. Usually, in this folder, java files are separated based on the application page.jni/this directory provides the original code that uses the Java Native Interface (JNI). If you do not use JNI, this folder will not appear.gen/same as JNI, this directory contains java files generated by Android Studio using an interface created from the AIDL file (Android Interface Definition Language), the example file in this directory is R.java. If you do not use AIDL, this directory will not appear.res/this directory contains all the resources of the application, such as layout settings, color settings, strings, etc.drawable/directory to store assets in the form of an image or icon. The system will automatically change the size according to the device used.layout/is a directory used explicitly for setting the layout of each page in the application.values/is a directory that contains the values used in the app, for example, string values, colors, and style settings.assets/this directory contains all files that will be compiled into an APK package.AndroidManifest.xmlis a file that contains the main application settings. In this file, you can set icons, splash screens, and others.test/this directory contains codes for local testing needs that are run on your JVM (Java Hosting Provider) host.
Well, after we understand the interface of Android Studio, and the directory structure of the Project. Now we will try to do our first Android application project. Continue to follow step by step in this Android studio tutorial.
Creating the First Android Application
To follow this Android Studio tutorial, make sure you have installed Android Studio complete with SDK and AVD on your computer. When we do this experiment, we use Android Studio version 3.4.1.
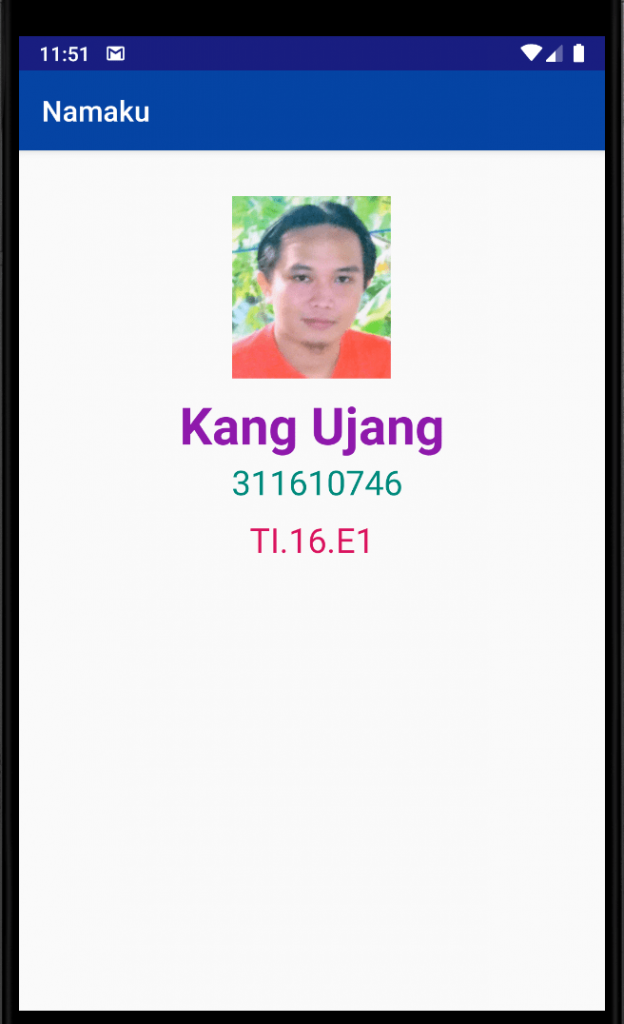
In this experiment, we will try to create an application that contains photos and text in the form of names, NIMs, and classes. The final look is roughly like the picture below.
Create a new project
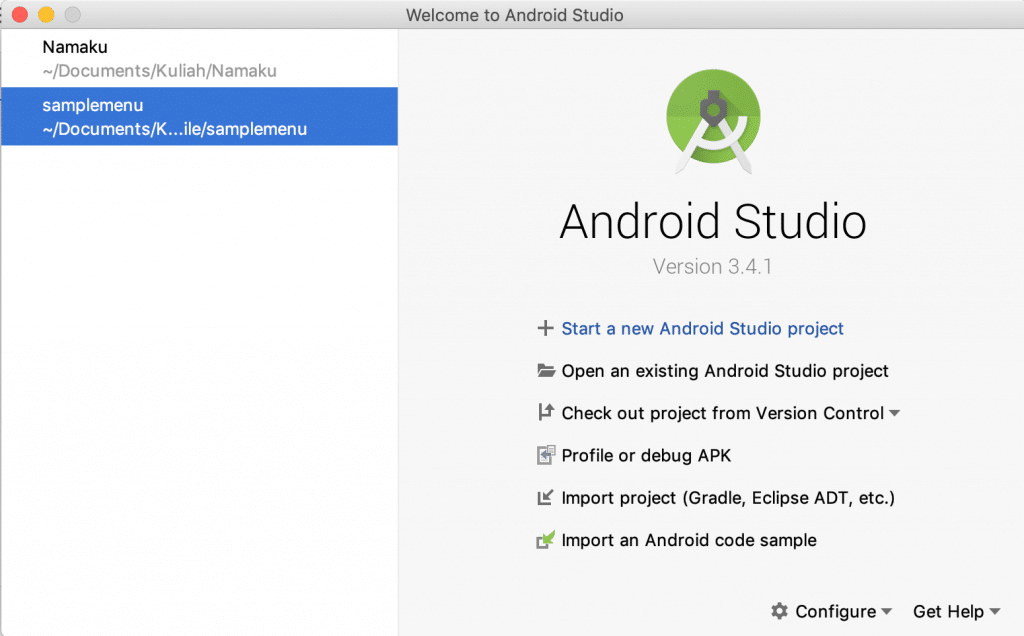
To create a new project, please open your Android Studio application. After the start page appears, click on the Start a new Android Studio Project link.
Choose the type of Project
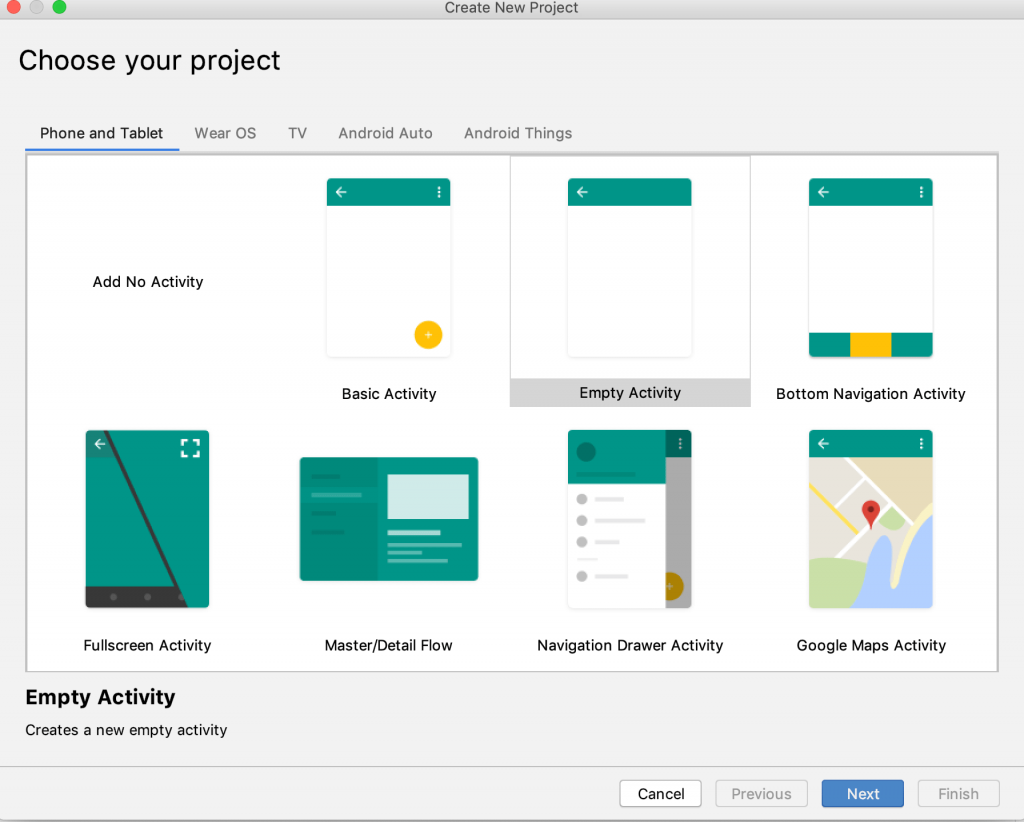
A new window will appear, which is the choice of the kind of Project we will create. Android Studio provides several types of projects including, Phone and Tablet, Android TV, Wear OS to develop applications on smartwatches, Android Auto to develop applications on Car Din and Android Things equipment. Because of our first Project for mobile apps, we select Phones and Tablets then click the Next button.
Project Configuration
Next, the initial configuration will appear for the Project that will be created. Fill in according to the application you want to make.
- Application Name, fill in the name of your application, for example, MyName.
- Package name, fill in the package name, this name must be unique and not the same as other applications. If your application is my name, try to fill it with com.mycompany.myname.
- Save Location, select the Location where your Project will be saved, use the folder browse button to select the folder on your computer. Give the name of the folder with the name of the application to make it easier.
- Language, this is the chosen programming language. Android Studio already supports Kotlin. However, to start a new project, try to choose Java.
- Minimum API Level, select the API that can support all Android devices. In this case, API 15 100% can be run on all Android devices. If you need an API that is not available, you can choose the API above with the consequence that your program might not run on some devices.
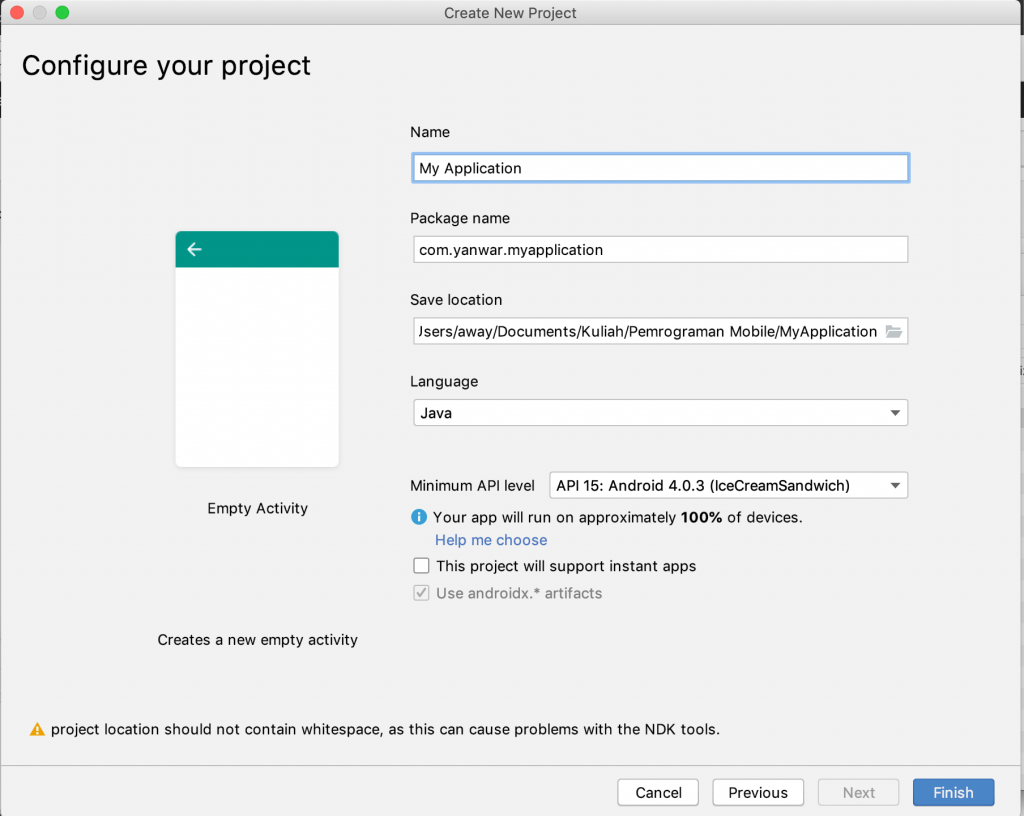
When finished setting, press the Finish button.
Adding Images
To add an image, we will save the image in the drawable/ directory. There are several ways to save images, but we will try by entering the image directly in the folder. Beforehand, prepare your image in the .png format first.
Add Images in a Drawable Directory
Enter your Windows Explorer or Finder if you are using Mac OS. Copy your image by doing Right Click -> Copy. Next, enter Android Studio, select in the drawable folder, right-click -> Paste. Your image will appear in the folder, try double-clicking on the image, and make sure it seems.
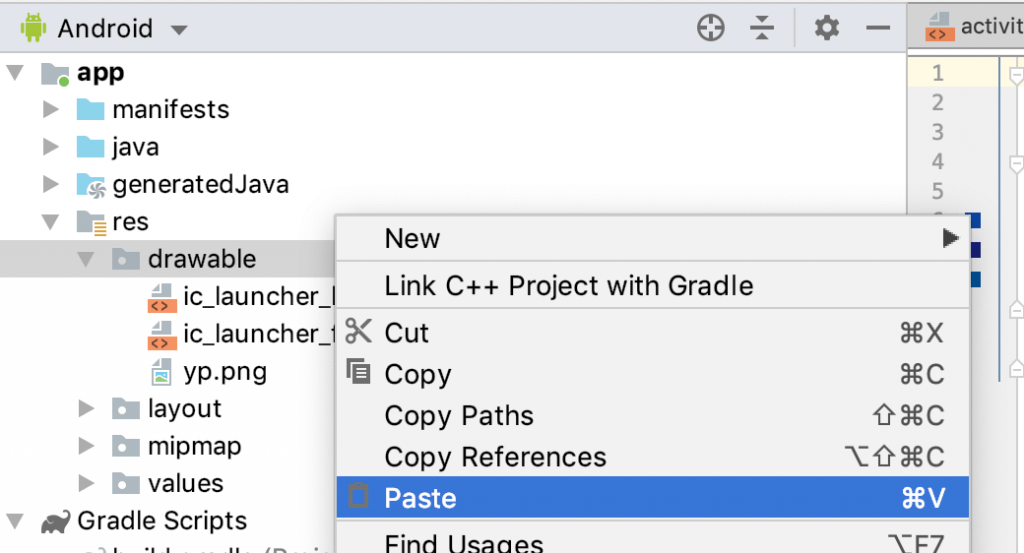
After you have finished adding your project image, go to the layout/ directory, then double-click on the activity_main.xml file. In the editor window on the right, your application layout will appear. By default your new Project is already available with textView elements with the words Hello World, please delete them by selecting the text, Right Click and then click Delete.
Entering Images into Layout
To enter an image in the application, in the palette window, click Common then select ImageView. Click and drag directly to your application's layout. The Resource window will automatically appear, you can choose on Project, then select the image that we have previously entered, then click OK.
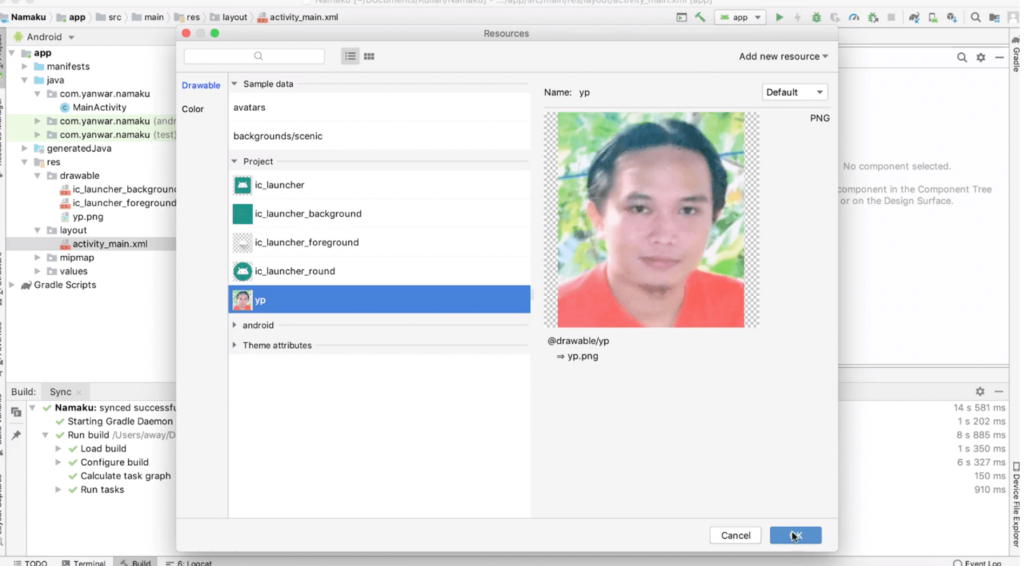
Your image now appears in the application layout. However, it looks to fill all the screens. Next, we will adjust the position and size of the image to match what we expect.
Adjusting Image Position and Size
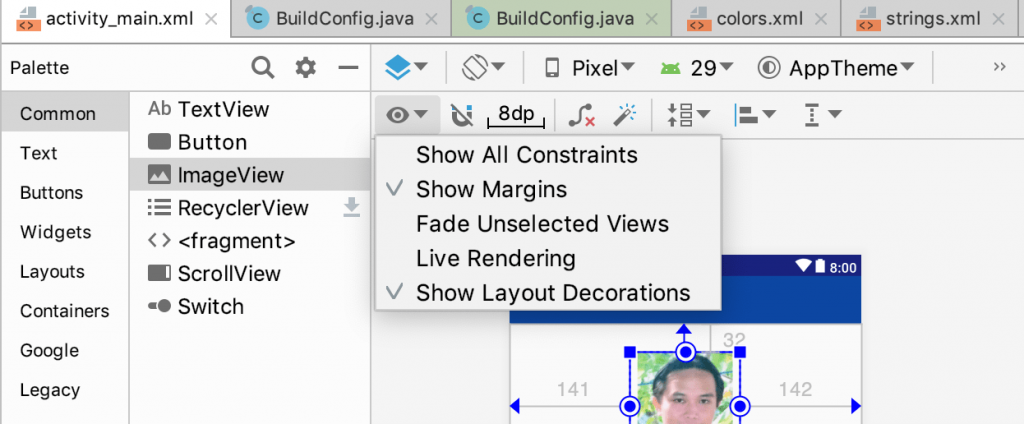
Before setting the position and size of the image, it's good to activate view layout decoration. In the top layout window, click the icon with the eye mask, then select Show Layout Decoration.
To change the image size, you can make adjustments to the layout attribute. In the attribute window on the right, select the layout tab, then enter the image size. The object size on Android can use DPi (Dot Per Inch) or pixel. Try to enter parameters like the following.
- layout_width : 128dp
- layout_height : 128dp
Then see the results in the layout. To better understand, try to enter the number in pixels. The pixel mark can use px, for example, 128px. Then see the difference.
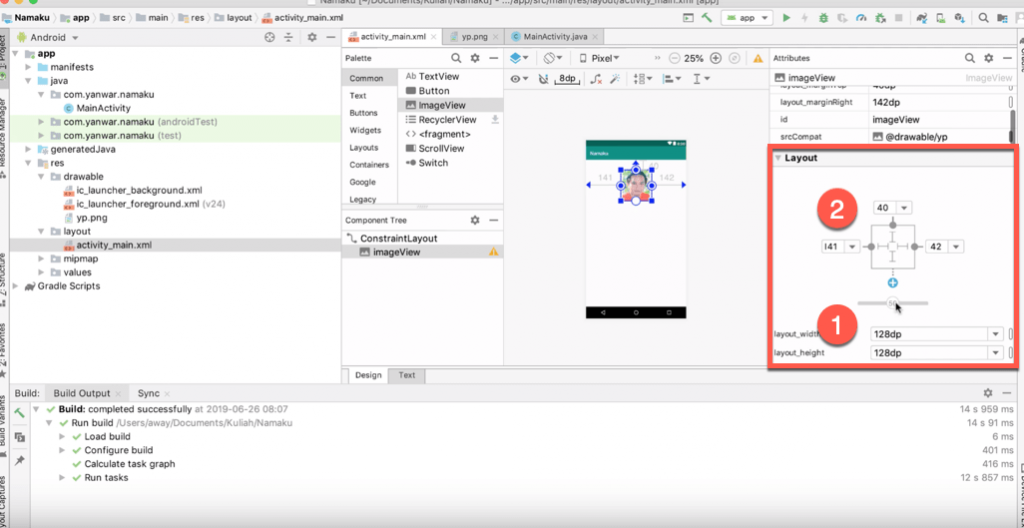
To adjust the position, please click the plus (+) sign in the editor margin as shown above in number 2. Click on the top, left and right. After clicking you will see the numbers which mean the distance from the top, left and right. You can change the number, or try to slide directly on the image object in the layout. Place it in the position you want.
Add Text
Next, we will add text in the form of names, nim, and class. However, so that we better understand the structure of the android studio project, we will create text from the variable string.
Add String Variables
Enter the values/ directories, then double-click on the strings.xml file. Then in the right editor code create a new string with name, nim and class attributes. Its value is your name, your nim and your class.
<resources>
    <string name="app_name">MyName</string>
    <string name="nama">Kang Ujang</string>
    <string name="nim">311610746</string>
    <string name="kelas">TI.16.E1</string>
</resources>
When finished, we will then add a palette text with the contents of the text taken from the strings we have created.
Enter Text in Layout
We return to the main layout by clicking on the activity_main.xml file in the layout/ directory. Click and drag in the TextView item Palette window, swipe to the layout view that we have made before.
When done, look for the Attributes column in the Common Attributes section of the Text column. Press the @ key to display all strings. And select the string that we have created, for example, the name string.
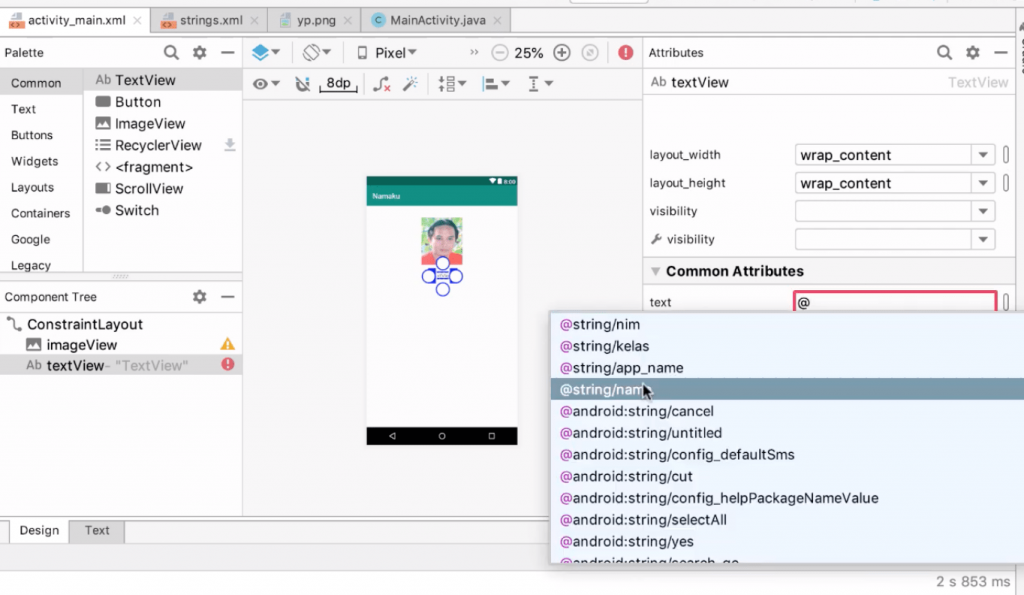
Do the same thing to enter nim and class.
Set Text
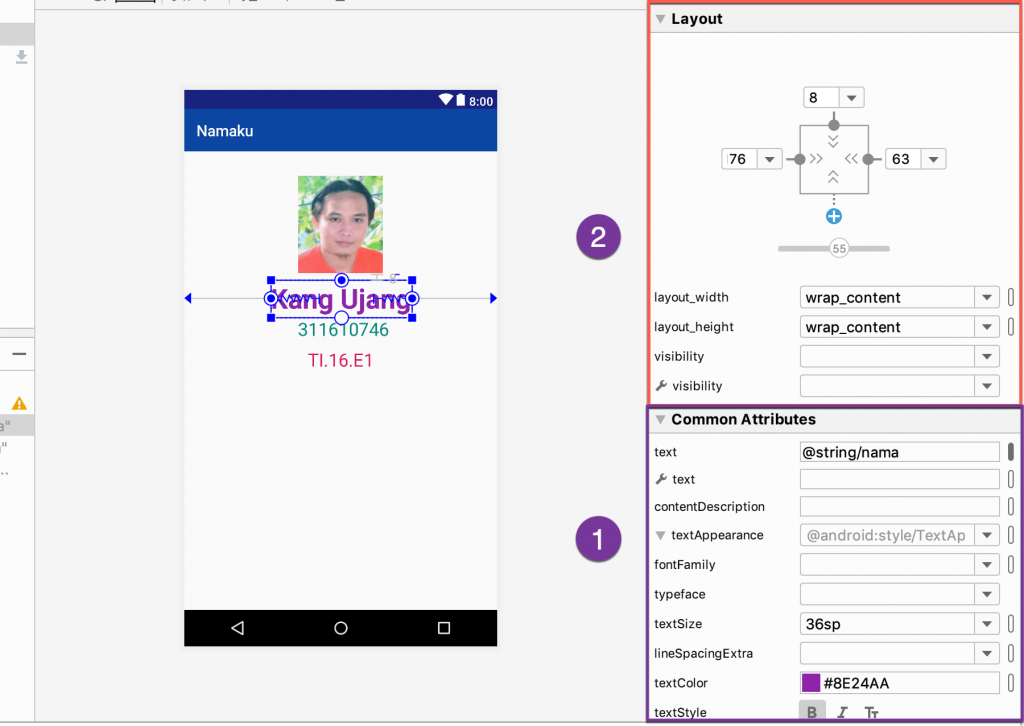
Next, we will arrange the text as the font type, font color, and size. The font alignment is still in the Common Attribute window. Try setting the following attributes.
- fontFamily
- textSize
- textColor
To set the text layout, you can use the attribute layout as in the image position settings. Please adjust the position to your liking.
Do it for all the text that we have entered before.
Set the Application Theme Color
We can adjust the color of the application theme. Color settings can be done by editing the colors.xml file in the values/ directory. You can directly change the color value in hex code, or you can make changes by clicking on the colors palette in the window on the side, as shown in the image below.

Running the Program
After the layout, we set in such a way according to our tastes. We will try to run the program. To run the program, we can go through a virtual device or directly on an Android device. If you want to try running the program, make sure you have installed the virtual device in AVD manager. In this tutorial, we will try to run the program using a virtual device.
Click the Run button on the toolbar, or you can do so by clicking on the Run menu -> Run App. Next, select the virtual device that you have installed. Wait until your application appears on the virtual device.
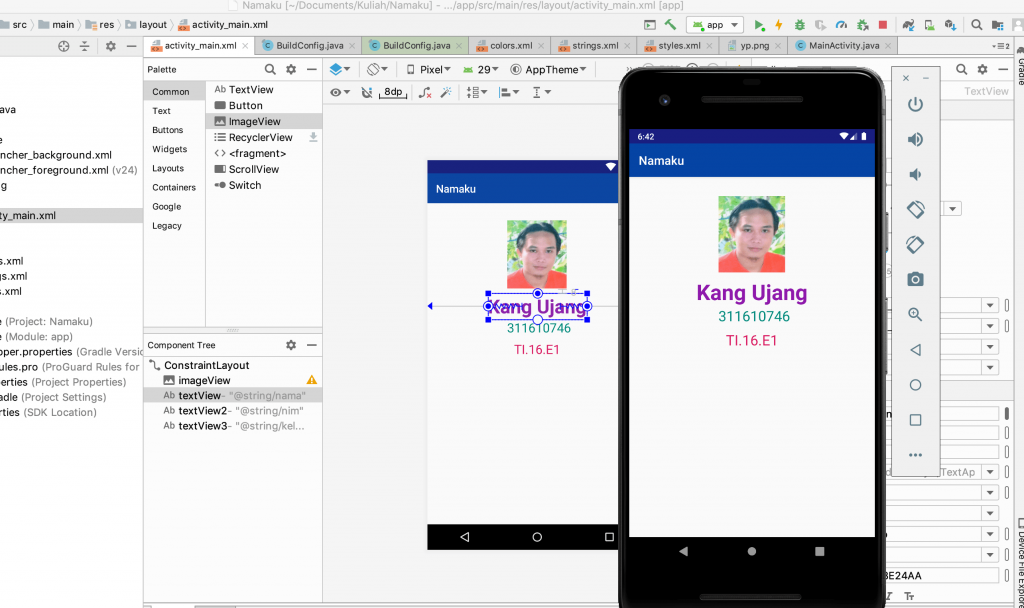
Android Studio Tutorial Videos
We have made all the steps to make the first Android application in the form of videos on YouTube. You can learn android studio tutorial directly from the youtube video that we have prepared. Please follow step by step in the video below.
Conclusion
Now, you have begun to understand how to make an Android application using Android Studio. Learning Android Studio is indeed quite long and time-consuming. But if we are getting used to it, programming is faster and easier to find program errors. Because Android Studio uses structured programming.
In the next article, we will try a few simple projects with Android Studio. Follow TeknoTut to get a tutorial on technology.
]]>In the previous article, we tried the OpenCV 4.1 installation on a Raspberry Pi 3 Model B+ device. Because Raspbian and Ubuntu are both derivatives from Debian, the installation method is not much different. Several parts are removed, and some parts that are added.
Regarding OpenCV, you can see the full description in the previous article, namely, Install OpenCV 4 on the Raspberry Pi.
Preparation
To follow this article, you must prepare a PC or Server that has installed Ubuntu 18.04. An adequate internet connection is needed to download the source code and packages needed.
In this experiment, we used VPS with 4GB RAM and 4 Core Processors.
Install OpenCV 4.1
Before the installation process, make sure you update the latest system. If you have already updated, please skip this step. If not, please update your Ubuntu with the following command, then restart.
sudo apt update
sudo apt upgrade -y
sudo reboot
Install Python
Because we will use python, we must install python along with the pip package. We will install Python version 2 and version 3 at once. Please use the following command.
sudo apt install python python3 python-dev python3-dev python-pip python3-pip -yCheck the results of your python installation, whether it is running as it should.
python --version
python3 --version
pip --version
pip3 --version
If everything is OK, the output of the command above is something like this.
away@ubuntu:~$ python --version
Python 2.7.15+
away@ubuntu:~$ python3 --version
Python 3.6.8
away@ubuntu:~$ pip --version
pip 9.0.1 from /usr/lib/python2.7/dist-packages (python 2.7)
away@ubuntu:~$ pip3 --version
pip 9.0.1 from /usr/lib/python3/dist-packages (python 3.6)
Install Dependencies that are needed
Next, we will install the required dependencies. Applications like cmake, unzip, and others will be required during the OpenCV compilation process.
sudo apt-get install build-essential cmake unzip pkg-config -y
sudo apt-get install libjpeg-dev libpng-dev libtiff-dev -y
sudo apt-get install libavcodec-dev libavformat-dev libswscale-dev libv4l-dev -y
sudo apt-get install libxvidcore-dev libx264-dev -y
sudo apt-get install libgtk-3-dev -y
sudo apt-get install libatlas-base-dev gfortran -y
Download OpenCV
In the next step, we will download and prepare the source from OpenCV. Use the following command.
cd ~
wget -O opencv.zip https://github.com/opencv/opencv/archive/4.1.0.zip
wget -O opencv_contrib.zip https://github.com/opencv/opencv_contrib/archive/4.1.0.zip
Extract the downloaded zip file, then delete the zip file and rename the extracted folder to make it easier.
unzip opencv.zip
unzip opencv_contrib.zip
mv opencv-4.1.0 opencv
mv opencv_contrib-4.1.0 opencv_contrib
rm -f opencv.zip opencv_contrib.zip
Configuring the Virtual Environment
The Virtual Environment is useful so that all installations performed only work on a virtual system. This is useful if you don't want to use a standard library in a normal environment, and will use another version of the library in the virtual environment.
sudo pip install virtualenv virtualenvwrapper
sudo pip3 install virtualenv virtualenvwrapper
sudo rm -rf ~/get-pip.py ~/.cache/pip
To complete the installation, we will update the ~/.profile file. Open and modify ~/.profile with the nano command.
nano ~/.profileThen fill the bottom with the following script.
export WORKON_HOME=$HOME/.virtualenvs
export VIRTUALENVWRAPPER_PYTHON=/usr/bin/python3
source /usr/local/bin/virtualenvwrapper.sh
Then use the profile with the command.
source ~/.profileWhen finished, we will try to create a new virtual environment called cv. You can make any environment name. But in this article, we will use cv to make it easier.
mkvirtualenv cv -p python3And try to activate the virtual environment.
workon cvIf there are no problems, your terminal will start with a sign (cv) which indicates that you are working in a virtual environment cv. If you want to exit the environment, you can use the deactivate command.
deactivateInstall NumPY
Next, we will install numpy in our environment. NumPy is a Python library for Scientific Computing. Type the following code, make sure you are in the Virtual Environment cv.
pip install numpyCompile OpenCV
Next, we will configure cmake for OpenCV. We will work in the build folder. So follow the instructions below to create a build folder and configure our OpenCV.
cd ~/opencv
mkdir build
cd build
cmake -D CMAKE_BUILD_TYPE=RELEASE \
-D CMAKE_INSTALL_PREFIX=/usr/local \
-D INSTALL_PYTHON_EXAMPLES=ON \
-D INSTALL_C_EXAMPLES=OFF \
-D OPENCV_ENABLE_NONFREE=ON \
-D OPENCV_EXTRA_MODULES_PATH=~/opencv_contrib/modules \
-D PYTHON_EXECUTABLE=~/.virtualenvs/cv/bin/python \
-D BUILD_EXAMPLES=ON ..Next, we will compile OpenCV using all processor cores. First, check how many of your processor cores are with nproc command.
nprocBecause we use four processor cores, the results of the nproc command are 4. Use the make -j<number of cores> command to start the compile process.
make -j4Wait until the process is complete. The time needed depends on the speed of your computer or server. When finished, continue by make install and ldconfig, then creating a symlink so that OpenCV works in the Virtual Environment.
sudo make install
sudo ldconfig
ln -s  /usr/local/lib/python3.6/site-packages/cv2/python-3.6/cv2.cpython-36m-x86_64-linux-gnu.so ~/.virtualenvs/cv/lib/python3.6/site-packages/cv2.so
Delete Installation Folder
To save space, we can delete the installation folder now. Please remove using the command below.
cd ~
rm -fr ~/opencv ~/opencv_contrib
Test your Installation
When finished, please test the installation results using the python command below.
python -c 'import cv2; print(cv2.__version__)'If there is an output that shows the OpenCV version as below, that's mean your installation process is complete.
'4.1.0'Conclusion
You have learned how to install OpenCV on an Ubuntu 18.04 server. The process is almost the same as the installation on the Raspberry Pi. However, on the server that we use, the process is faster because it uses an SSD Disk that has more reliable IO performance.
In the next article, we will try some simple Computer Vision projects that use OpenCV.
Hopefully, this article helps.
]]>VNC Server is the software used to do VNC (Virtual Network Computing) desktops on Linux environments. If you use the Windows Operating System, you only have to activate Remote Desktop. But on Linux, you have to install VNC Server so you can do remote desktop in real-time.
There is much software for VNC servers, but in this article, we will only discuss how to install VNC servers using TigerVNC. For information about TigerVNC, you can directly visit the official site on the page https://tigervnc.org/.
Preparation
To follow this article, you must prepare an Ubuntu 18.04 server that can be remote via SSH or directly from the terminal on the screen. An adequate internet connection is needed to download the software.
You can use Droplet from Digitalocean with a minimum RAM of 512 MiB. If you are a new user, you can get $200 credit if you register from the button below.

For VNC clients from your computer. You can use the VNC Viewer application, for example, RealVNC. Please download the app and install it on your computer. You can get the RealVNC Viewer download page at VNC Viewer Download.
In this experiment, we used a Dedicated Server with Ubuntu 18.04.1 (Bionic Beaver) OS that was accessed using SSH with a local connection.
Install VNC Server
System Update
Before we continue the installation, make sure your server has been updated to the latest version.
sudo apt update
sudo apt upgrade -y
If there is an update, you should restart your server so that you can boot with the latest application.
sudo rebootInstall Tiger VNC
After server up again, install the required packages, then install TigerVNC.
sudo apt install xserver-xorg-core
sudo apt install tigervnc-standalone-server tigervnc-xorg-extension tigervnc-viewer
Install Gnome
Next, we will install Gnome Desktop on our Ubuntu server.
sudo apt install ubuntu-gnome-desktopStart the gnome desktop service, and make sure it runs when booting.
sudo systemctl start gdm
sudo systemctl enable gdm
VNC Password Settings
Next, we will set the VNC password that will be used when we are connected to VNC Server. Use the following command.
vncpasswordEnter your password, then verify. You can make the password read-only if needed. But if it's not required, you can confirm by pressing the N button.
If the vncpassword command doesn't work, use the vncserver command, enter the password, then kill vncserver.
vncserver
vncserver -kill :*
Startup Script Settings
Next, we will create a startup script as the initial configuration that will be executed when the VNC Server is activated. Create a ~/.vnc/xstartup file with the nano command.
nano ~/.vnc/xstartupThen fill in the following code.
#!/bin/sh
[ -x /etc/vnc/xstartup ] && exec /etc/vnc/xstartup
[ -r $HOME/.Xresources ] && xrdb $HOME/.Xresources
vncconfig -iconic &
dbus-launch --exit-with-session gnome-session &
Start VNC Server
To run the VNC Server, you can use the following command.
vncserver -localhost no -geometry 800x600 -depth 24The above option will create a session that allows connections from outside with 800 × 600-pixel resolution and sharpness 24. You can configure the resolution and sharpness according to your taste.
Start Stop Script
To make it easier, we will create a script to start the VNC server service. Also, with this script, we can make autostart VNC servers when the computer is turned on. Create a file with the name [email protected] in the /etc/systemd/system folder. Use the nano command.
sudo nano /etc/systemd/system/[email protected]Then fill in the following script.
[Unit]
Description=VNC Server by TeknoTut
After=syslog.target network.target

[Service]
Type=forking
User=away

# Clean any existing files in /tmp/.X11-unix environment
ExecStartPre=/usr/bin/vncserver -kill :%i > /dev/null 2>&1 || :
ExecStart=/usr/bin/vncserver -geometry 800x600 -depth 24 -localhost no :%i
ExecStop=/usr/bin/vncserver -kill :%i

[Install]
WantedBy=multi-user.target
Note that in the User row, make sure the user matches the user you are using. Because we use a user away, we fill the option away.
Stop all VNC sessions if available.
vncserver -kill :*Make sure to enable at startup, then restart VNC Server.
sudo systemctl enable vncserver@1
sudo systemctl start vncserver@1
Up to this point, your VNC Server has finished, and can automatically be used when your server is restarted.
Connect to VNC Server
Well, after the installation process is complete, you can connect to the VNC Server by using the VNC Viewer that we have previously installed.
Enter your server's IP address with port 5901 (For ID 1). If successful, you will be asked for a VNC password. Enter the VNC password that was previously set.
Another thing
There are several things to know about VNC Server to better understand how VNC Server works.
See if VNC Server is active
You can verify that your VNC Server is active and running with the following command.
pgrep XtigervncOr,
ss -tulpn | egrep -i 'vnc|590'
See who is connected
To view listings of anyone connected to a VNC server you can use the following command.
vncserver -list
Delete the VNC session
You can delete a VNC session with the following command.
vncserver -kill :1The above command will delete the VNC session with ID 1. You can customize the ID. Or you can remove all VNC sessions with wildcard marks.
vncserver -kill :*When this command is run, all connected to VNC will be automatically disconnected.
Conclusion
Not all Linux applications can be executed with the CLI (Command Line Interface). Some apps can only be done through the desktop. Ubuntu 18 with Gnome has a beautiful and easy to use display.
Install this VNC Server so that we can remote desktop display, and do a desktop activity from any computer. The installation method is very easy.
Hopefully, this article helps.
]]>Tensorflow is a library for high-scale numerical computing and Machine Learning. Google created Tensorflow and opened to the public with an open source license. Tensorflow can be used for train models and running deep learning with a neural network. It's like the nerves of humans who can learn objects quickly and deeply.
Tensorflow can be used to object recognition, natural language processing recurrent neural networks, handwriting recognition, and others. This is Tensorflow, a library for deep learning using artificial neural networks. It will work and study objects just as humans learn.
To learn more about Tensorflow, please visit the https://www.tensorflow.org/ page.
Same with Keras. Keras is a library that is built with python to build and train deep learning. Keras can be used for research, prototype, or production. To learn Keras, please visit the official website at https://keras.io/.
In this article, we will try Tensorflow and Keras installations on a Raspberry Pi device.
Preparation
You must have a Raspberry Pi 3 Model B+ (Buy Here) that has OpenCV installed. Please read the previous article entitled Install OpenCV 4 on the Raspberry Pi. Suggested SSH or VNC access has been installed before.
In this tutorial, we will install using the cv Virtual Environment that was previously created.
Installation
For Tensorflow and Keras, the Raspberry Pi currently provides a wheel for python. You can directly install via PIP. However, when we tried, we got some errors. It might be fixed soon in another version. We will still write the method, but we will write how to install different versions.
Install in Easily way
Before installing tensorflow and Keras, install some of the libraries that are needed.
sudo apt-get install python3-numpy
sudo apt-get install libblas-dev
sudo apt-get install liblapack-dev
sudo apt-get install python3-dev
sudo apt-get install libatlas-base-dev
sudo apt-get install gfortran
sudo apt-get install python3-setuptools
sudo apt-get install python3-scipy
sudo apt-get update
sudo apt-get install python3-h5py
When done, go to Virtual Environment cv, and install it with PIP.
workon cv
pip install --upgrade scipy
pip install --upgrade cython
pip install tensorflow
pip install keras
If there is no error, then you can successfully install Tensorflow and Keras in an easy way. You can go directly to the installation Test section. However, if you don't succeed, try the installation in another way below.
Install in other ways
Before continuing, make sure the install dependencies needed in the easy way above are already running. When this article was written, the latest version of tensorflow is v1.13.1. You can try checking and installing the latest version on the page https://github.com/lhelontra/tensorflow-on-arm/releases.
workon cv
wget https://github.com/lhelontra/tensorflow-on-arm/releases/download/v1.13.1/tensorflow-1.13.1-cp35-none-linux_armv7l.whl
pip install tensorflow-1.13.1-cp35-none-linux_armv7l.whl
pip install tensorflow
To install it Keras, we get an error when installing Scipy. Therefore, we try to install the manual for the Scipy.
wget https://www.piwheels.org/simple/scipy/scipy-1.2.1-cp35-cp35m-linux_armv7l.whl
pip install scipy-1.2.1-cp35-cp35m-linux_armv7l.whl
pip install scipy
Then install Keras.
pip install kerasIf it's ok, you can test the installation.
Installation Test
Type the following command to test the Tensorflow and Keras installation.
Tensorflow
python -c 'import tensorflow as tf; print(tf.__version__)'If the output is a version, for example, 1.13.1, then your tensorflow installation process is successful.
Keras
python -c 'import keras; print(keras.__version__)'If the output is a version like 2.2.4, that means your Keras install is successful.
Kesimpulan
Tensorflow and Keras are essential libraries for those of you who are studying deep learning and neural networks. Also, the good thing is, Tensorflow and Keras can be installed on Raspberry Pi quickly. This will make our Raspberry Pi even smarter. The development can be even wider.
Follow Teknotut to learn about other Computer Vision.
]]>OpenCV (Open Source Computer Vision Library) is a library for Computer Vision and Machine Learning with an open source license. OpenCV was built to provide infrastructure commonly used in Computer Vision. According to the source website, OpenCV was built with 2500 more comprehensive algorithms for Computer Vision and Machine Learning.
Then what is the use of OpenCV for? Maybe you have uploaded photos on Facebook social media. Then suddenly, intelligently, Facebook recognizes every face of your friend to be tagged. Or, if you are traveling in Jakarta, and you are committing a traffic violation. Suddenly you will get a ticket automatically. This is the work of Computer Vision because the computer will see and detect objects that are adjusted to the program.
In this tutorial, we will try to install OpenCV on a Raspberry Pi device. The next one can be developed into smart camera applications such as Facial Recognition, Object Recognition, or just for smart security cameras.
Preparation
Prepare 1 Unit of Raspberry Pi that has fresh Stretch Raspbian installed. For how to install Raspberry Pi, please see the article Install Raspberry Pi in Headless or How to Install Raspberry Pi with NOOBS. Also prepare an adequate internet connection, because we will download a relatively large software.
If you do not use the display, you must activate the SSH server and VNC Server on your Raspberry Pi. The method can be found in the Headless Installation article.
Install OpenCV 4
Please follow the installation steps below. When this article was written, we used the Raspberry Pi 3 Model B+ (Buy Here) model with 1GB RAM and 4 Core Processors. The installation time is approximately 2 to 5 hours, depending on the internet speed and your SD Card type. Follow the steps carefully so that this OpenCV installation is successful.
Expand Filesystem
When your Raspberry Pi is installed, the file system used is the file system from the original image. We will use all quota that is on our Micro SD. Type the following commandment.
sudo raspi-configAfter the Raspberry Pi display config appears, select it in Advanced Option then press the Enter key. Next, select the A1 Expanded Filesystem option. You will be warned that the new filesystem will be active after your Raspberry Pi is rebooted. Select OK and Finish, if there is a request to reboot, please select Reboot.


Remove Unnecessary Applications
Next, we will try to delete the application that is not needed to save SD Card capacity. If your SD Card is large enough, and you don't want to delete applications that aren't needed, you can ignore this step.
sudo apt-get purge wolfram-engine -y
sudo apt-get purge libreoffice* -y
sudo apt-get clean
sudo apt-get autoremove -y
Install the required software
Before we compile OpenCV, there is some software needed for installation. Type the following command on your Raspberry Pi to install supporting software.
It's a good idea to change the Repository to the Indonesian Repository so that the installation process is faster. You can follow the steps in the article Change the Repository on the Raspberry Pi.
sudo apt-get update && sudo apt-get upgrade -y
sudo apt-get install build-essential cmake unzip pkg-config -y
sudo apt-get install libjpeg-dev libpng-dev libtiff-dev -y
sudo apt-get install libavcodec-dev libavformat-dev libswscale-dev libv4l-dev -y
sudo apt-get install libxvidcore-dev libx264-dev -y
sudo apt-get install libgtk-3-dev -y
sudo apt-get install libcanberra-gtk* -y
sudo apt-get install libatlas-base-dev gfortran -y
sudo apt-get install python3-dev -y
Download OpenCV
Next, we will try to download the latest OpenCV source. You can see the latest version via the official OpenCV page at https://opencv.org/releases/. When this article was created, the latest version is version 4.1.0. We will install the latest version. There are 2 files that we will download, namely opencv and opencv_contrib. Type the following command to download both files in the main directory.
cd ~
wget -O opencv.zip https://github.com/opencv/opencv/archive/4.1.0.zip
wget -O opencv_contrib.zip https://github.com/opencv/opencv_contrib/archive/4.1.0.zip
The command will download the OpenCV file and save it to two files with the name opencv.zip and opencv_contrib.zip. Next, extract the both files.
unzip opencv.zip
unzip opencv_contrib.zip
The extraction results above are 2 folders, namely opencv-4.1.0 and opencv_contrib-4.1.0. We will rename the two folders to make the installation easier to become opencv and opencv_contrib.
mv opencv-4.1.0 opencv
mv opencv_contrib-4.1.0 opencv_contrib
Delete the opencv.zip and opencv_contrib.zip files to save space.
rm -f opencv.zip opencv_contrib.zipConfigure the Virtual Environment for Python3
The Virtual Environment is useful so that all installations performed only work on a virtual system. This will make it easier for the installation to not mix with the primary system. Also, the virtual environment will run what version of the default Python will be run. With the Virtual Environment, it will isolate the primary system from error configuration errors. We will install virtualenvwrapper with the pip command.
sudo pip install virtualenv virtualenvwrapper
sudo pip3 install virtualenv virtualenvwrapper
sudo rm -rf ~/get-pip.py ~/.cache/pip
To complete the installation, we will update the ~/.profile file. Open and modify ~/.profile with the nano command.
nano ~/.profileThen paste the following code.
export WORKON_HOME=$HOME/.virtualenvs
export VIRTUALENVWRAPPER_PYTHON=/usr/bin/python3
source /usr/local/bin/virtualenvwrapper.sh
Save the ~/.profile file by pressing the CTRL+X button followed by confirmation Y.
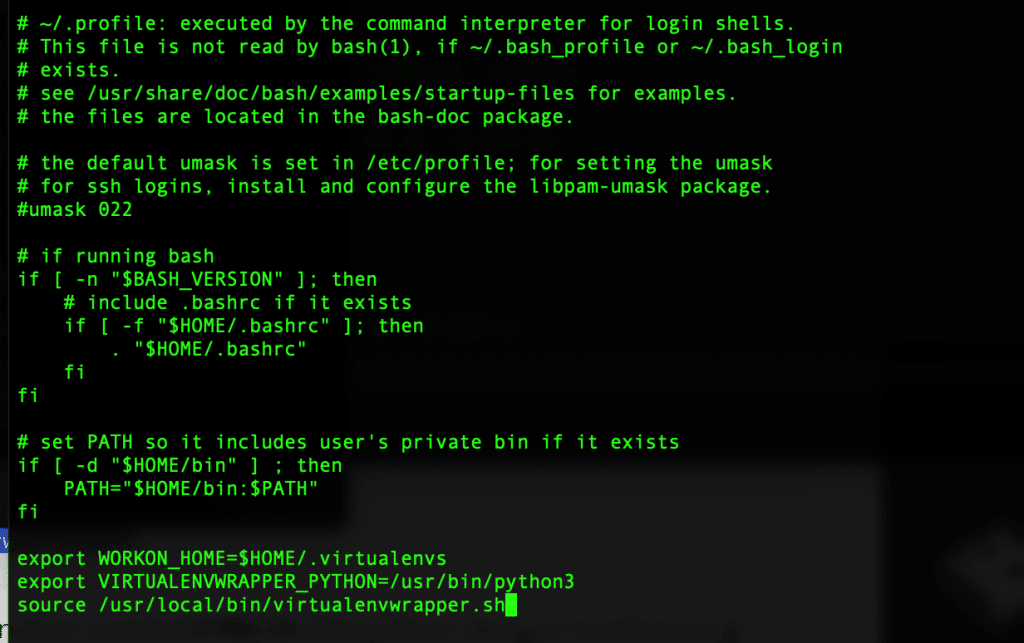
Next, use the ~/.profile file as source.
source ~/.profileThe configuration is complete. Then we will try to create a new Virtual Environment, for example with the name cv with the Python 3 version as default.
mkvirtualenv cv -p python3Next, we will work on the cv environment.
workon cvNow we are in the Virtual Environment cv, in your terminal, it will be marked with a sign (cv) as shown below.

Install NumPy
Next, we will install numpy in our environment. NumPy is a Python library for Scientific Computing. Type the following code, make sure you are in the Virtual Environment cv.
pip install numpyNext, we will compile OpenCV in environment cv.
Compile OpenCV
OpenCV CMake Configuration
Before the compilation process, we will configure OpenCV. All configurations will be saved in the build folder in the main folder of OpenCV. Type the following command.
cd ~/opencv
mkdir build
cd build
Then run the cmake command with the following configuration.
cmake -D CMAKE_BUILD_TYPE=RELEASE \
    -D CMAKE_INSTALL_PREFIX=/usr/local \
    -D OPENCV_EXTRA_MODULES_PATH=~/opencv_contrib/modules \
    -D ENABLE_NEON=ON \
    -D ENABLE_VFPV3=ON \
    -D BUILD_TESTS=OFF \
    -D OPENCV_ENABLE_NONFREE=ON \
    -D INSTALL_PYTHON_EXAMPLES=OFF \
    -D BUILD_EXAMPLES=OFF ..
Wait until the CMake process is complete. At this stage, the process is quite long. You have to wait patiently.
Increase Swap
Swap Space will help main Raspberry pi memory. We will try to increase the swap space to 2GB. The trick is to edit the file /etc/dphys-swapfile, and configure it in the CONF_SWAPSIZE variable. By default, the Raspberry pi swap size is 100.
sudo nano /etc/dphys-swapfileEdit in the CONF_SWAPSIZE section to:
CONF_SWAPSIZE=2048The final file results, like the example in the image below. Press CTRL+X and confirm Y to save the file.
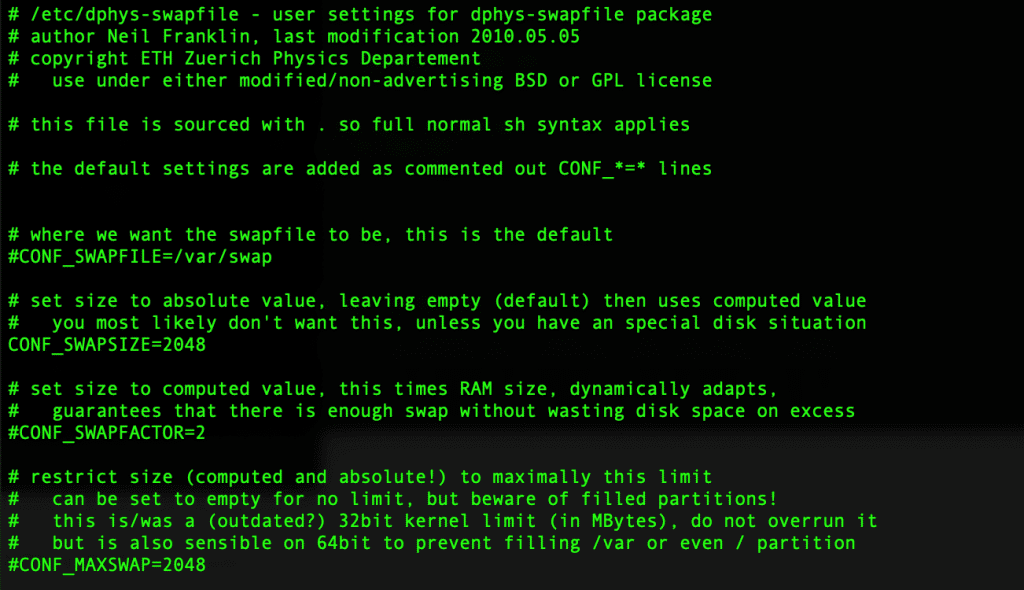
Next, apply the new swap size then start the swap service with the following command.
sudo dphys-swapfile setup
sudo dphys-swapfile swapon
You can check the new swap configuration with the command:
free -mThe output can look like the image below. It can be seen that the new total swap is 2047MB (or mean 2GB).

Now you are ready to compile OpenCV.
Compile OpenCV
We will compile OpenCV using all Raspberry Pi processor cores. This will use all processor resources and will heat up your Raspberry Pi. Make sure your Raspberry Pi uses a heatsink or fan cooler, and store your Raspberry Pi in a quite cold room.
During the make process, it will take a long time, so you must be patient enough. Type the following command to start the process.
make -j4The -j4 option will use all 4 of your processor cores. You can use 2 cores or 3 cores. Consequently, the process will be longer.
After the compilation process is complete, install with the following command.
sudo make install
sudo ldconfig
Symlink OpenCV to Virtual Environment
After the compilation and install process for OpenCV is complete, then we will create the OpenCV symlink module so that it can work in the Virtual Environment. Type the following command to create a symlink.
ln -s /usr/local/lib/python3.5/site-packages/cv2/python-3.5/cv2.cpython-35m-arm-linux-gnueabihf.so ~/.virtualenvs/cv/lib/python3.5/site-packages/cv2.soOpenCV Test
Next, we will do an OpenCV test, whether it can work in our Virtual Environment. Type the following command to execute python in the cv environment.
workon cv
python
>>> import cv2
>>> cv2.__version__
>>> exit()
Alternatively, by:
python -c 'import cv2; print(cv2.__version__)'In the above command, we will run a python program that displays a version of OpenCV. If you get a response like below:
'4.1.0'
That means OpenCV is ready to use. Until this stage, the OpenCV Installation process is complete. In the next article, we will make a simple project of Computer Vision with OpenCV.
Conclusion
Installing OpenCV on the Raspberry Pi is quite complicated and quite time-consuming. You must be careful step by step without missing anything. However, the complexity of installing OpenCV will pay off when you make the first project later. We will try to make a human detection security camera, a face detection camera, and deep learning object detection with TensorFlow.
Follow TeknoTut to get articles about technology.
]]>OpenCV is rich in libraries for Computer Vision and Machine Learning. One of them is face recognition. With specific algorithms, the machine can detect and recognize faces from the images or videos provided. For large websites, classmates, Facebook, or Google may be familiar with this facial recognition. Google and Facebook have quite capable face recognition and detection system.
In this tutorial, we will try to make a face detection application based on OpenCV. We will make a dataset of photos with various expressions so that our face recognition system is more accurate. Image input directly from our Raspberry Pi camera, so we can make face recognition in real-time.
Then you can develop this face recognition to become wider. For example, detection of a criminal's face, or his own face detector for authentication. Also, actually more development, depending on our imagination, of course.
Preparation
For preparation, you must provide a Raspberry Pi 3 Model B+ (Buy Here) that have OpenCV installed with the Virtual Environment. For how to install OpenCV, please see the previous article Install OpenCV 4 on the Raspberry Pi. You also have to prepare Pi Cam as an input (See the article Preparing the Raspberry Pi Camera). SSH and VNC access may be needed so the program can run properly. Make sure the camera settings are enabled in raspi-config.
Install Library needed
We will install additional libraries for Python3, namely, dlib, face_recognition, and imutils. We will work on the cv environment we have previously created.
workon cv
pip install dlib
pip install face_recognition
pip install imutils
Installing dlib is quite long depending on the internet speed and speed of your SD Card.
If at installation face_recognition you get an error like the following.
ERROR: THESE PACKAGES DO NOT MATCH THE HASHES FROM THE REQUIREMENTS FILE. If you have updated the package versions, please update the hashes. Otherwise, examine the package contents carefully; someone may have tampered with them.
    face-recognition-models>=0.3.0 from https://www.piwheels.org/simple/face-recognition-models/face_recognition_models-0.3.0-py2.py3-none-any.whl#sha256=8d6b0af2e37a17120c3f13107974bc252142a4ffcb4e58eabdfcf26608e52c24 (from face_recognition):
        Expected sha256 8d6b0af2e37a17120c3f13107974bc252142a4ffcb4e58eabdfcf26608e52c24
             Got        b1e8b8472604b9a2f139e51d8413a0c31716d2e5887f07eb8ea84aee894c5890
Try doing a manual installation as below.
wget https://www.piwheels.org/simple/face-recognition-models/face_recognition_models-0.3.0-py2.py3-none-any.whl
pip install face_recognition_models-0.3.0-py2.py3-none-any.whl
pip install --upgrade face_recognition
Programming
For programming, we will use Python by utilizing the Library that was previously installed. 3 main python programs will be created. That is face-encoding.py to encode all faces in the dataset. The second file is face-recognition-img.py to recognize faces with image input. Also, the 3rd face-recognition-video.py file to recognize faces in real-time with video input.
Directory Structure
For the program to be made neat, we must arrange the directory. We will create a project directory in the Raspberry Pi home folder. All projects that we will create will be saved under the project folder.
cd ~
mkdir project
cd project
mkdir face-recognition
cd face-recognition
Next we will work in the ~/project/face-recognition directory. This face-recognition project will require a dataset folder that will contain a face photo that will be detected. Each different face will be stored in a folder with the name of each owner's face.
cd ~/project/face-recognition
mkdir dataset
Source Code
Create a file with the name face-encoding.py in the face-recognition project directory, namely at ~/project/face-recognition.
nano face-encoding.pyThen fill in the following code.
# PENGGUNAAN
# python face-encoding.py --dataset dataset --encodings encodings.pickle --detection-method hog

# import library yang di perlukan
from imutils import paths
import face_recognition
import argparse
import pickle
import cv2
import os

# Parsing Argumen
ap = argparse.ArgumentParser()
ap.add_argument("-i", "--dataset", required=True,
	help="path to input directory of faces + images")
ap.add_argument("-e", "--encodings", required=True,
	help="path to serialized db of facial encodings")
ap.add_argument("-d", "--detection-method", type=str, default="cnn",
	help="face detection model to use: either `hog` or `cnn`")
args = vars(ap.parse_args())

# Ambil gambar dari folder dataset
print("[INFO] mendapatkan model wajah...")
imagePaths = list(paths.list_images(args["dataset"]))

# inisialiassi wajah yang di kenal
knownEncodings = []
knownNames = []

# loop di direktori gambar
for (i, imagePath) in enumerate(imagePaths):
	# Ambil nama dari masing-masing folder
	print("[INFO] Memproses gambar {}/{}".format(i + 1,
		len(imagePaths)))
	name = imagePath.split(os.path.sep)[-2]

	# konversi ke RGB (OpenCV ordering) ke dlib ordering (RGB)
	image = cv2.imread(imagePath)
	rgb = cv2.cvtColor(image, cv2.COLOR_BGR2RGB)

	# deteksi (x, y) koordinat dari kotak wajah
	boxes = face_recognition.face_locations(rgb,
		model=args["detection_method"])

	# Pemrosesan Wajah
	encodings = face_recognition.face_encodings(rgb, boxes)

	# loop semua proses encoding
	for encoding in encodings:
		knownEncodings.append(encoding)
		knownNames.append(name)

# dump the facial encodings + names to disk
print("[INFO] Memproses serialize encoding...")
data = {"encodings": knownEncodings, "names": knownNames}
f = open(args["encodings"], "wb")
f.write(pickle.dumps(data))
f.close()
Save the file. Next, we will create the face-recognition-video.py file in the same directory.
nano face-recognition-video.pyEnter the following code:
# PENGGUNAAN
# python face-recognition-video.py --cascade haarcascade_frontalface_default.xml --encodings encodings.pickle

# import library yang di perlukan
from imutils.video import VideoStream
from imutils.video import FPS
import face_recognition
import argparse
import imutils
import pickle
import time
import cv2

# Parsing Argumen
ap = argparse.ArgumentParser()
ap.add_argument("-c", "--cascade", required=True,
	help = "path to where the face cascade resides")
ap.add_argument("-e", "--encodings", required=True,
	help="path to serialized db of facial encodings")
args = vars(ap.parse_args())

# load pendeteksi wajah dari file cascade OpenCV
print("[INFO] loading encodings + face detector...")
data = pickle.loads(open(args["encodings"], "rb").read())
detector = cv2.CascadeClassifier(args["cascade"])

# Nyalakan Kamera
print("[INFO] Memulai Stream dari Pi Camera...")
vs = VideoStream(src=0).start()
time.sleep(2.0)

# Penghitung FPS (Frame per Second)
fps = FPS().start()

# loop dari semua frame yang di dapat
while True:
	# dapatkan frame, dan resize ke 500pixel agar lebih cepat
	frame = vs.read()
	frame = imutils.resize(frame, width=500)

	# Konversi ke grayscale dan konversi ke RGB
	gray = cv2.cvtColor(frame, cv2.COLOR_BGR2GRAY)
	rgb = cv2.cvtColor(frame, cv2.COLOR_BGR2RGB)

	# deteksi wajah dari frame grayscale
	rects = detector.detectMultiScale(gray, scaleFactor=1.1,
		minNeighbors=5, minSize=(30, 30),
		flags=cv2.CASCADE_SCALE_IMAGE)

   # Tampilkan kotak di wajah yang dideteksi
	boxes = [(y, x + w, y + h, x) for (x, y, w, h) in rects]

	encodings = face_recognition.face_encodings(rgb, boxes)
	names = []

	# loop di semua wajah yang terdeteksi
	for encoding in encodings:
		matches = face_recognition.compare_faces(data["encodings"],
			encoding)
		name = "Unknown"

		# check apakah ada wajah yang di kenali
		if True in matches:
			matchedIdxs = [i for (i, b) in enumerate(matches) if b]
			counts = {}
			for i in matchedIdxs:
				name = data["names"][i]
				counts[name] = counts.get(name, 0) + 1
			name = max(counts, key=counts.get)
		names.append(name)

	# loop di semua wajah yang sudah di kenali
	for ((top, right, bottom, left), name) in zip(boxes, names):
		# tampilkan nama di wajah yang di kenali
		cv2.rectangle(frame, (left, top), (right, bottom),
			(0, 255, 0), 2)
		y = top - 15 if top - 15 > 15 else top + 15
		cv2.putText(frame, name, (left, y), cv2.FONT_HERSHEY_SIMPLEX,
			0.75, (0, 255, 0), 2)

	# Tampilkan gambar di layar
	cv2.imshow("Frame", frame)
	key = cv2.waitKey(1) & 0xFF

	# tunggu tombol 1 untuk keluar
	if key == ord("q"):
		break

	# update FPS
	fps.update()

# tampilkan info FPS
fps.stop()
print("[INFO] elasped time: {:.2f}".format(fps.elapsed()))
print("[INFO] approx. FPS: {:.2f}".format(fps.fps()))

# cleanup
cv2.destroyAllWindows()
vs.stop()
When finished, save the file. We currently have 2 python files in this project directory.
Download the haarcascade file
Next, we will need the default haarcascade file from OpenCV. In this case, we need the haarcascade_frontalface_default.xml file. The haarcascade file is classifier for training objects. In this case, we will only get the face image from the photo stored in the dataset folder or directly taken from the camera. We will download it directly from Github and save it in our project directory.
wget https://raw.githubusercontent.com/opencv/opencv/master/data/haarcascades/haarcascade_frontalface_default.xmlOK, until now, we have finished the coding phase. Next, we will try to make a model.
Train a Model
At this stage, we will collect face photos that will be stored in the dataset folder. You can use photos of your own face for trials. In this experiment, I will make a model for my friend and me. Create a directory with the name of each model that will be trained.
cd ~/project/face-recognition/dataset/
mkdir yanwar
mkdir nunut
mkdir ferdy
Save each photo in the appropriate directory. Photos can be taken from Facebook, or directly from your responder camera with the raspistill command (See: Preparing for the Raspberry Pi Camera). Save photos with various expressions. The more photos saved, the more accurate face detection will be.
After finishing saving photos in each directory, then we will encode the pickle file with the face-encoding.py script that we have created. Run the following command in your project directory.
cd ~/project/face-recognition/
python face-encoding.py --dataset dataset --encodings encodings.pickle --detection-method hog
Wait until the encoding process is complete. Once done, you will find a new file in your directory called encodings.pickle.
Examples of finished directory structures are as below.
(cv) pi@raspberrypi:~/project/face-recognition $ tree
.
├── dataset
│   ├── Ferdy
│   │   ├── 001.jpg
│   │   ├── 002.jpg
│   │   ├── 003.jpg
│   │   ├── 004.jpg
│   │   ├── 005.jpg
│   │   ├── 006.jpg
│   │   ├── 007.jpg
│   │   └── 008.jpeg
│   ├── Nunut
│   │   ├── 001.jpg
│   │   ├── 002.jpg
│   │   ├── 003.jpg
│   │   ├── 004.jpg
│   │   └── 005.jpg
│   └── Yanwar
│       ├── 001.jpg
│       ├── 002.jpg
│       ├── 003.jpg
│       ├── 004.jpg
│       ├── 005.jpg
│       ├── 006.jpg
│       └── 007.jpg
├── encodings.pickle
├── face-encoding.py
├── face-recognition-video.py
└── haarcascade_frontalface_default.xml
Run the Program
After the encoding process is complete, your face detection program is ready for use. Run the following command in the main directory of your project.
python face-recognition-video.py --cascade haarcascade_frontalface_default.xml --encodings encodings.pickleWait until the video appears on the screen. Try to face the camera and see what happens. To run this program, you must use a monitor on your Raspberry Pi. Alternatively, you can use VNC. See the article How to Install Raspberry Pi in Headless for how to activate VNC.
Follow approximately as in the video below. As you can see, the results are less accurate. This may be because the coding uses the HOG method, the CNN (Convolutional Neural Network) method cannot be done on a Raspberry Pi engine. Next, we will try with the CNN method using Server.
Conclusion
The Facial Recognition project that we created is still a simple project. However, this project is the entrance to the wider world of Computer Vision. We hope that new ideas will emerge after successfully creating this project.
In a separate article, we will try to do another project based on Computer Vision. Continue to follow TeknoTut to learn more.
]]>Delete files on the Linux Operating System is very easy, with the command rm (remove) your file can be deleted quickly. However, what if we want to delete files with certain conditions, for example, the file size is above x MB. Or I want to delete files over the age x days. Here is how to delete files with certain conditions.
The commands below apply to all types of Linux, including Raspberry Pi.
Delete files with the rm command
The rm command is a standard command for deleting files. Here is how to delete files with the rm command.
Delete single file
Use the following command to delete a single file. Suppose you want to delete the file myfile.txt.
rm myfile.txtAlternatively, if you want to delete files with specific directories such as /home/teknotut/aku.txt. Use the following command.
rm /home/teknotut/myfile.txtDelete without Confirmation
The previous command will delete the file with a confirmation. You will be asked if you really want to delete the file. If you are sure, you can press the Y key. Sometimes we want to delete the file without being asked. Use the following command.
rm myfile.txt -fThe -f option is a force, meaning it doesn't need to be asked, immediately delete it.
Delete Directory
To delete a directory, you must use the -r option which means recursive. Suppose you want to delete my data folder and all its contents, use the following command.
rm -rf mydataIf you use the folder -f (force) option and its contents, it is immediately deleted without confirmation.
Delete multiple files
To delete several files, you only need to separate the file names with spaces. Suppose you want to delete the file aku.txt, kamu.txt in the current directory, use the following command.
rm -f me.txt you.txtIf you are unsure, you can remove the -f (force) option.
Delete file with Wildcard
Deleting certain files can use wildcards, which are represented by a * (Asterisk). Suppose we want to delete all files with the extension .txt, use the following command;
rm -f *.txtIf you want to delete files with data prefix, for example in one directory, you have a file with the name dataaku.txt, your datakamu.xlsx, and you want to delete all files that start with data. Use the following command.
rm -f data*If you want to delete all files in the current directory, use the following command.
rm -f *Be careful when using the command above. Your files in the selected directory will be deleted.
Delete old file
To delete certain old files, for example, you want to delete files that were one year old in the /home/teknotut/dataku folder. Use the following command.
find /home/teknotut/dataku/* -mtime +365 -deleteThe above command will search for files with the age of 365 days and before, after being found, then deleted.
Change -mtime with the age of the file you want (in days).
Delete files of a certain size
To delete files of the specified size, for example, you want to delete files above 1GB in the current directory, use the following command.
find . -type f -name "*" -size +1G -deleteSign . (dot) Indicates the current directory, if you want to delete it in another directory, you only have to change the sign with the desired directory path.
The -name option is a search by file name. An asterisk indicates a wildcard, which means all files. If you want to delete files with certain extensions, for example, you want to delete files with Extensions .mp3, .tar, and .gz with file sizes above 4MB, use the following command.
find -type f \( -name "*zip" -o -name "*tar" -o -name "*gz" \) -size +4M -deleteAlternatively, you can exclude files. For example, delete all files above 5MB that are not .mp3 and .mp4, you can use the following command.
find . -type f ! -name '*.mp3' ! -name '*.mp4' -size +5M -deleteThe -size option is the file size criterion, the + sign to indicate above, and the - sign will indicate below. To -size +1G means you will search for files with a size above 1GB. If you type size -1G, then you search for files under 1GB.
The -delete option will execute the deletion when the criteria file that we specify is found.
I hope this helps :).
]]>Installing Raspberry Pi with NOOBS (New Out of Box Software) is the easiest way to install Raspberry Pi. The Raspberry Pi is designed with all the ease of installation and configuration to be easily understood by users, including new users who have never installed the OS.
Unlike headless installations, NOOBS installations require standard I/O devices such as a mouse, keyboard and monitor. This installation method is not complicated because the configuration is done in the user interface that is easy to understand.
Preparation
Following are some preparations in the form of hardware or Software to start the installation with NOOBS.
- 1 Unit of Raspberry Pi 3 Model B+ (Buy Here)
- 1 Power Supply Unit suggested above 1A (Buy Here).
- Micro SD 8GB or more, recommended class 10 (Buy Here).
- Card Reader that supports Micro SD (Buy Here).
- Monitor that supports HDMI (Buy Here).
- Keyboard and Mouse with USB Interface (Buy Here).
- SD Formater Software. Please download via this link.
If you use Raspberry Pi Zero, you need a Mini HDMI to HDMI female adapter converter (Buy Here). Many are available in various online stores. The price is around $5 to $11.
If you have a monitor with a VGA port, you can use an HDMI to VGA converter (Buy Here). The price is around $5 to $15.

In this experiment we use Raspberry Pi 3 Model B+, with NOOBS version v 3.0.1 full (Offline).
Preparation of NOOBS and Micro SD
Install SD Formater on your PC, after installing, format the SD card with the Software.
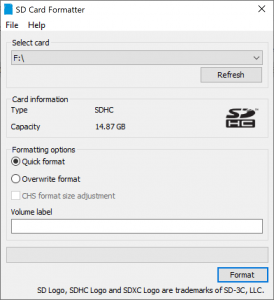
Then download NOOBS from the official Raspberry Pi website. To download, please click here. There are two versions of NOOBS, namely NOOBS and NOOBS lite. The difference is, for NOOBS lite, you have to use the internet during the installation process. For full NOOBS, the installation process will be done offline.
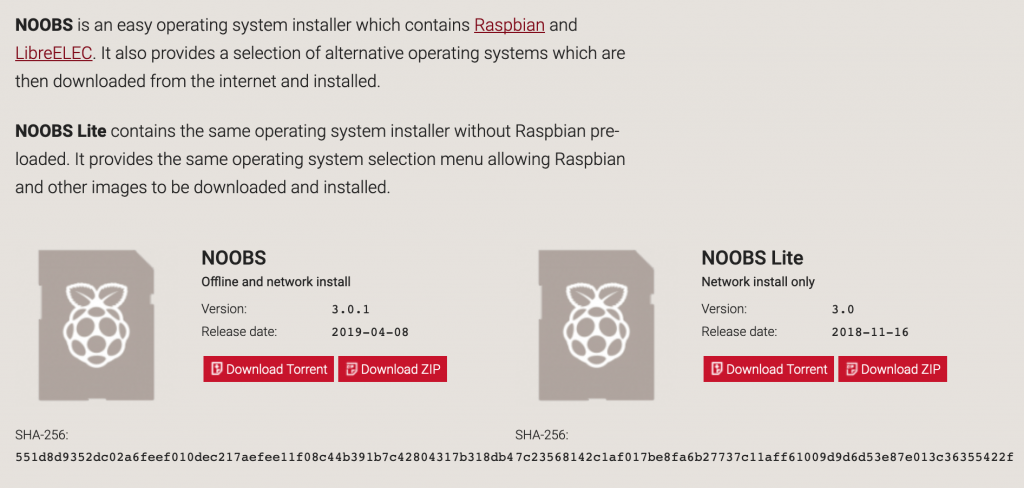
After successfully downloading, please extract the file directly to the Micro SD that has been formatted before. Actually, you can extract files in any folder, and copy the results to Micro SD. However, it is not efficient and does not save time.
When finished, your Micro SD is ready to use. Eject micro SD from your PC.
Installation Process
Enter Micro SD into your Raspberry Pi. Prepare the monitor to the HDMI port, mouse, and keyboard embedded in the USB port. Then turn on your Raspberry Pi. Wait for the next instruction on your monitor screen.
After the Installation option appears above, check the Raspbian [RECOMMENDED] option, then click on the Install button. The system will install, wait until it's finished. The time needed varies, depending on your Micro SD type. In our experience using Sandisk 16GB Class 10 98MB/s Micro SD, the installation process takes around 30 minutes.
Initial Configuration
After the installation process is complete, then we will do the initial configuration. The process is very easy because you only have to follow the wizard in your Raspbian interface. At the initial stage, you will get a welcome display from Raspbian. Press the Next button to start.
Setting Region, Language, and Timezone
Next, you will be asked to choose Country, language, and timezone. In this experiment, we chose Indonesia with Indonesian and Timezone Asia/Jakarta. Then press Next.
Password settings
Next, you will be asked to set a password. Please type the password as you wish. If you don't want to change the password, just clear it, then press Next. The default password for Raspbian is raspberry with username pi.
Black Border Configuration
In the next configuration, you will configure the screen resolution. If on your monitor there is a black border, please check the option "This screen shows a black border around the desktop". Raspbian will automatically configure the screen resolution that matches your monitor after restarting later.
Select and Connect Wifi
At this stage, please select your wifi network, and enter the appropriate password so that your Raspberry Pi is connected to the internet.
Software Update
The last step of the initial wizard is the update option. Select Next to update the Software. Next, you will be asked to restart your Raspberry Pi. Press on the Reboot button. Then wait for your Raspberry Pi to boot. Your Raspberry Pi is ready to use.
For details on how to install, you can see the video below.
Conclusion
The installation process using NOOBS is indeed very easy, and there are not too many complicated configurations compared to how to install with Headless. However, you must prepare a monitor that supports HDMI and input devices such as the mouse and keyboard.
Judging from the way and time efficiency, Install NOOBS is very fast and easier to understand. However, in terms of usage and equipment, it is easier to install headless.
]]>The Raspberry Pi 3 Model B+ is equipped with the DSI (Display Serial Interface) and CSI (Camera Serial Interface) interfaces. For the Raspberry Pi 3 Model B + you can directly use the 22 pin ribbon cable to connect to the Camera. Especially for Raspberry Pi Zero, there is now a CSI Interface. You can use ribbon cable 14 pin to 22 pins.
The Raspberry Pi camera application is very wide. The Raspberry Pi can only be used to snap photos, record videos, CCTV cameras to smart camera applications.
In this article, we will discuss about preparing the Raspberry Pi camera and its use with a few basic commands.
Preparation
Here are some tools that must be prepared.
If you use Raspberry Pi Zero, you can use ribbon cable 15 to 22 pins (Buy Here). If you buy the original Pi Zero casing, you will get this cable.
Camera Installation
Attach the Camera's ribbon cable to the CSI interface, as shown below.
Configuration
If you have just installed your Raspberry Pi. You must first activate the Camera from the device configuration.
sudo raspi-configSelect Interfacing Option then P1 Camera then Yes.


If you have finished installation and configuration, then you can directly use Pi Camera to get photos or record videos.
Using the Camera
Raspbian provides basic commands for taking photos and recording videos. You can execute from the terminal or ssh.
Capture photos
To capture photos, you can use the raspistill command. For example, as shown below.
raspistill -O fotopertamaku.jpgThe above command will take a picture from the Camera and save it with the file name fotopertamaku.jpg. The file will be saved in the current directory. To save photos on the directory, you specify you can immediately type in the directory name. For example, we will take pictures of the Camera and save them in the ~/Pictures folder. Then, type the following command.
raspistill -O ~/Pictures/fotoku1.jpgraspistill also provides vertical flip and horizontal flip. You can try with the following command and see the difference in the results.
raspistill -vf -o ~/Pictures/vf.jpg
raspistill -hf -o ~/Pictures/hf.jpg
There are still many other options with this raspistill command. To find out all available options, you can type the command below.
raspistill 2>&1 | lessAll options available on raspistill are
"raspistill" Camera App (commit 7cbfbd38d982 Tainted)

Runs camera for specific time, and take JPG capture at end if requested

usage: raspistill [options]

Image parameter commands

-q, --quality	: Set jpeg quality <0 to 100>
-r, --raw	: Add raw bayer data to jpeg metadata
-l, --latest	: Link latest complete image to filename <filename>
-t, --timeout	: Time (in ms) before takes picture and shuts down (if not specified, set to 5s)
-th, --thumb	: Set thumbnail parameters (x:y:quality) or none
-d, --demo	: Run a demo mode (cycle through range of camera options, no capture)
-e, --encoding	: Encoding to use for output file (jpg, bmp, gif, png)
-x, --exif	: EXIF tag to apply to captures (format as 'key=value') or none
-tl, --timelapse	: Timelapse mode. Takes a picture every <t>ms. %d == frame number (Try: -o img_%04d.jpg)
-fp, --fullpreview	: Run the preview using the still capture resolution (may reduce preview fps)
-k, --keypress	: Wait between captures for a ENTER, X then ENTER to exit
-s, --signal	: Wait between captures for a SIGUSR1 or SIGUSR2 from another process
-g, --gl	: Draw preview to texture instead of using video render component
-gc, --glcapture	: Capture the GL frame-buffer instead of the camera image
-bm, --burst	: Enable 'burst capture mode'
-dt, --datetime	: Replace output pattern (%d) with DateTime (MonthDayHourMinSec)
-ts, --timestamp	: Replace output pattern (%d) with unix timestamp (seconds since 1970)
-fs, --framestart	: Starting frame number in output pattern(%d)
-rs, --restart	: JPEG Restart interval (default of 0 for none)

GL parameter commands

-gs, --glscene	: GL scene square,teapot,mirror,yuv,sobel,vcsm_square
-gw, --glwin	: GL window settings <'x,y,w,h'>

Common Settings commands

-?, --help	: This help information
-w, --width	: Set image width <size>
-h, --height	: Set image height <size>
-o, --output	: Output filename <filename> (to write to stdout, use '-o -'). If not specified, no file is saved
-v, --verbose	: Output verbose information during run
-cs, --camselect	: Select camera <number>. Default 0
-md, --mode	: Force sensor mode. 0=auto. See docs for other modes available
-gps, --gpsdexif	: Apply real-time GPS information to output (e.g. EXIF in JPG, annotation in video (requires libgps.so.22)

Preview parameter commands

-p, --preview	: Preview window settings <'x,y,w,h'>
-f, --fullscreen	: Fullscreen preview mode
-op, --opacity	: Preview window opacity (0-255)
-n, --nopreview	: Do not display a preview window

Image parameter commands

-sh, --sharpness	: Set image sharpness (-100 to 100)
-co, --contrast	: Set image contrast (-100 to 100)
-br, --brightness	: Set image brightness (0 to 100)
-sa, --saturation	: Set image saturation (-100 to 100)
-ISO, --ISO	: Set capture ISO
-vs, --vstab	: Turn on video stabilisation
-ev, --ev	: Set EV compensation - steps of 1/6 stop
-ex, --exposure	: Set exposure mode (see Notes)
-fli, --flicker	: Set flicker avoid mode (see Notes)
-awb, --awb	: Set AWB mode (see Notes)
-ifx, --imxfx	: Set image effect (see Notes)
-cfx, --colfx	: Set colour effect (U:V)
-mm, --metering	: Set metering mode (see Notes)
-rot, --rotation	: Set image rotation (0-359)
-hf, --hflip	: Set horizontal flip
-vf, --vflip	: Set vertical flip
-roi, --roi	: Set region of interest (x,y,w,d as normalised coordinates [0.0-1.0])
-ss, --shutter	: Set shutter speed in microseconds
-awbg, --awbgains	: Set AWB gains - AWB mode must be off
-drc, --drc	: Set DRC Level (see Notes)
-st, --stats	: Force recomputation of statistics on stills capture pass
-a, --annotate	: Enable/Set annotate flags or text
-3d, --stereo	: Select stereoscopic mode
-dec, --decimate	: Half width/height of stereo image
-3dswap, --3dswap	: Swap camera order for stereoscopic
-ae, --annotateex	: Set extra annotation parameters (text size, text colour(hex YUV), bg colour(hex YUV), justify, x, y)
-ag, --analoggain	: Set the analog gain (floating point)
-dg, --digitalgain	: Set the digital gain (floating point)
-set, --settings	: Retrieve camera settings and write to stdout


Notes

Exposure mode options :
off,auto,night,nightpreview,backlight,spotlight,sports,snow,beach,verylong,fixedfps,antishake,fireworks

Flicker avoid mode options :
off,auto,50hz,60hz

AWB mode options :
off,auto,sun,cloud,shade,tungsten,fluorescent,incandescent,flash,horizon

Image Effect mode options :
none,negative,solarise,sketch,denoise,emboss,oilpaint,hatch,gpen,pastel,watercolour,film,blur,saturation,colourswap,washedout,posterise,colourpoint,colourbalance,cartoon

Metering Mode options :
average,spot,backlit,matrix

Dynamic Range Compression (DRC) options :
off,low,med,high
Video Recording
To do video recording, you can use the raspivid command. For example, use the following command.
raspivid -o ~/Videos/videoku.h264The above command will record video for 5 seconds and save it in the ~/Videos folder with the name videoku.h264. You can open the folder and play videos with VLC.
For a specific time, for example, 10 seconds, you can use the -t option followed by the number of milliseconds, for example, in the command below.
raspivid -o ~/Videos/video10s.h264 -t 10000The above command will record videos for 10 seconds (10000 ms) and will be saved in the ~/Videos/ folder.
To get other options, you can use the command below.
raspivid 2>&1 | lessAlso, here are the options available at raspivid command.
"raspivid" Camera App (commit 7cbfbd38d982 Tainted)

Display camera output to display, and optionally saves an H264 capture at requested bitrate


usage: raspivid [options]

Image parameter commands

-b, --bitrate	: Set bitrate. Use bits per second (e.g. 10MBits/s would be -b 10000000)
-t, --timeout	: Time (in ms) to capture for. If not specified, set to 5s. Zero to disable
-d, --demo	: Run a demo mode (cycle through range of camera options, no capture)
-fps, --framerate	: Specify the frames per second to record
-e, --penc	: Display preview image *after* encoding (shows compression artifacts)
-g, --intra	: Specify the intra refresh period (key frame rate/GoP size). Zero to produce an initial I-frame and then just P-frames.
-pf, --profile	: Specify H264 profile to use for encoding
-td, --timed	: Cycle between capture and pause. -cycle on,off where on is record time and off is pause time in ms
-s, --signal	: Cycle between capture and pause on Signal
-k, --keypress	: Cycle between capture and pause on ENTER
-i, --initial	: Initial state. Use 'record' or 'pause'. Default 'record'
-qp, --qp	: Quantisation parameter. Use approximately 10-40. Default 0 (off)
-ih, --inline	: Insert inline headers (SPS, PPS) to stream
-sg, --segment	: Segment output file in to multiple files at specified interval <ms>
-wr, --wrap	: In segment mode, wrap any numbered filename back to 1 when reach number
-sn, --start	: In segment mode, start with specified segment number
-sp, --split	: In wait mode, create new output file for each start event
-c, --circular	: Run encoded data through circular buffer until triggered then save
-x, --vectors	: Output filename <filename> for inline motion vectors
-if, --irefresh	: Set intra refresh type
-fl, --flush	: Flush buffers in order to decrease latency
-pts, --save-pts	: Save Timestamps to file for mkvmerge
-cd, --codec	: Specify the codec to use - H264 (default) or MJPEG
-lev, --level	: Specify H264 level to use for encoding
-r, --raw	: Output filename <filename> for raw video
-rf, --raw-format	: Specify output format for raw video. Default is yuv
-l, --listen	: Listen on a TCP socket
-stm, --spstimings	: Add in h.264 sps timings
-sl, --slices	: Horizontal slices per frame. Default 1 (off)


H264 Profile options :
baseline,main,high

H264 Level options :
4,4.1,4.2

H264 Intra refresh options :
cyclic,adaptive,both,cyclicrows

Raw output format options :
yuv,rgb,gray

Raspivid allows output to a remote IPv4 host e.g. -o tcp://192.168.1.2:1234or -o udp://192.168.1.2:1234
To listen on a TCP port (IPv4) and wait for an incoming connection use the -l option
e.g. raspivid -l -o tcp://0.0.0.0:3333 -> bind to all network interfaces,
raspivid -l -o tcp://192.168.1.1:3333 -> bind to a certain local IPv4 port

Common Settings commands

-?, --help	: This help information
-w, --width	: Set image width <size>
-h, --height	: Set image height <size>
-o, --output	: Output filename <filename> (to write to stdout, use '-o -'). If not specified, no file is saved
-v, --verbose	: Output verbose information during run
-cs, --camselect	: Select camera <number>. Default 0
-md, --mode	: Force sensor mode. 0=auto. See docs for other modes available
-gps, --gpsdexif	: Apply real-time GPS information to output (e.g. EXIF in JPG, annotation in video (requires libgps.so.22)

Preview parameter commands

-p, --preview	: Preview window settings <'x,y,w,h'>
-f, --fullscreen	: Fullscreen preview mode
-op, --opacity	: Preview window opacity (0-255)
-n, --nopreview	: Do not display a preview window

Image parameter commands

-sh, --sharpness	: Set image sharpness (-100 to 100)
-co, --contrast	: Set image contrast (-100 to 100)
-br, --brightness	: Set image brightness (0 to 100)
-sa, --saturation	: Set image saturation (-100 to 100)
-ISO, --ISO	: Set capture ISO
-vs, --vstab	: Turn on video stabilisation
-ev, --ev	: Set EV compensation - steps of 1/6 stop
-ex, --exposure	: Set exposure mode (see Notes)
-fli, --flicker	: Set flicker avoid mode (see Notes)
-awb, --awb	: Set AWB mode (see Notes)
-ifx, --imxfx	: Set image effect (see Notes)
-cfx, --colfx	: Set colour effect (U:V)
-mm, --metering	: Set metering mode (see Notes)
-rot, --rotation	: Set image rotation (0-359)
-hf, --hflip	: Set horizontal flip
-vf, --vflip	: Set vertical flip
-roi, --roi	: Set region of interest (x,y,w,d as normalised coordinates [0.0-1.0])
-ss, --shutter	: Set shutter speed in microseconds
-awbg, --awbgains	: Set AWB gains - AWB mode must be off
-drc, --drc	: Set DRC Level (see Notes)
-st, --stats	: Force recomputation of statistics on stills capture pass
-a, --annotate	: Enable/Set annotate flags or text
-3d, --stereo	: Select stereoscopic mode
-dec, --decimate	: Half width/height of stereo image
-3dswap, --3dswap	: Swap camera order for stereoscopic
-ae, --annotateex	: Set extra annotation parameters (text size, text colour(hex YUV), bg colour(hex YUV), justify, x, y)
-ag, --analoggain	: Set the analog gain (floating point)
-dg, --digitalgain	: Set the digital gain (floating point)
-set, --settings	: Retrieve camera settings and write to stdout


Notes

Exposure mode options :
off,auto,night,nightpreview,backlight,spotlight,sports,snow,beach,verylong,fixedfps,antishake,fireworks

Flicker avoid mode options :
off,auto,50hz,60hz

AWB mode options :
off,auto,sun,cloud,shade,tungsten,fluorescent,incandescent,flash,horizon

Image Effect mode options :
none,negative,solarise,sketch,denoise,emboss,oilpaint,hatch,gpen,pastel,watercolour,film,blur,saturation,colourswap,washedout,posterise,colourpoint,colourbalance,cartoon

Metering Mode options :
average,spot,backlit,matrix

Dynamic Range Compression (DRC) options :
off,low,med,high
Conclusion
The use of a camera on the Raspberry Pi is very easy. Raspbian has provided complete commands for shooting and video recording. Raspberry Pi camera applications can be used for CCTV cameras, publish to YouTube with RSTP, and can even be created as smart cameras for object recognition and face recognition.
Follow TeknoTut to get quality technology articles.
]]>Changing the repository to the nearest country is needed to speed up the upgrade process or the software installation process on the Raspberry Pi. By default, Raspberry Pi uses the repository from United Kingdom (UK). If your International internet connection is slow, this will slow down the update process or install software on the Raspberry Pi.
Raspbian is a derivative Linux from Debian. We can change its repositories using the mirror closest to our location.
Raspbian provides Mirror Repositories almost all over the world, you can see on page https://www.raspbian.org/RaspbianMirrors. if you are from Indonesia, you can replace the repository with an Indonesian repository.
When this article is written, there are 3 Indonesian repositories. You can test the speed of latency by using the ping command on your PC. If the Indonesian repository is not fast enough, at least you can use the Singapore repository, which is geographically closer to Indonesia.

To change the repository on Raspbian is very easy. Only needed to edit /etc/apt/sources.list file, then enter the repository URL. In this example, we will try replacing the repository to DATAUTAMA-NET-ID.
sudo nano /etc/apt/sources.listComment on the active repository by adding a hash mark (#) at the beginning of the line, then add a new repository above it. I guess the end result is like this.
deb http://kartolo.sby.datautama.net.id/raspbian/raspbian stretch main contrib non-free rpi
#deb http://raspbian.raspberrypi.org/raspbian/ stretch main contrib non-free rpi
# Uncomment line below then 'apt-get update' to enable 'apt-get source'
#deb-src http://raspbian.raspberrypi.org/raspbian/ stretch main contrib non-free rpi
When done, save it by pressing the CTRL+X button followed by confirmation Y. Make an update so that the Raspbian Package Manager uses a new repository.
sudo apt update
sudo apt upgrade -y
Your Raspbian repository has now moved to the Indonesian repository.
]]>