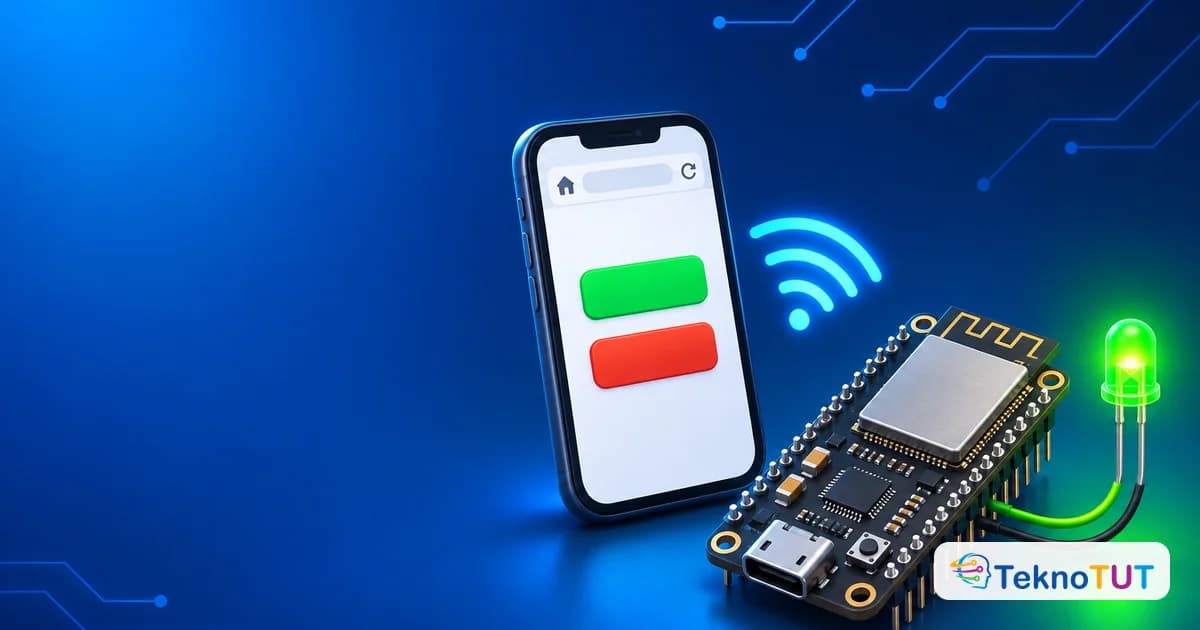
If you have already made an LED blink with an ESP32, you have probably started wondering: how do I turn that LED on from my phone, without touching the board at all? Isn't that the whole point of IoT (Internet of Things)?
Many beginners assume this requires a dedicated Android app, a paid cloud service, or an extra server. It doesn't. The ESP32 has built-in WiFi and enough power to run a small web server all by itself. That means your phone or laptop only needs to open a browser, type the ESP32's IP address, and tap a button on a web page.
In this article, we will walk through how to build an ESP32 web server that controls an LED from the browser, from understanding how it works, wiring the LED, and writing the program with the built-in WebServer library, to reaching it by the name esp32.local and fixing the most common problems. Let's get started!
What is an ESP32 Web Server?
A web server is a program that waits for a request from a browser and answers with a response, usually an HTML page. The websites you open every day work this way, except their servers are large computers in a data center.
In this project, the ESP32 plays that server role. The little board joins your home WiFi, gets an IP address, and "listens" on port 80 (the standard HTTP port). When a browser on the same network opens that IP address, the ESP32 sends back an HTML page with buttons. When a button is pressed, the browser sends a new request, and the ESP32 turns the LED on or off accordingly.
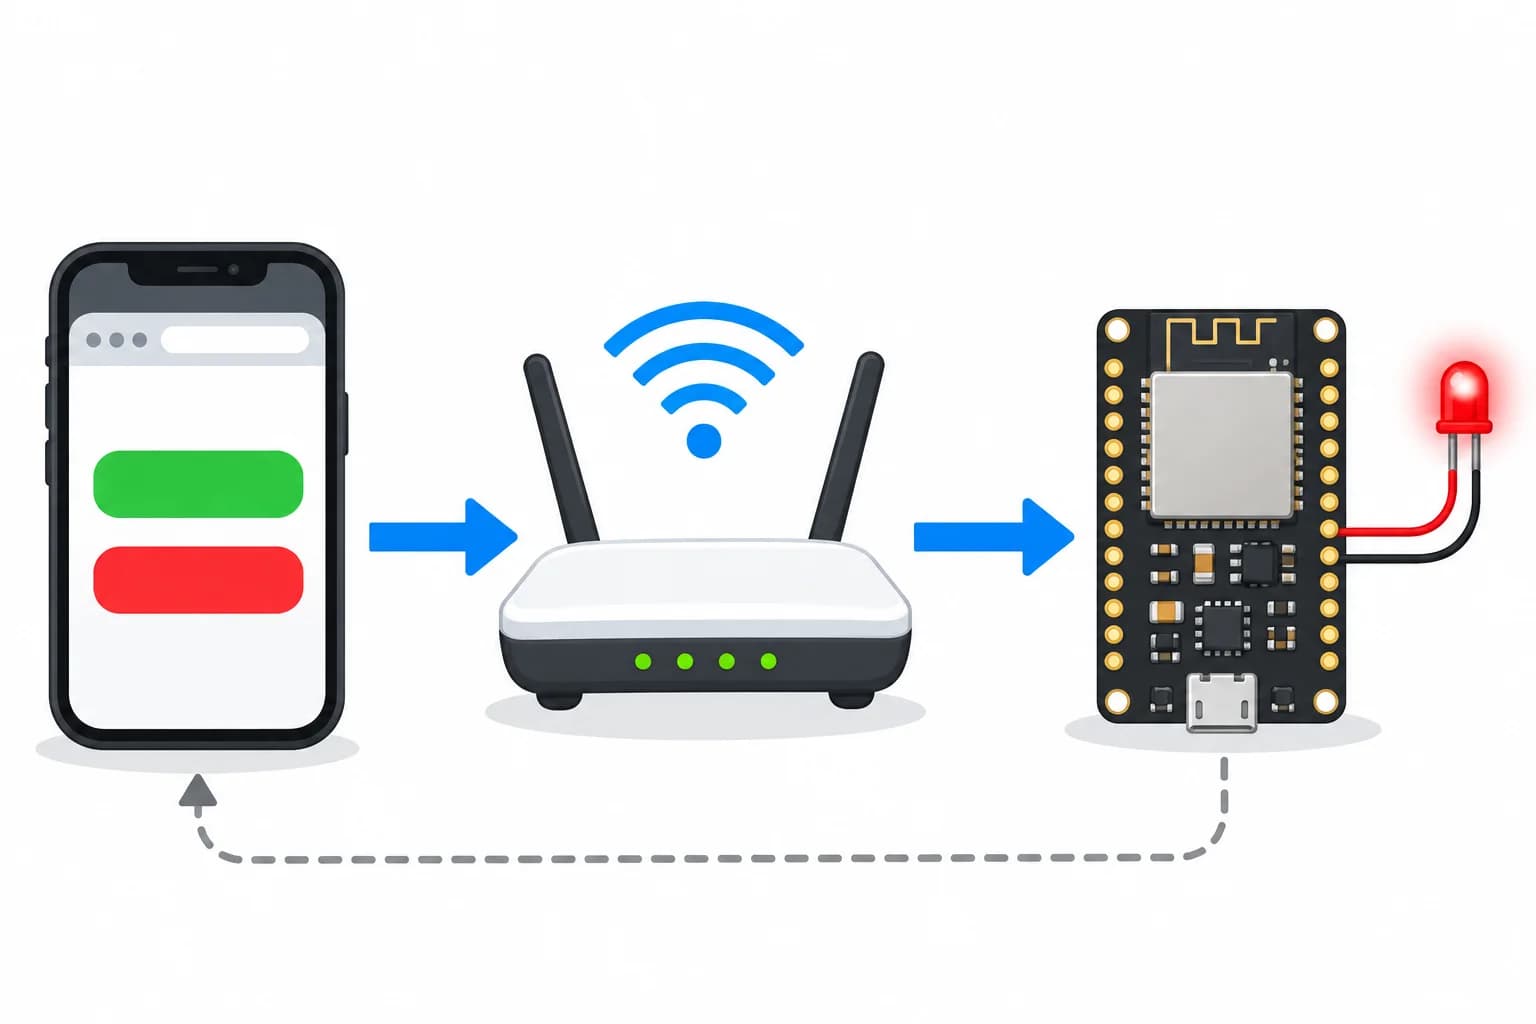 Illustration of the flow: the phone's browser sends a request through the WiFi router to the ESP32, and the ESP32 turns on the LED.
Think of the ESP32 as a waiter in a small diner. The browser arrives with an order ("please turn on the LED"), the waiter takes care of it, then comes back with an answer ("the LED is on"). Simple, right?
Why Run a Web Server on the ESP32?
There are several ways to control an ESP32 remotely, but a web server is the best starting point for beginners:
- No special app needed: any device with a browser (phone, tablet, laptop) works right away.
- No internet or cloud required: everything runs on your local WiFi network, with no account and no subscription fee.
- No extra library to install: the
WebServerlibrary ships with the Arduino core for ESP32. - Easy to extend: the same concept works for switching relays, showing sensor data, or building a simple API.
To keep things balanced, here are the limitations:
- Only reachable from the same network. The page cannot be opened from outside your home (and for security reasons, that is how it should be).
- One request at a time. The built-in
WebServerlibrary is synchronous. That is plenty for you or your family, but not for hundreds of visitors. - No encryption. Communication uses plain HTTP, not HTTPS.
Preparation
This article continues from how to program the ESP32 with Arduino IDE. If your Arduino IDE does not know about ESP32 boards yet, please follow that article first.
Here is what you need:
- An ESP32 DevKit V1 (30 or 38 pins) and a micro USB cable that supports data.
- Arduino IDE 2.3.x with the esp32 by Espressif Systems package version 3.3.x. The code in this article is written for that version (the latest stable release at the time of writing is 3.3.12).
- One 5 mm LED, one 220Ω resistor (or 330Ω), a breadboard, and 2 female-to-male jumper wires.
- A 2.4 GHz WiFi network along with its name (SSID) and password. The classic ESP32 does not support 5 GHz WiFi.
- A phone or laptop connected to the same WiFi network.
Voltage warning: ESP32 GPIO pins operate at 3.3V and are not 5V tolerant. This project only lights a small LED, so it is safe. However, never connect a lamp or any mains-powered appliance directly to the ESP32. That requires a relay module and a solid understanding of electrical safety.
How to Build an ESP32 Web Server
Step #1: Wire the LED to the ESP32
The circuit is the same as the blinking LED project: we use GPIO 23 as the output. Wire the components according to this connection table:
| From | To |
|---|---|
| ESP32 pin D23 (GPIO 23) | One leg of the 220Ω resistor |
| The other resistor leg | The LED's long leg (anode, +) |
| The LED's short leg (cathode, −) | ESP32 GND pin |
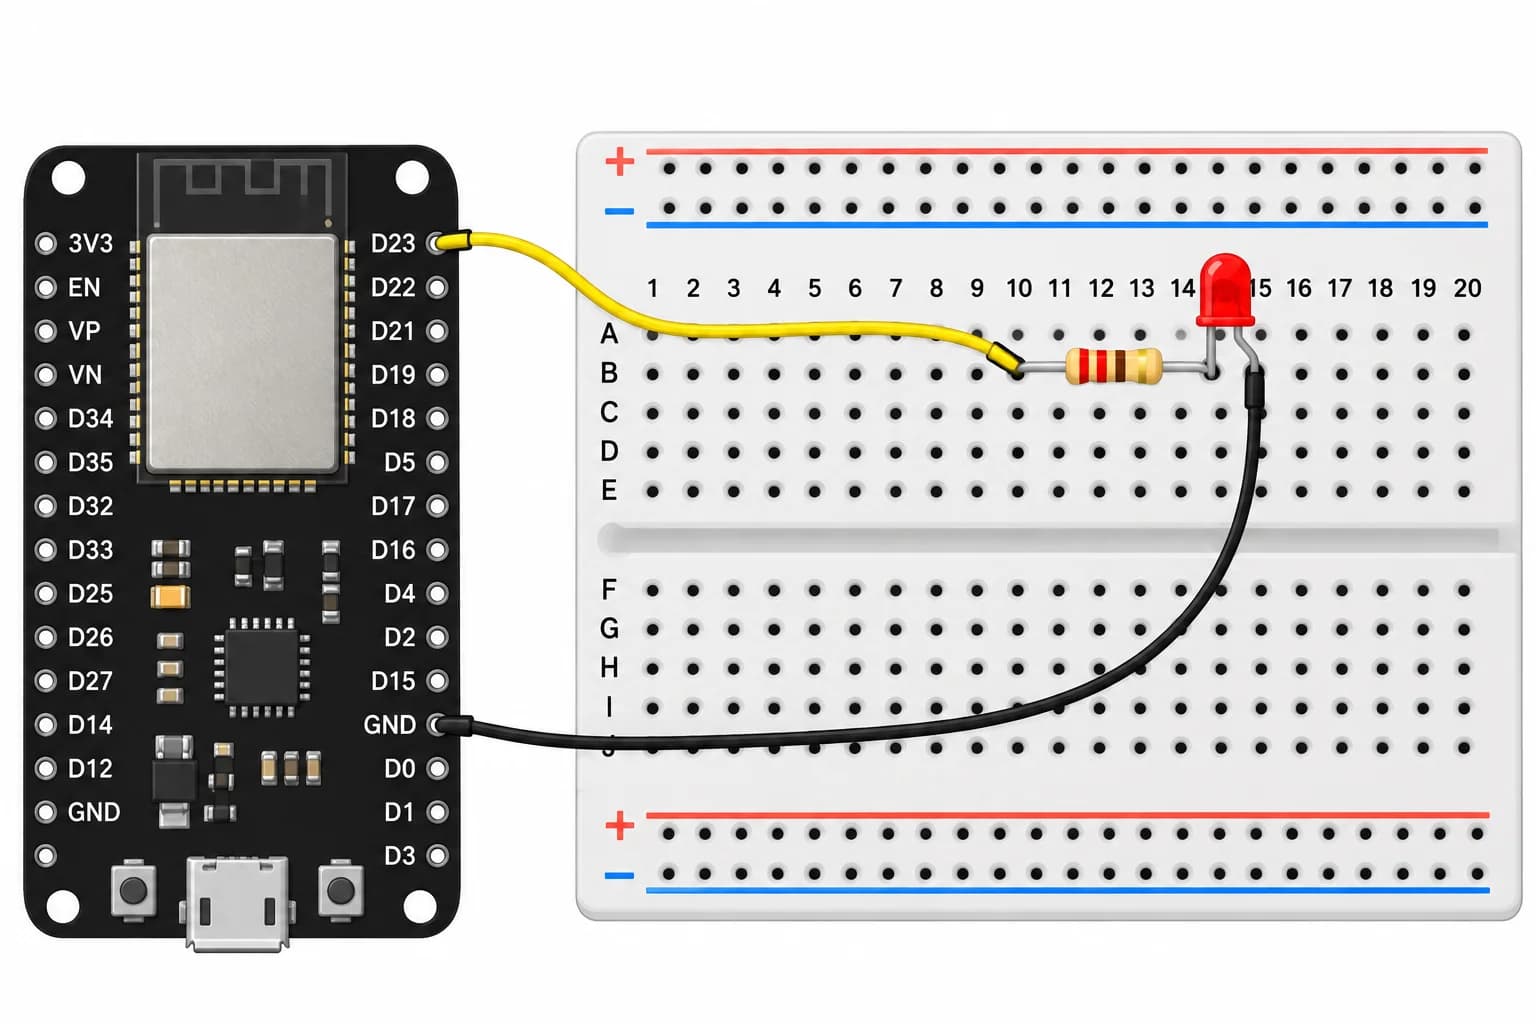 Illustration of the LED circuit on a breadboard. Follow the connection table above.
Don't have an LED and resistor yet? You can still follow this tutorial with the board's built-in blue LED. Just change the value of LED_PIN in the code to 2 (this applies to DevKit V1 boards whose LED is wired to GPIO 2).
Step #2: Write the Web Server Program
Open Arduino IDE, create a new sketch via File → New Sketch, then replace its entire content with the code below. Don't forget to replace YourWiFiName and YourWiFiPassword:
#include <WiFi.h>
#include <WebServer.h>
#include <ESPmDNS.h>

const char* ssid     = "YourWiFiName";
const char* password = "YourWiFiPassword";

const int LED_PIN = 23;   // GPIO the LED is connected to
bool ledOn = false;       // keeps the current LED state

WebServer server(80);     // web server on port 80 (HTTP)

// The HTML page is stored as a raw string so it stays readable
const char INDEX_HTML[] = R"rawliteral(
<!DOCTYPE html>
<html lang="en">
<head>
  <meta charset="UTF-8">
  <meta name="viewport" content="width=device-width, initial-scale=1">
  <title>ESP32 Web Server</title>
  <style>
    body { font-family: sans-serif; text-align: center; margin-top: 48px; }
    button { width: 160px; padding: 16px; margin: 8px; font-size: 18px;
             border: none; border-radius: 8px; color: white; }
    .on  { background: green; }
    .off { background: crimson; }
  </style>
</head>
<body>
  <h1>ESP32 Web Server</h1>
  <p>LED status: <strong>{{STATUS}}</strong></p>
  <form action="/led" method="POST">
    <button class="on" name="state" value="on">TURN ON</button>
    <button class="off" name="state" value="off">TURN OFF</button>
  </form>
</body>
</html>
)rawliteral";

// GET / : send the main page with the latest LED status
void handleRoot() {
  String html = INDEX_HTML;
  html.replace("{{STATUS}}", ledOn ? "ON" : "OFF");
  server.send(200, "text/html", html);
}

// POST /led : receive the command from the buttons (state=on/off)
void handleLed() {
  String state = server.arg("state");

  if (state == "on") {
    ledOn = true;
  } else if (state == "off") {
    ledOn = false;
  } else {
    server.send(400, "text/plain", "Parameter state must be on or off");
    return;
  }

  digitalWrite(LED_PIN, ledOn ? HIGH : LOW);
  Serial.println(ledOn ? "LED on" : "LED off");

  // send the browser back to the main page
  server.sendHeader("Location", "/");
  server.send(303);
}

// GET /status : LED status as JSON
void handleStatus() {
  String json = "{\"led\":\"";
  json += ledOn ? "on" : "off";
  json += "\"}";
  server.send(200, "application/json", json);
}

// any other unknown address
void handleNotFound() {
  server.send(404, "text/plain", "Page not found");
}

void setup() {
  Serial.begin(115200);
  pinMode(LED_PIN, OUTPUT);
  digitalWrite(LED_PIN, LOW);

  // connect to WiFi
  WiFi.mode(WIFI_STA);
  WiFi.begin(ssid, password);
  Serial.print("Connecting to WiFi");
  while (WiFi.status() != WL_CONNECTED) {
    delay(500);
    Serial.print(".");
  }
  Serial.println();
  Serial.print("Connected! IP address: ");
  Serial.println(WiFi.localIP());

  // enable the esp32.local name on the local network
  if (MDNS.begin("esp32")) {
    MDNS.addService("http", "tcp", 80);
    Serial.println("mDNS active: http://esp32.local");
  }

  // register the routes and the functions that handle them
  server.on("/", HTTP_GET, handleRoot);
  server.on("/led", HTTP_POST, handleLed);
  server.on("/status", HTTP_GET, handleStatus);
  server.onNotFound(handleNotFound);

  server.begin();
  Serial.println("Web server running on port 80");
}

void loop() {
  server.handleClient();  // serve incoming requests
  delay(2);               // short pause so other tasks can run
}
The code is fairly long, but don't worry. We will break it down piece by piece in the Understanding How the Code Works section once the program is running.
Step #3: Upload and Note the IP Address
Make sure the ESP32 Dev Module board and the correct port are selected in the Tools menu, then click the Upload button. If the upload gets stuck at Connecting...., press and hold the BOOT button on the board until the upload percentage starts moving.
When the upload finishes, open Tools → Serial Monitor (Ctrl+Shift+M) and set the speed to 115200 baud. Press the EN button on the board if no message shows up. The output looks roughly like this:
Connecting to WiFi.....
Connected! IP address: 192.168.1.37
mDNS active: http://esp32.local
Web server running on port 80
Write down the IP address. In this article's examples it is 192.168.1.37, while the address on your network will almost certainly be different.
Step #4: Open the Web Page in a Browser
Make sure your phone or laptop is connected to the same WiFi network as the ESP32. Open a browser and type the IP address into the address bar, starting with http://. In this example the address is http://192.168.1.37.
You will see a page titled ESP32 Web Server, the text LED status: OFF, and two buttons: a green TURN ON and a red TURN OFF.
Tap TURN ON. The LED on the breadboard lights up and the status text changes to ON. Tap TURN OFF to switch it off again. Pretty cool, right? You have just controlled hardware through a web page you built yourself.
Important: type
http://in full. Some browsers automatically tryhttps://, but our ESP32 only serves HTTP, so the page will not open.
Step #5: Test with curl (Optional)
Because this web server speaks plain HTTP, you can also control it from a terminal. This is handy if you later want a script or another application to drive the ESP32.
Read the LED status with the following command (replace the IP address with yours):
curl http://192.168.1.37/statusThe output looks roughly like this:
{"led":"off"}Then turn the LED on by sending a POST request:
curl -i -X POST -d "state=on" http://192.168.1.37/ledThe output looks roughly like this:
HTTP/1.1 303 See Other
Location: /
Content-Length: 0
Connection: close
If the LED lights up and you get a 303 See Other response, the ESP32 received the command correctly.
Understanding How the Code Works
Now, let's look at what actually happens inside that program.
Creating the Server Object
The line WebServer server(80); creates a web server that listens on port 80. The WiFi.h, WebServer.h, and ESPmDNS.h libraries all ship with the esp32 package, so there is nothing to install through the Library Manager.
Registering Routes
Inside setup(), we tell the server which addresses it serves and which function handles each one:
server.on("/", HTTP_GET, handleRoot);
server.on("/led", HTTP_POST, handleLed);
server.on("/status", HTTP_GET, handleStatus);
server.onNotFound(handleNotFound);
Each address-and-function pair is called a route. Here is the summary:
| Route | Method | Purpose |
|---|---|---|
/ |
GET | Shows the HTML page with the status and buttons |
/led |
POST | Turns the LED on or off based on the state parameter |
/status |
GET | Returns the LED status as JSON |
| anything else | any | Responds with 404 |
Sending the HTML Page
The HTML page lives in the INDEX_HTML constant using a raw string literal (R"rawliteral( … )rawliteral"). This lets us write HTML as-is, without putting a \ in front of every quotation mark.
Inside that HTML there is a {{STATUS}} placeholder. Every time the page is requested, handleRoot() copies the HTML into a String, replaces the placeholder with ON or OFF, and sends it with server.send(200, "text/html", html). The number 200 is the HTTP status code that means "OK".
Handling the Buttons
Both buttons sit inside a <form> with method="POST" and action="/led". When one is pressed, the browser sends a POST request to /led with the body state=on or state=off, matching the button's value attribute. On the ESP32 side, that value is read with server.arg("state").
After changing the LED, the ESP32 does not send a new page. Instead, it replies with code 303 and a Location: / header. This response asks the browser to open the main page again. Thanks to this pattern, the LED does not change when you hit the browser's refresh button.
Why POST instead of links like
/onand/off? Many tutorials use plain links (the GET method) to switch the LED. That is shorter, but browsers and chat apps often open links automatically to build previews, so the LED could turn on by itself. The general rule of the web: GET is only for reading, POST is for changing something.
Serving Requests in loop()
The server.handleClient() call inside loop() is the heart of this web server. Each time it runs, it checks whether a request has come in and then calls the matching route function.
For that reason, don't put long delay() calls inside loop(). If loop() is blocked for 5 seconds, the browser has to wait that long for an answer. For periodic work (such as reading a sensor every 10 seconds), use a time check with millis() instead.
Reaching the ESP32 by the Name esp32.local
Memorizing an IP address is a hassle, especially since it can change when the router restarts. That is why our program also enables mDNS (multicast DNS) with the line MDNS.begin("esp32").
With mDNS, the ESP32 announces its name on the local network, so you can open http://esp32.local in the browser without knowing its IP address. If you have more than one ESP32, give each board a different name, for example MDNS.begin("porch-light") to reach it at http://porch-light.local.
mDNS support depends on the device opening the page:
| Device | .local support |
|---|---|
| macOS, iPhone, iPad | ✅ built in |
| Windows 10/11 | ✅ generally built in |
| Linux | ✅ when the Avahi service is running (default on Ubuntu Desktop) |
| Android | ⚠️ generally only on newer versions (Android 12 and later) |
If esp32.local does not open on your device, just use the IP address. To keep the IP address from changing, the cleanest approach is to set up a DHCP reservation (sometimes called a static lease or address reservation) in your router's admin page, so the router always hands the same IP to your ESP32.
Tips for Extending the ESP32 Web Server
Tip #1: Don't Expose It to the Internet
This web server has no login and no encryption. As long as it is only reachable from your home WiFi, the risk is small. However, do not set up port forwarding from your router to the ESP32 to reach it from outside, because anyone on the internet would be able to press your buttons.
The WebServer library does provide server.authenticate() and server.requestAuthentication() for a simple login (HTTP Basic Auth). That helps keep curious guests on your WiFi away, but keep in mind that over plain HTTP, the username and password are still sent unencrypted.
Tip #2: Add More Devices
To control more than one LED, simply add a parameter. For example, the form sends pin=1&state=on, and handleLed() reads server.arg("pin") to decide which GPIO to change. Pick pins that are safe to use as outputs, and avoid GPIO 6–11 and GPIO 34–39 as explained in the ESP32 basics article.
Tip #3: Show Sensor Data
The /status route that returns JSON is the basic pattern of an API. You can add other data to it, such as temperature and humidity from a DHT22 sensor, and display it on the web page. If you want to get to know the sensor first, read how to read a DHT22 sensor with a Raspberry Pi. The sensor works the same way; only the board is different.
Tip #4: Know the Limits of the WebServer Library
The built-in WebServer library serves requests one at a time. For heavier projects, such as a page that updates in real time over WebSocket or is opened by many devices at once, people usually reach for an asynchronous third-party library such as ESPAsyncWebServer. For learning and simple home projects, the built-in library is more than enough.
Troubleshooting Common Problems
| Problem | Likely Cause | Solution |
|---|---|---|
| Serial Monitor keeps printing dots | Wrong SSID/password, or the WiFi is 5 GHz only | Check the SSID and password capitalization, make sure the 2.4 GHz network is enabled |
| The page will not open | The phone is on mobile data or a different WiFi | Connect the phone to the same WiFi as the ESP32 |
| The page will not open even on the same WiFi | AP isolation / client isolation on the router (often enabled on guest WiFi) | Turn the feature off or use the main network |
| Browser shows a secure connection error | The browser is trying https:// |
Type the full address with http:// |
esp32.local cannot be found |
The device does not support mDNS | Use the IP address |
| The page opens, but the LED stays off | LED legs reversed or wrong pin | Long leg to the resistor, short leg to GND, check LED_PIN |
| ESP32 keeps restarting when WiFi is active (brownout) | Not enough power from the USB port | Try another USB cable or port, avoid unpowered USB hubs |
| The page responds slowly | A long delay() in loop() |
Replace it with a time check using millis() |
Conclusion
From this article, we can conclude that building a web server on the ESP32 requires neither an extra library nor a cloud service. With just the built-in WebServer library, the ESP32 can serve an HTML page, receive commands from buttons, and control an LED from a browser on your phone or laptop.
The pattern is always the same: connect the ESP32 to WiFi, register routes with server.on(), send responses with server.send(), and keep calling server.handleClient() inside loop(). Once you understand this pattern, swapping the LED for a relay, a sensor, or another device is just a matter of adding routes.
Things to Remember
- The ESP32 and your device must be on the same WiFi network.
- Use GET to read data and POST to change something.
- Don't put long
delay()calls inloop()so the server stays responsive. - This web server has no encryption and no login, so don't expose it to the internet.
- ESP32 GPIO pins operate at 3.3V, and never connect mains voltage without a relay and proper safety knowledge.
Next Steps
From here, you can try adding a second LED, showing sensor data on the web page, or sending data to another server using the MQTT protocol.
Resources and Useful Links
- Arduino core for ESP32 documentation (Espressif)
- WebServer library source code and examples on GitHub
- ESPmDNS library examples on GitHub
- arduino-esp32 release notes
Have a question or run into trouble while following this tutorial? Feel free to ask, and stay tuned to Teknotut for the next ESP32 project!
I hope this article helps.