Jika anda adalah seorang developer aplikasi tentu anda tidak asing mendengar istilah PaaS (Platform as Services) dimana anda bisa mengembangkan aplikasi tanpa harus pusing dengan infrastruktur server. Sebutlah misalnya Heroku atau AWS Elastic Beanstalk dari AWS, mereka adalah penyedia layanan PaaS senior yang sudah sangat terkenal.
Sebelum lebih jauh pembahasan tentang CapRover, mari kita perdalam dahulu pengertian kita tentang PaaS.
Apa itu PaaS (Platform As Services)?
PaaS (Platform as a Service) adalah jenis layanan cloud computing yang menyediakan platform untuk membangun, menjalankan, dan mengelola aplikasi web tanpa perlu mengelola infrastruktur server secara manual. PaaS menyediakan seperangkat alat, teknologi, dan layanan yang dibutuhkan untuk membangun dan mengelola aplikasi web, termasuk database, sistem operasi, middleware, dan lain-lain.
Dengan menggunakan PaaS, pengembang web dapat fokus pada membangun aplikasi tanpa perlu pusing mengelola infrastruktur server. PaaS juga memudahkan deployment aplikasi ke produksi dengan menyediakan fitur-fitur seperti continuous integration dan delivery, scaling, dan monitoring.
Beberapa contoh layanan PaaS yang populer adalah Heroku, AWS Elastic Beanstalk, Google Cloud Platform, Microsoft Azure dan sekarang bahkan Digital Ocean pun menyediakan PaaS.
Layanan tersebut memiliki Infrastruktur server dan jaringan yang di kelola masing-masing penyedia PaaS. Oleh karena itu, meskipun harga mereka relatif lebih murah, namun tetap terasa mahal jika aplikasi kita semakin berkembang dan membutuhkan sumber daya yang lebih besar.
Nah, tentu kita akan berfikir, bagaimana jika kita memiliki PaaS sendiri, di infrastuktur server kita sendiri, jadi kita cukup mengeluarkan biaya untuk server saja. Solusinya adalah CapRover!
Apa itu CapRover?
CapRover adalah platform yang memungkinkan Anda untuk mengelola aplikasi web dan server dengan mudah baik di VPS (Virtual Private Server), dedicated server, maupun cloud hosting seperti Digital Ocean, Amazon AWS, Google Cloud, dan lain-lain.
CapRover menyediakan antarmuka web yang intuitif yang memudahkan pengguna untuk mengatur dan mengelola aplikasi web, termasuk menginstall, memulai, menghentikan, dan menghapus aplikasi. CapRover juga menyediakan fitur-fitur seperti load balancer, reverse proxy, auto SSL, dan integrasi dengan Git yang memudahkan Anda untuk mengelola aplikasi web dengan lebih cepat dan efisien.
CapRover merupakan platform yang cocok bagi pengembang web atau pengguna yang ingin mengelola aplikasi web dengan mudah di hosting cloud tanpa harus mengelola infrastruktur server secara manual. CapRover tersedia untuk diinstall di berbagai hosting cloud seperti DigitalOcean, Linode, AWS EC2, dan Google Cloud.
Dengan kata lain, CapRover merupakan PaaS yang di kelola sendiri dan gratis karena bersifat open-source. Didalamnya sudah terdapat aplikasi-aplikasi modern yang siap di install dengan mudah hanya dengan hanya satu klik.
Sudah di sediakan juga pengaturan domain yang terintegrasi dengan automatic SSL. Jadi anda tidak perlu lagi mengingat-ngingat kapan anda harus memperpanjang Sertifikat SSL, karena semuanya sudah otomatis.
Menarik bukan?
Beberapa contoh aplikasi yang tersedia di CapRover adalah sebagai berikut;
Database
- MongoDB
- MongoExpress
- MsSQL
- MySQL
- Redis
- PhpMyAdmin
- PostgreSQL
- Adminer
- Apache CouchDB
- Gitea
- ElasticSearch
- Dan lain-lain..
Blog dan Kontent
- WordPress
- Ghost
- Prisma 1
- Strapi
- Minio
- Dan lain-lain..
Dev Tools
- Jenkins
- Drone.io
- Hasura
- Nexus3
- Dan lain-lain..
Aplikasi Lainnya
- Parse
- NextCloud
- Rainloop
- Thumbor
- OhMyForm
Dan sebetulnya masih banyak lagi, jika CapRover anda sudah terinstall akan terlihat semua aplikasi yang siap kita install dengan hanya 1 klik.
Mengapa harus CapRover?
Berikut adalah beberapa kelebihan yang dapat Anda temukan pada CapRover, layanan PaaS (Platform as a Service) yang memungkinkan Anda untuk mengelola aplikasi web dan server di VPS (Virtual Private Server), Dedicated Server atau hosting cloud:
- Antarmuka yang intuitif
CapRover menyediakan antarmuka web yang mudah digunakan yang memudahkan Anda untuk mengelola aplikasi web dengan cepat dan mudah. - Fitur deployment yang lengkap
CapRover menyediakan fitur-fitur seperti continuous integration, delivery, dan rollback yang memudahkan Anda untuk mengelola aplikasi web di stage produksi dengan lebih efisien. - Scalability
CapRover menyediakan fitur scaling yang memudahkan Anda untuk mengatur jumlah instance aplikasi sesuai kebutuhan. - Monitoring dan logging
CapRover menyediakan fitur monitoring yang memudahkan Anda untuk mengetahui performa aplikasi dan mengidentifikasi masalah yang mungkin terjadi. CapRover juga menyediakan fitur logging yang memudahkan Anda untuk menganalisis aktivitas aplikasi. - Dokumentasi dan komunitas yang aktif
CapRover memiliki dokumentasi yang lengkap dan komunitas yang aktif yang dapat membantu Anda mengelola aplikasi web dengan lebih efisien.
Dengan menginstall CapRover di VPS atau Dedicated Server, kita seperti memiliki PaaS sendiri, sehingga kita tidak perlu khawatir akan pembengkakan biaya yang di akibatkan karena kelebihan sumber daya server.
Install CapRover
Installasi CapRover terbilang sangat mudah, karena di DigitalOcean sendiri sudah di siapkan One Click Install di marketplace Digital Ocean, jadi anda tinggal memilih spesifikasi server anda, dan melanjutkan installasi, CapRover pun sudah siap di gunakan.
Namun, kita akan coba menginstall CapRover tahap-demi tahap agar kita lebih mengerti dan jika suatu saat terjadi masalah, kita akan dengan mudah mendapatkan solusinya.
Dalam artikel kali ini, kami akan menggunakan VPS dari Digital Ocean dengan RAM 1GB dan Sistem Operasi Ubuntu 20.04.
Prasyarat
Sebelum melanjutkan, berikut adalah beberapa yang di butuhkan untuk menginstall CapRover.
- VPS atau Dedicated Server: Minimal RAM 1GB dengan Sistem Operasi Ubuntu 18 Keatas. Dalam artikel kali ini kami menggunakan Ubuntu 20.04
- Nama domain: Anda harus memiliki nama domain terlebih dahulu, tidak masalah jika domain tersebut sudah di gunakan, karena kita hanya akan menggunakan Sub domain yang di setting di DNS server. Dalam artikel kali ini kami akan menggunakan domain teknotut.com dengan subdomain app.teknotut.com.
- DNS Server: Jika anda sudah membeli domain, biasanya di sediakan DNS server, anda bisa menggunakan DNS server bawaan provider atau menggunakan provider lain seperti Cloudflare. Dalam artikel kali ini kami akan menggunakan DNS dari Cloudflare.
Proses Installasi
Jika semua prasyarat diatas sudah terpenuhi, silahkan akses server anda menggunakan SSH dan ikuti proses instalasi CapRover di bawah ini.
Langkah #1: Konfigurasi Firewall
Biasanya jika anda menggunakan Ubuntu fresh install, akan memblok beberapa port yang biasanya tidak digunakan. Silahkan ketik perintah di bawah ini untuk membuka port yang di butuhkan di CapRover;
ufw allow 80,443,3000,996,7946,4789,2377/tcp; ufw allow 7946,4789,2377/udp;Langkah #2: Konfigurasi Swap
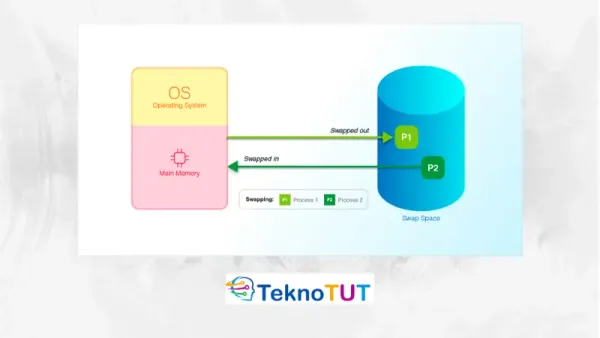
Karena dalam artikel kali ini kami menggunakan RAM 1GB, maka kami akan mensetting Swap sebesar 2GB (besaran swap disarankan 1.5x atau 2x dari besar RAM). Ketikan perintah dibawah ini untuk mengkonfigurasi Swap Memory sebesar 2GB.
sudo fallocate -l 2G /swapfile
sudo chmod 600 /swapfile
sudo mkswap /swapfile
sudo swapon /swapfile
echo '/swapfile none swap sw 0 0' | sudo tee -a /etc/fstab
sudo sysctl vm.swappiness=10
Untuk memahami konsep Swap memory dan konfigurasi swap di Linux, silahkan mengikuti artikel kami yang berjudul Memahami Swap Memory di Linux dan Konfigurasinya.
Langkah #3: Install Docker
Pada platform CapRover menggunakan Docker, sehingga di butuhkan Docker di Ubuntu anda, untuk menginstall docker silahkan ketik perintah berikut;
apt update
apt install -y apt-transport-https ca-certificates curl software-properties-common
curl -fsSL https://download.docker.com/linux/ubuntu/gpg | sudo apt-key add -
sudo add-apt-repository "deb [arch=amd64] https://download.docker.com/linux/ubuntu bionic stable"
sudo apt update
sudo apt -y install docker-ce
sudo systemctl start docker
sudo systemctl enable docker
Untuk memahami lebih jauh tentang docker container silahkan ikuti artikel kami yang berjudul Mengenal Docker Container.
Langkah #4: Install Image Docker Caprover
Selanjutnya kita akan menginstall CapRover di docker dari image utama terbaru CapRover, ketikan perintah berikut untuk menginstall CapRover;
docker run -p 80:80 -p 443:443 -p 3000:3000 -v /var/run/docker.sock:/var/run/docker.sock -v /captain:/captain caprover/caproverUntuk melihat versi lain dari CapRover, anda bisa mengunjungi halaman Docker Hub.
Selanjutnya, tunggu hingga proses instalasi selesai. Jika sudah selesai, tampilan di layar terminal anda kira-kira seperti ini;
December 29th 2022, 9:03:16.088 am    Fresh installation!
December 29th 2022, 9:03:16.090 am    Starting swarm at 157.230.47.xx:2377
Swarm started: tfas8le4csrgu84b7h8femevr
*** CapRover is initializing ***
Please wait at least 60 seconds before trying to access CapRover.
Tunggu sekitar 1 menit sebelum ke proses selanjutnya (Langkah #6).
Langkah #5: Install CapRover CLI (Opsional)
CapRover CLI (Command Line Interface) diperlukan untuk pengaturan awal dalam setting domain dan SSL utama CapRover. Namun langkah ini merupakan langkah opsional jadi anda tidak perlu melakukan langkah ini, karena setting domain dan SSL bisa dilakukan langsung di interface utama CapRover. Namun, jika anda nyaman menggunakan command line, anda bisa melanjutkan tahap ini.
CapRover CLI ditulis menggunakan Node.js, jadi silahkan anda menginstall terlebih dahulu Node.js di sistem anda, untuk menginstall Node.js, silahkan ikuti artikel kami tentang Cara Install Node.js. Setelah install Node.js berhasil, silahkan ketik perintah berikut untuk menginstall CapRover CLI;
npm install -g caproverLalu gunakan perintah di bawah ini untuk memulai konfigurasi domain dan SSL, lalu ikuti petunjuknya;
caprover serversetupLangkah #6: Konfigurasi Domain dan SSL
Buka server DNS domain anda untuk mengkonfigurasi sub domain ke alamat IP server anda. Pada konfigurasi DNS dalam contoh ini kita akan mengkonfigurasi *.app.teknotut.com mengarah ke IP server. Tanda * pada subdomain merupakan DNS wildcard, yang berarti apasaja text sebelum .app.teknotut.com akan diarahkan ke IP server tujuan.
Pada artikel ini kami menggunakan cloudflare sebagai DNS server domain, sehingga pengaturannya kira-kira seperti di bawah ini.

Setelah selesai, pastikan DNS sudah berjalan sempurna dengan melakukan ping ke host app.teknotut.com, jika sudah mereply dengan IP server berarti domain sudah mengarah dengan baik. Jika belum tunggu beberapa saat, mungkin pengaturan DNS anda sedang dalam propagasi DNS.
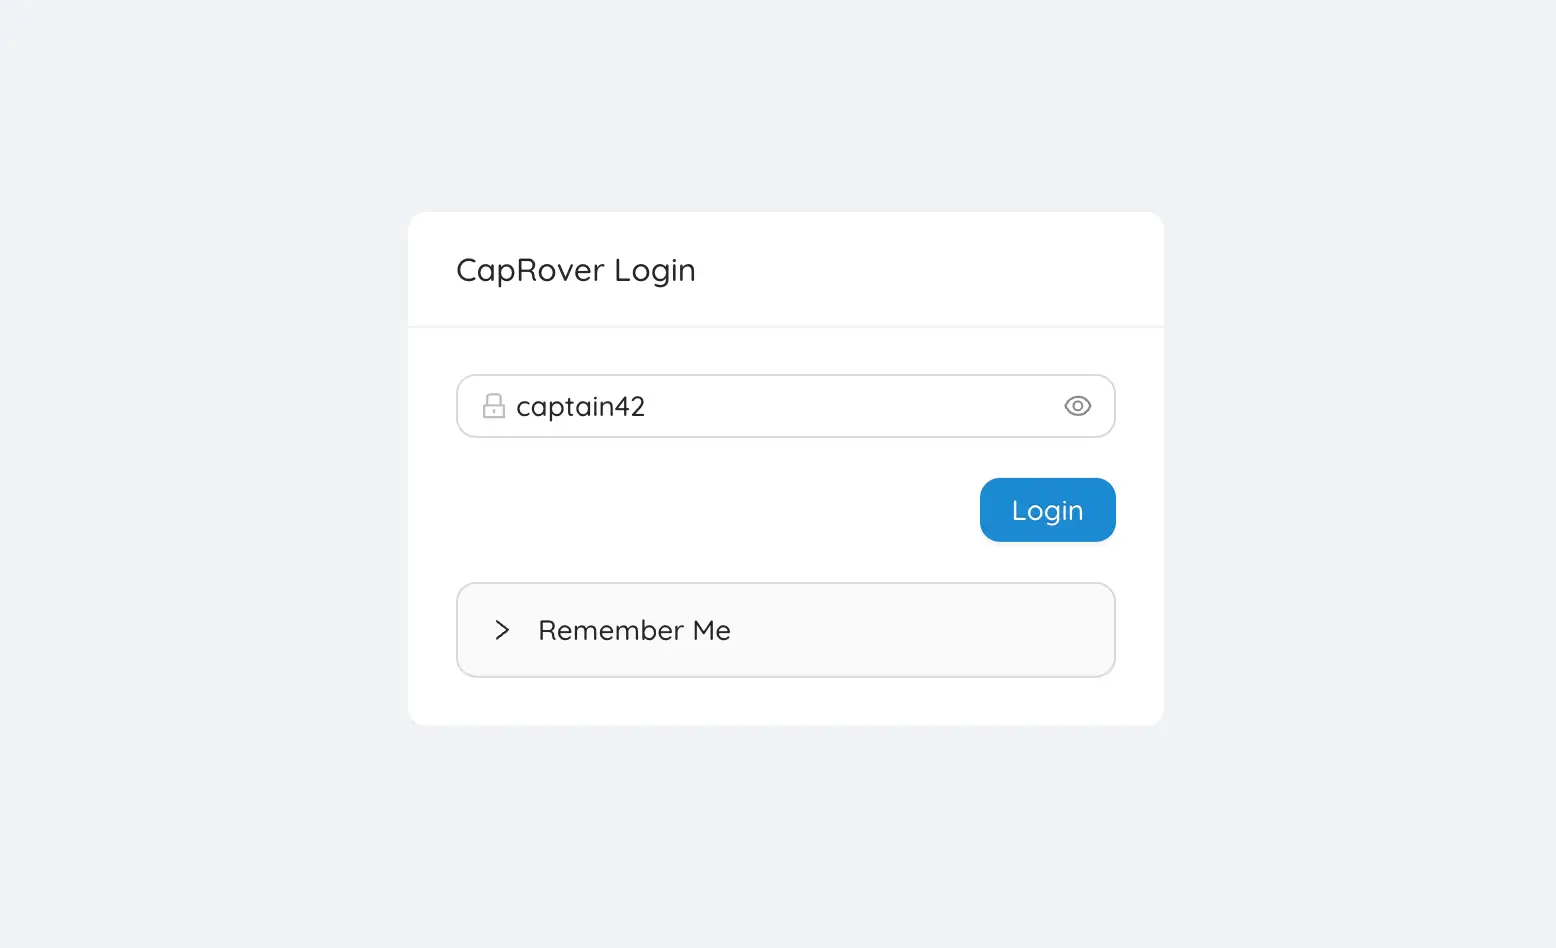
Sekarang, buka browser anda dan masuk ke halaman http://<IP ADDRESS>:3000, misalkan dalam hal ini server kami adalah 157.230.47.xx maka kami akan masuk ke http://157.230.47.xx:3000. Anda akan masuk ke halaman utama login CapRover, masukan password default CapRover yaitu: captain42.
Setelah login anda akan langsung masuk ke dashboard CapRover, masukan sub domain yang telah di konfigurasi tadi di root domain CapRover seperti pada gambar di bawah ini.
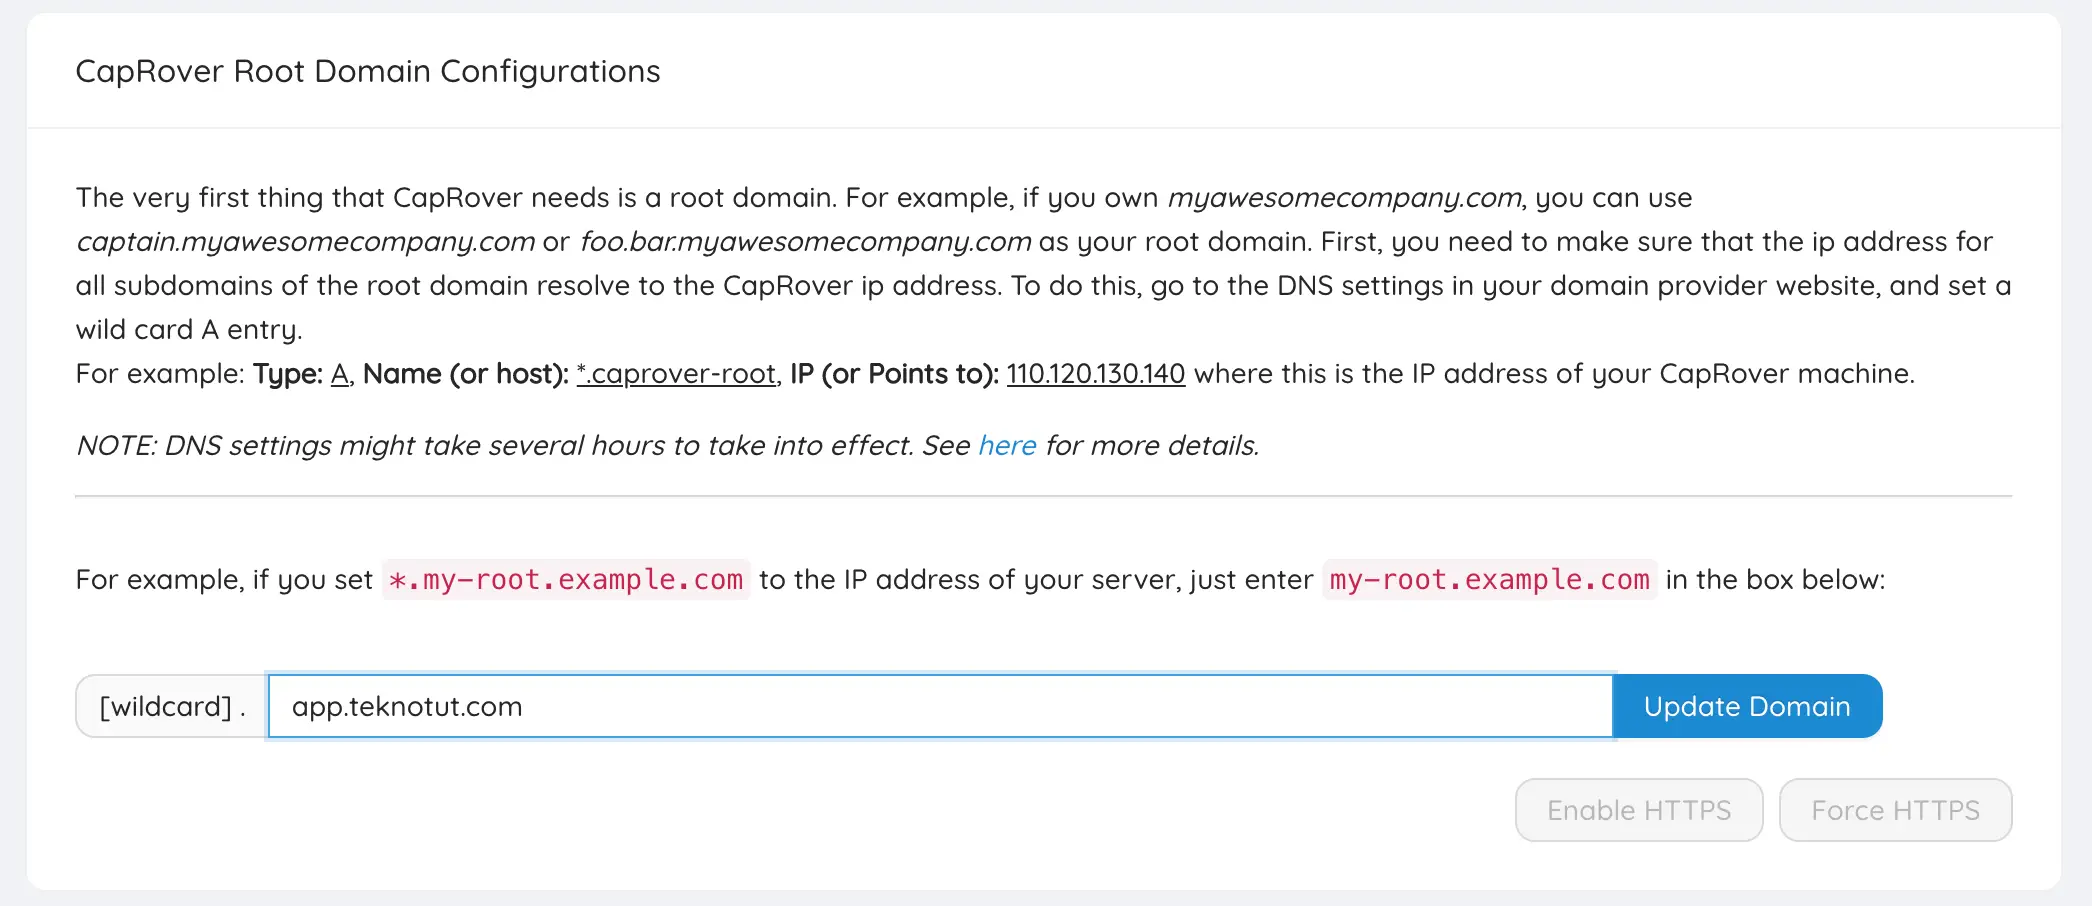
Klik pada tombol Update Domain, halaman akan otomatis meredirect ke captain.app.teknotut.com dan anda akan di minta login ulang. Setelah masuk kembali, klik pada Enable HTTPS, masukan alamat email anda (untuk data Let's Encrypt free SSL), setelah berhasil, klik pada tombol Force HTTPS, agar setiap kali anda mengakses CapRover anda akan di redirect ke https.
Langkah #7: Ganti Password Default (Penting)
Pada saat anda mengaktifkan Force HTTPS, anda akan di redirect ke halaman https dan harus login lagi. Login kembali dengan password default, lalu masuk ke menu Settings.
Masukan password default di Old password dan password baru anda di New Password.
Hore, sampai tahap ini, proses Instalasi CapRover anda selesai, selanjutnya kita akan coba menginstall salah satu aplikasi di CapRover yang baru ini.
Test Install Aplikasi (Wordpress)
OK, sekarang kita coba install salah satu aplikasi yang siap pakai, dalam hal ini kita akan coba install Wordpress 6.0.1. Pada saat artikel ini di tulis, versi Wordpress terbaru adalah versi 6.0.3, namun kita akan coba install versi 6.0.1. Nanti kita akan upgrade ke 6.0.3, dan kita simulasikan rollback ke versi 6.0.1 kembali, agar kita bisa memahami bagaimana cara upgrade dan bagaimana cara rollback jika upgrade ternyata tidak memuaskan.
Di dashboard CapRover anda klik pada menu Apps, lalu klik pada One-Click Apps/Databases.
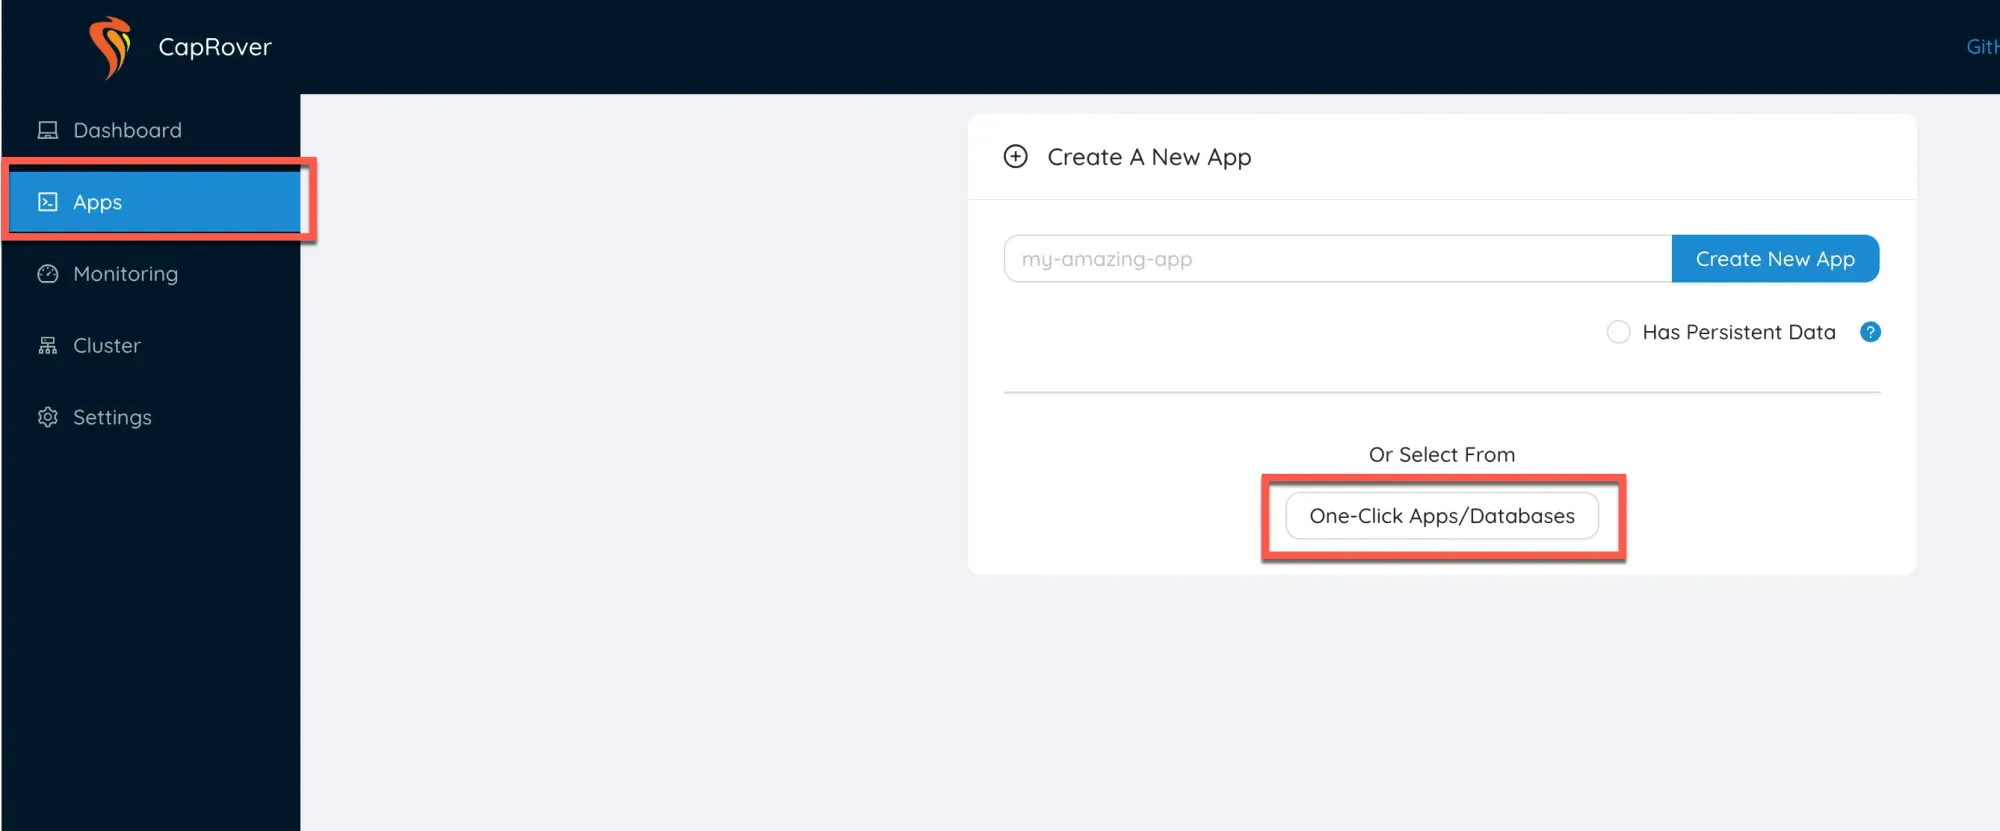
Halaman selanjutnya akan memunculkan semua aplikasi yang dapat di install di CapRover, ketik wordpress di kolom pencarian lalu pilih WordPress.
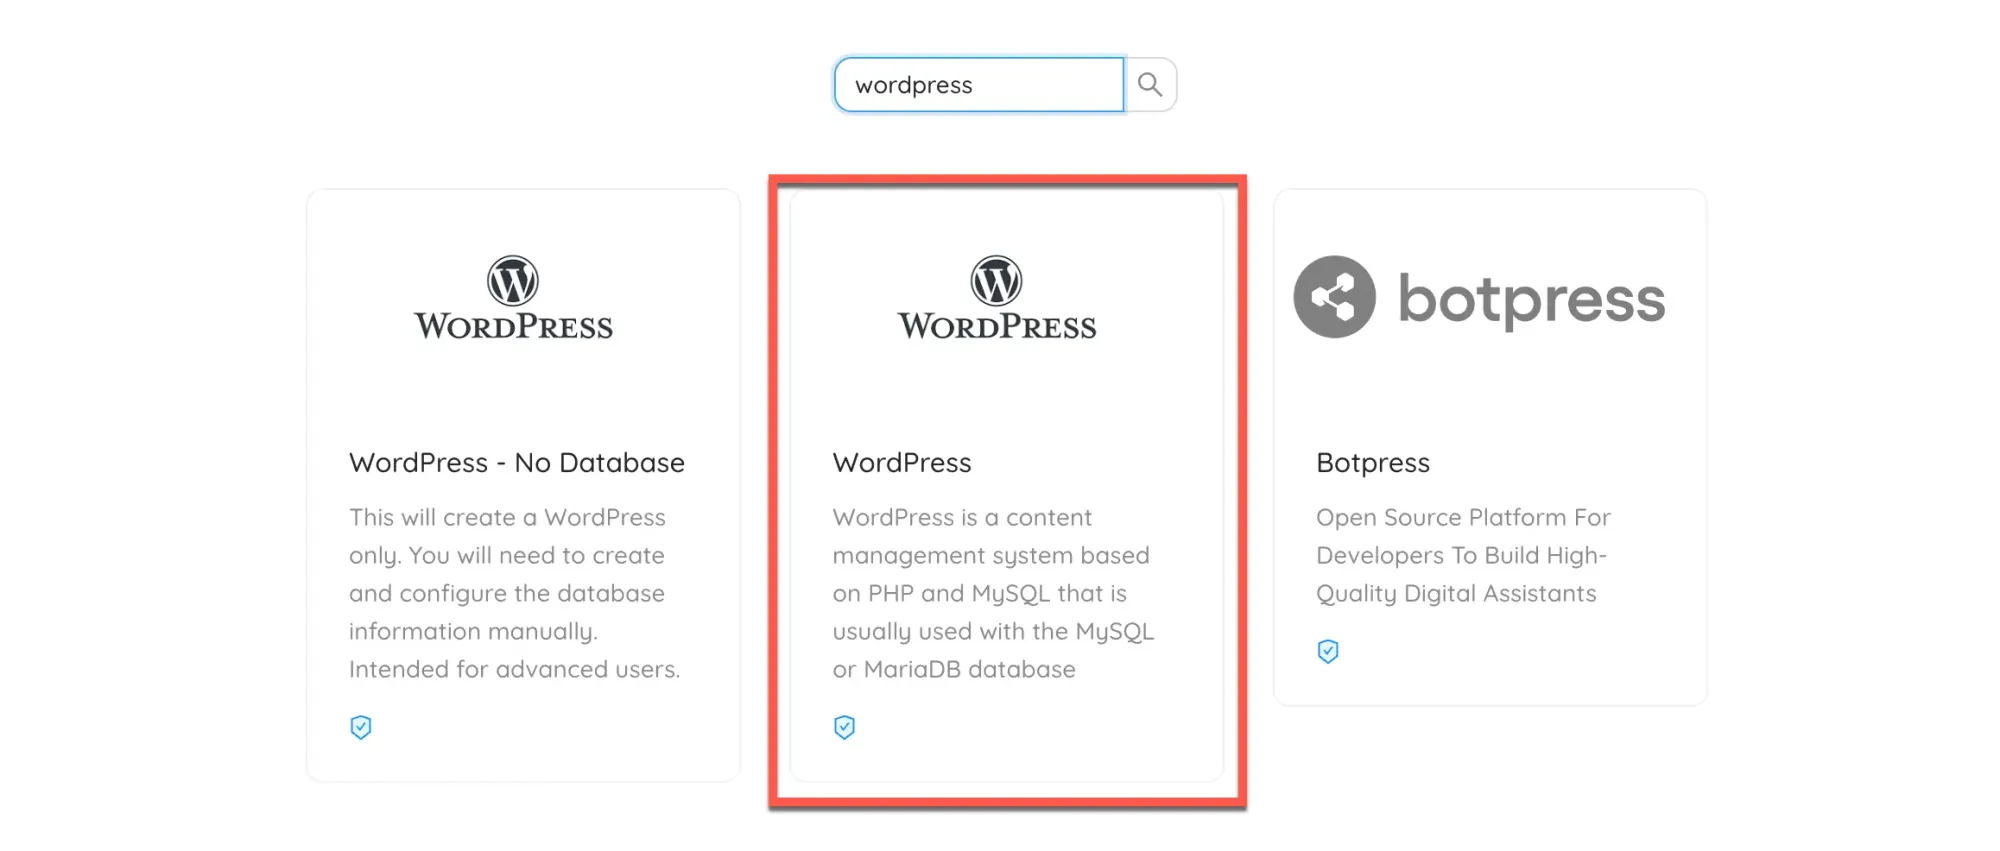
Selanjutnya akan muncul konfigurasi instalasi seperti nama aplikasi, password mysql dan versi database yang akan di gunakan, dalam artikel kali ini kami akan menginstall WordPress versi 6.0.1.
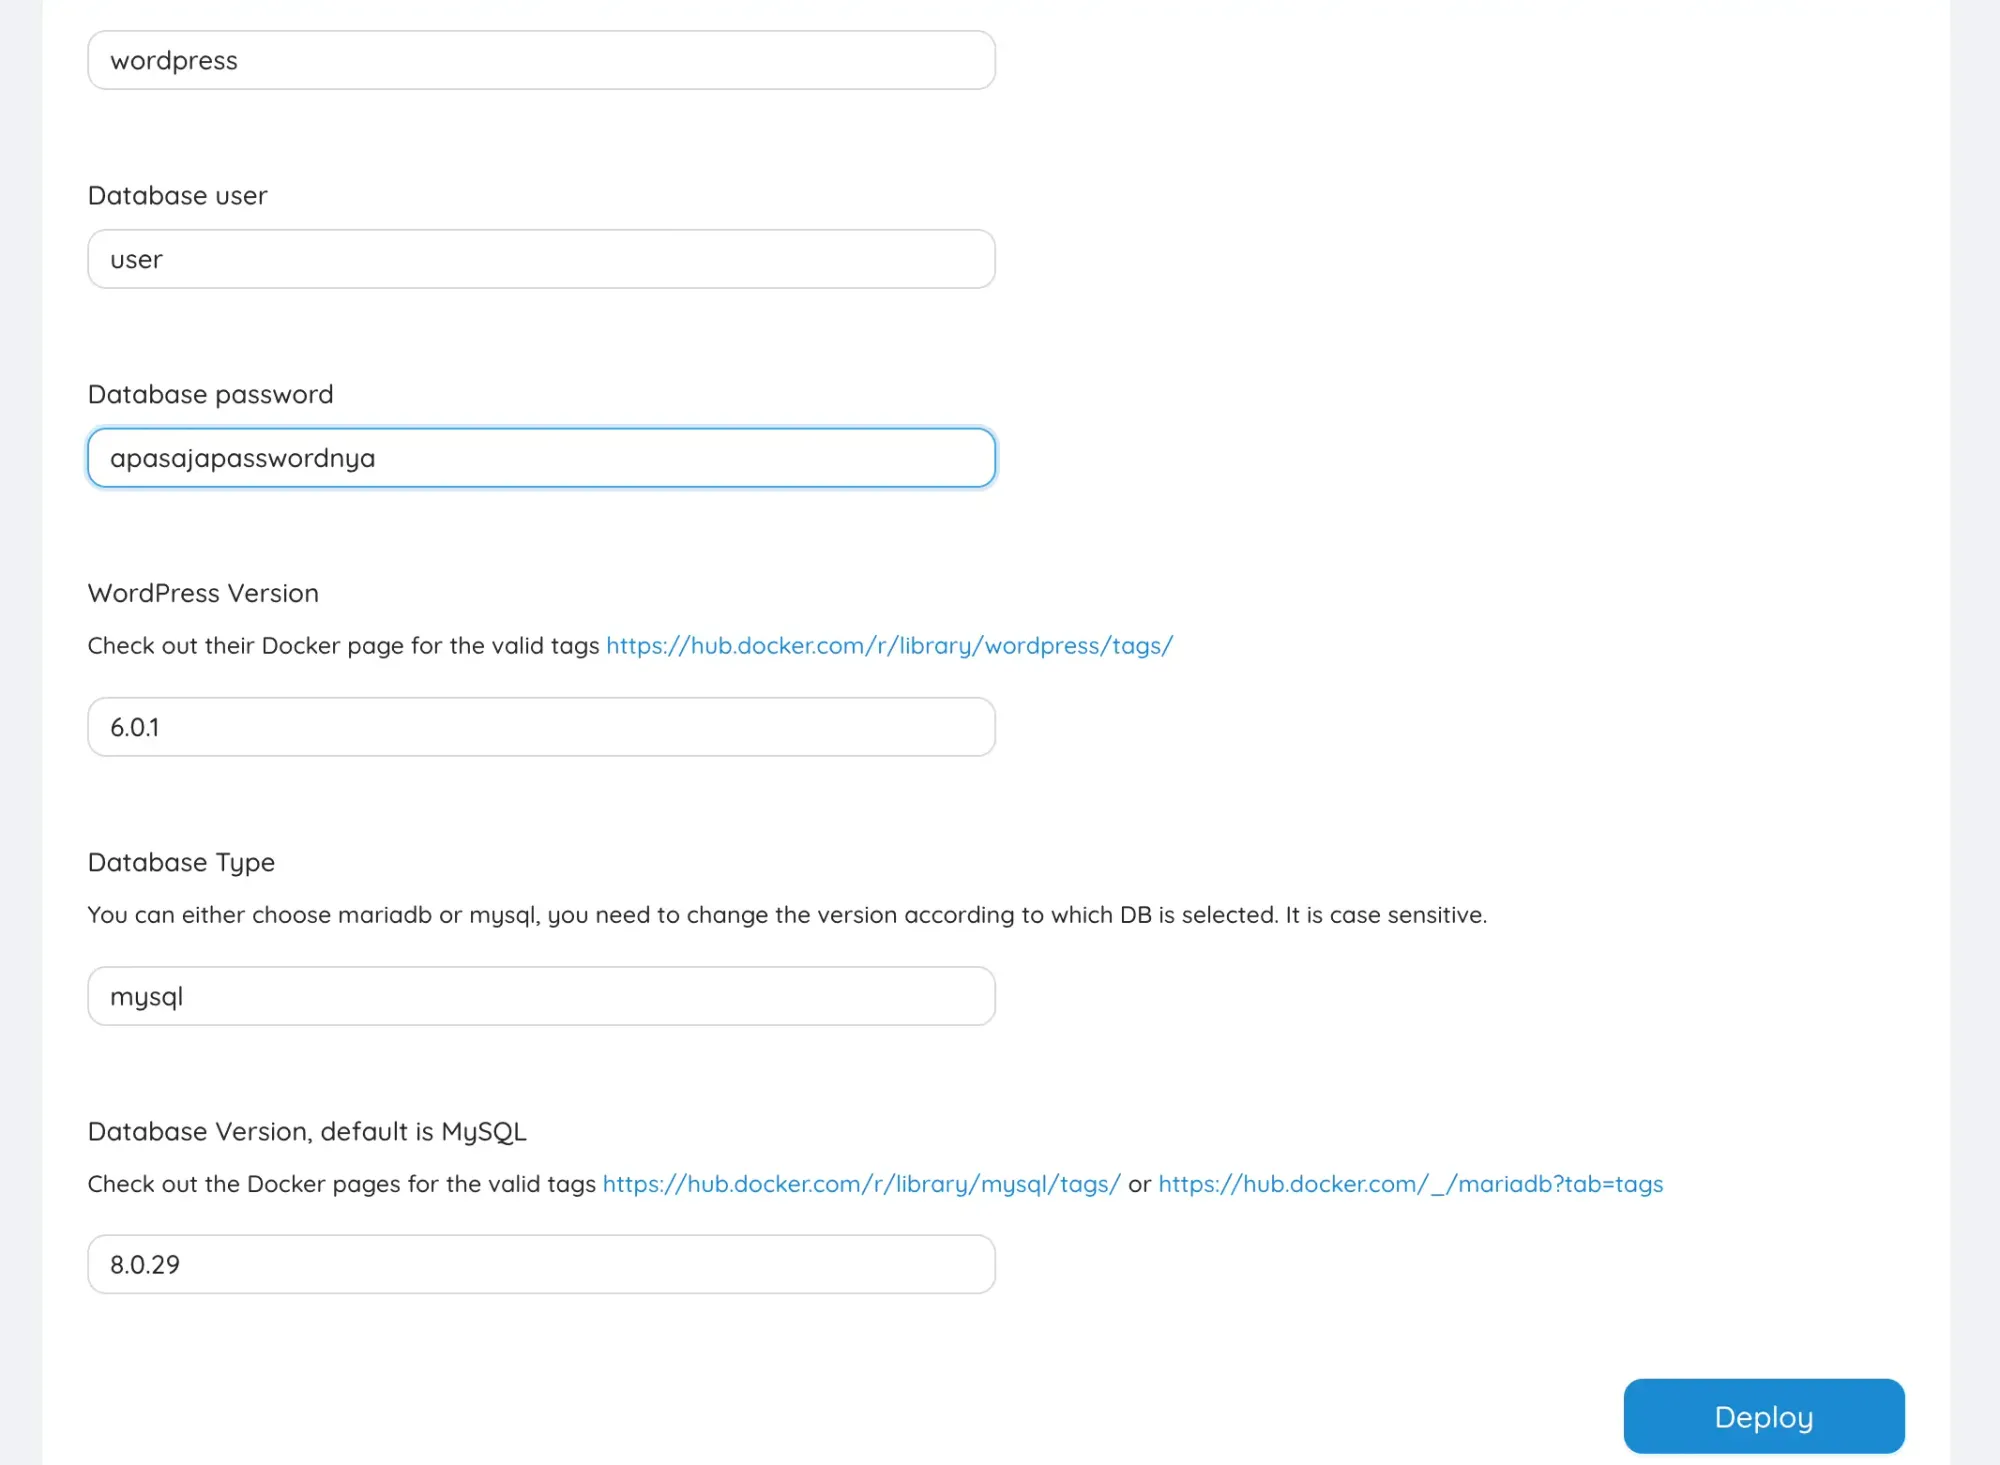
Setelah konfigurasi diisi, klik pada tombol Deploy!
CapRover akan melakukan proses instalasi wordpress lengkap seperti core wordpress, nginx, php dan mysql dalam sekali klik.

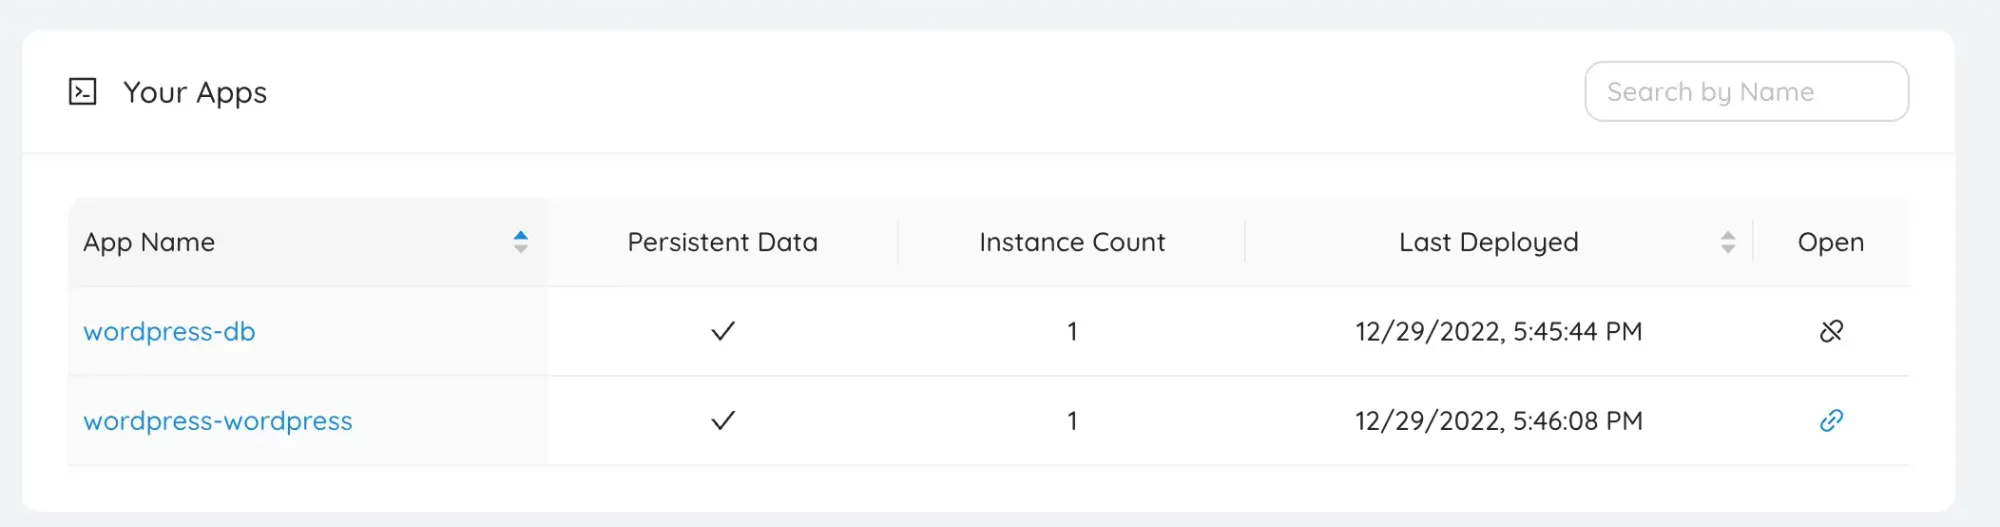
Install Wordpress sudah selesai, selanjutnya kita akan mengkonfigurasi wordpress yang sudah kita Install.
Saat anda mengklik tombol Finish, anda akan kembali ke menu Apps, disitu terlihat ada dua aplikasi yang sudah terinstall, yaitu wordpress dan databasenya. Kita akan mengkonfigurasi Wordpress-nya saja, maka klik pada aplikasi wordpress-wordpress.
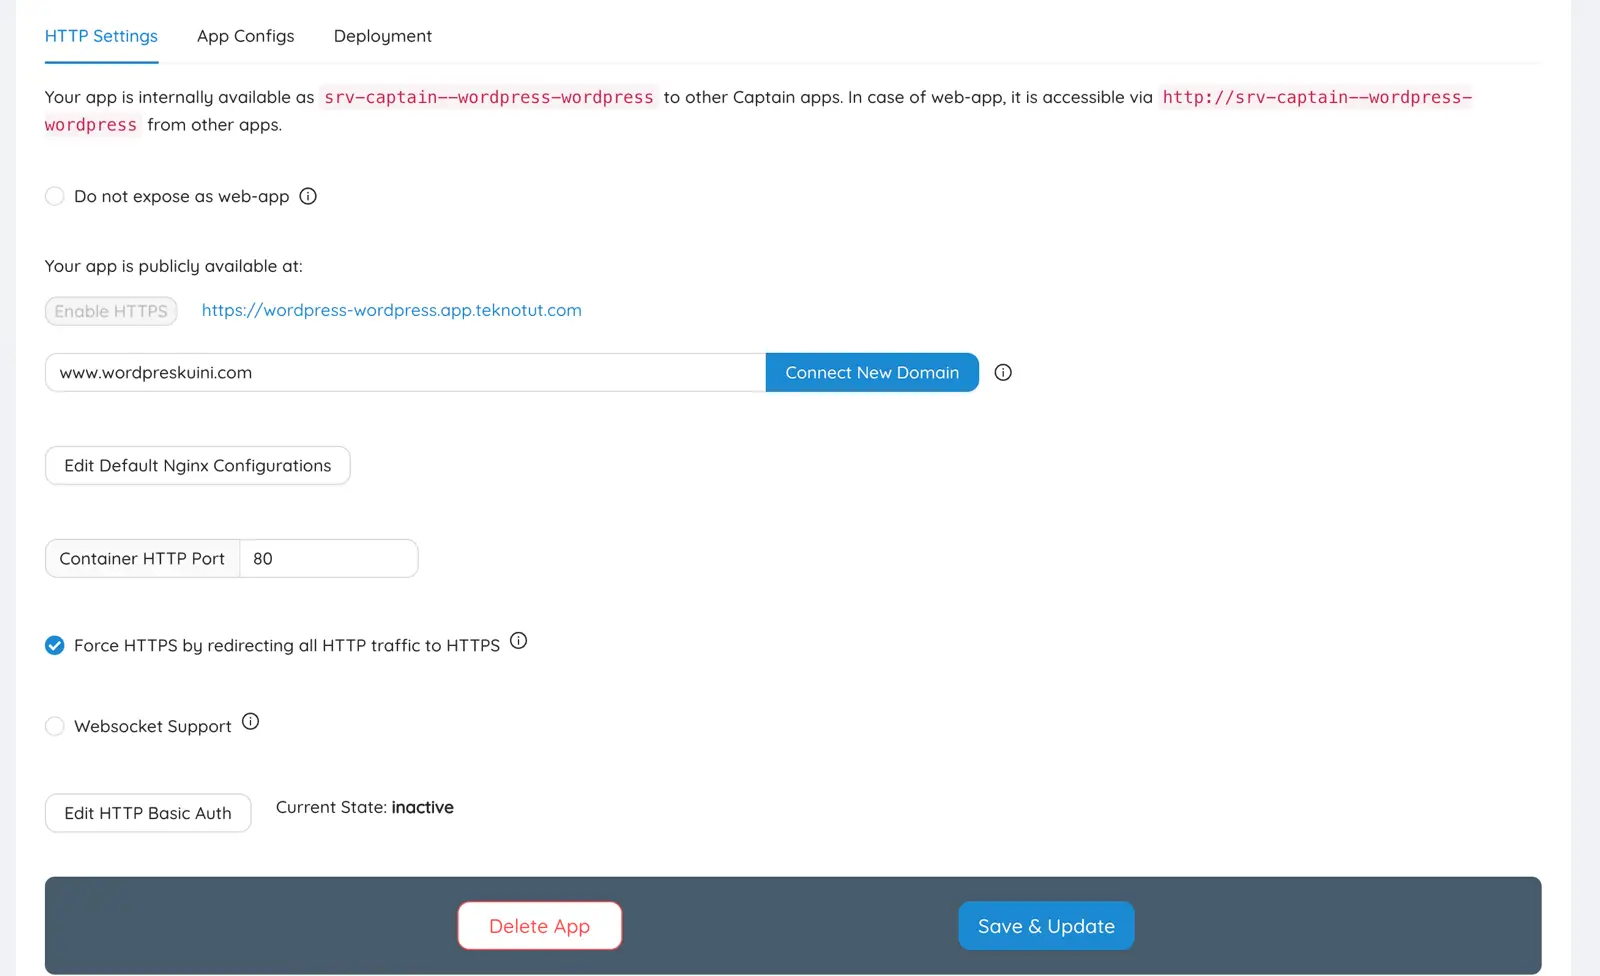
Klik pada tombol Enable HTTPS untuk mengaktifkan Sertifikat SSL gratis. Jika anda sudah memiliki domain untuk Wordpress baru anda, masukan nama domain di form domain lalu klik tombol Connect New Domain, dan klik lagi Enable HTTPS. Pilih opsi Force HTTPS by redirecting all HTTP traffic to HTTPS agar semua trafik di redirect ke https. Lalu klik Save & Update.
Selanjutnya kita akan mengkonfigurasi wordpress di URL https://wordpress-wordpress.app.teknotut.com atau nama domain anda jika anda sudah memasukan nama domain di Wordpress baru anda. Dalam artikel ini kami hanya menggunakan domain wildcard dan tidak menggunakan domain utama. Ikuti langkah-langkah instalasi sesuai petunjuk wizard di halaman Wordpress anda.
Selesai, anda bisa login ke WP Admin Wordpress anda sekarang. Pada saat login WP Admin, ternyata versi wordpress langsung terupgrade ke versi 6.1.1, anda bisa mengupgrade langsung Wordpress dari WP Admin anda.
Install NetData Engine (Opsional)
CapRover sebetulnya sudah dilengkapi dengan sistem monitoring server, namun hanya monitoring sederhana. Jika anda ingin menginstall sistem monitoring dengan GUI (Graphical User Intefaces) yang cantik dan data yang lengkap, anda bisa menginstall NetData Engine di CapRover anda. Cara installnya sangat mudah, klik pada menu Monitoring, lalu klik tombol Start NetData Engine.
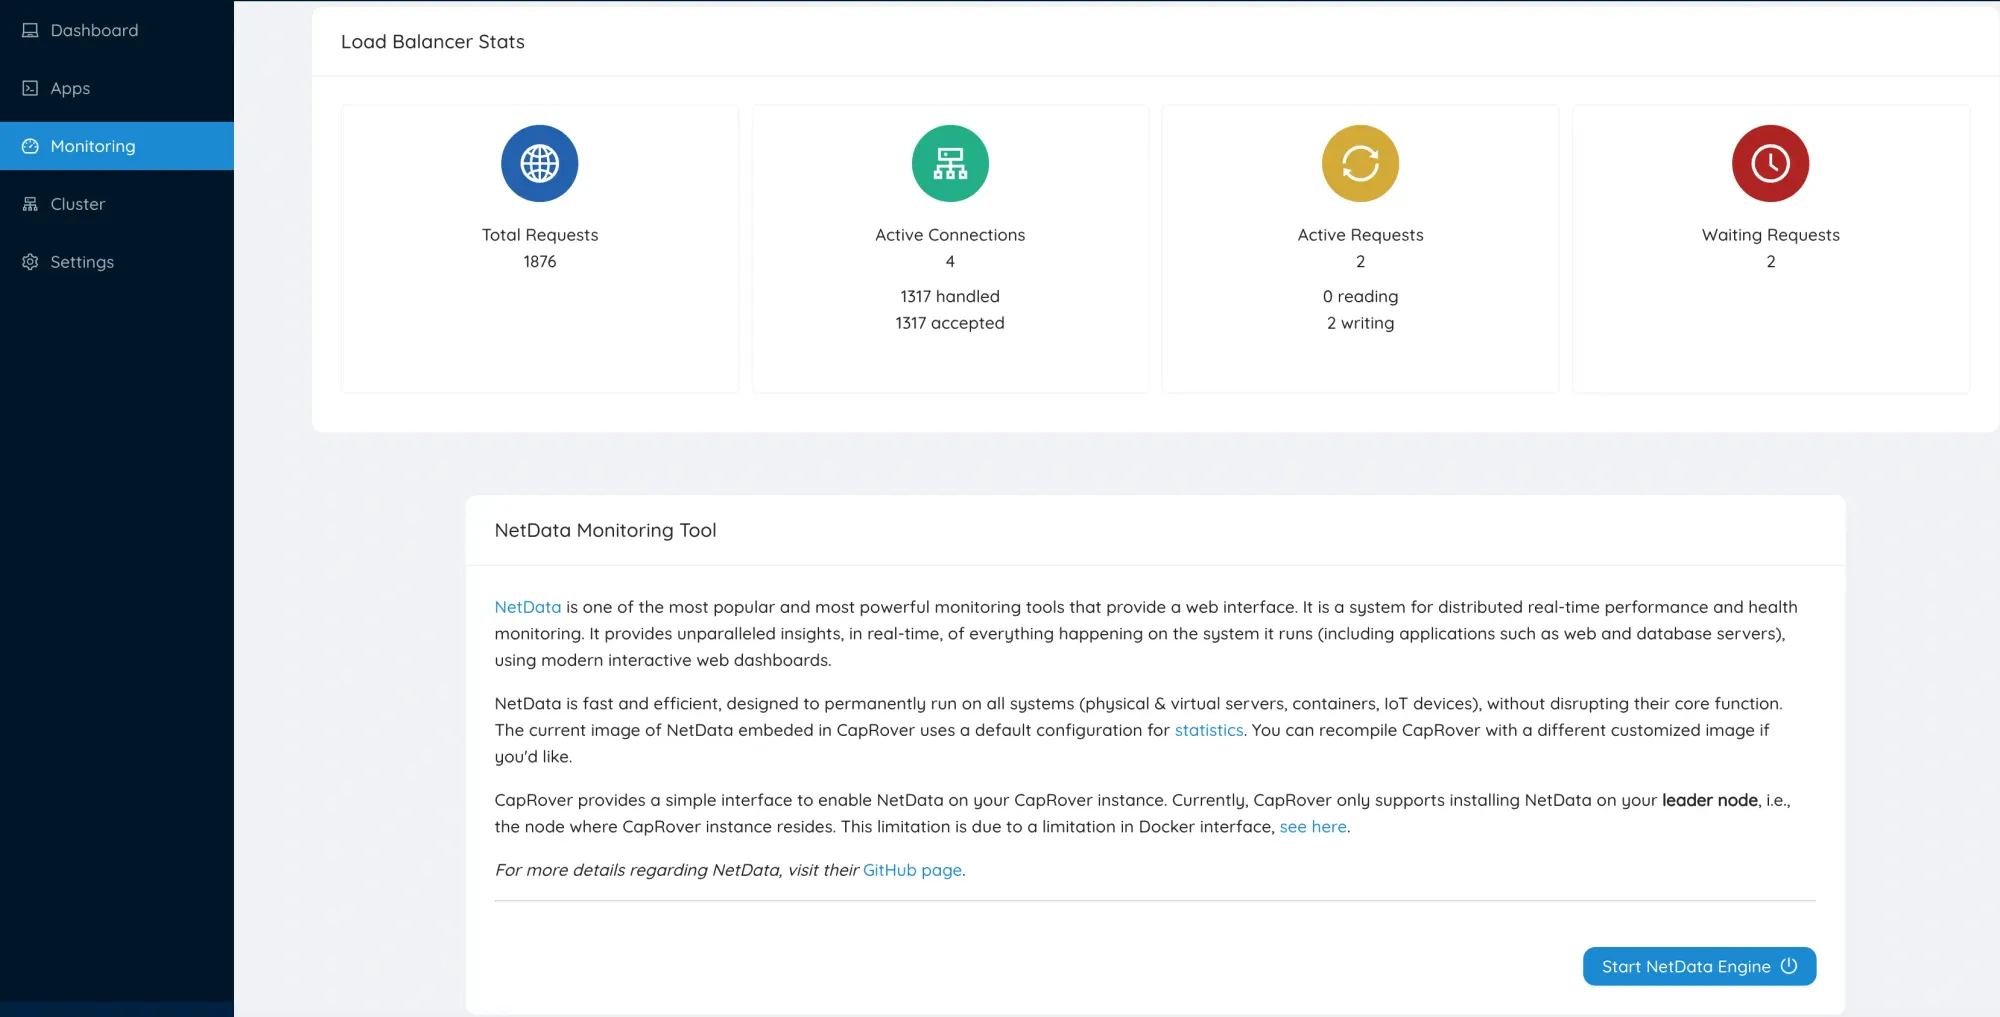
Tunggu proses instalasi selesai, setelah selesai akan keluar tombol Open NetData, klik tombol tersebut, anda akan di arahkan ke /net-data-monitor/.
Nah, sistem monitoring server anda sekarang sudah lengkap, seperti pada gambar di bawah ini.
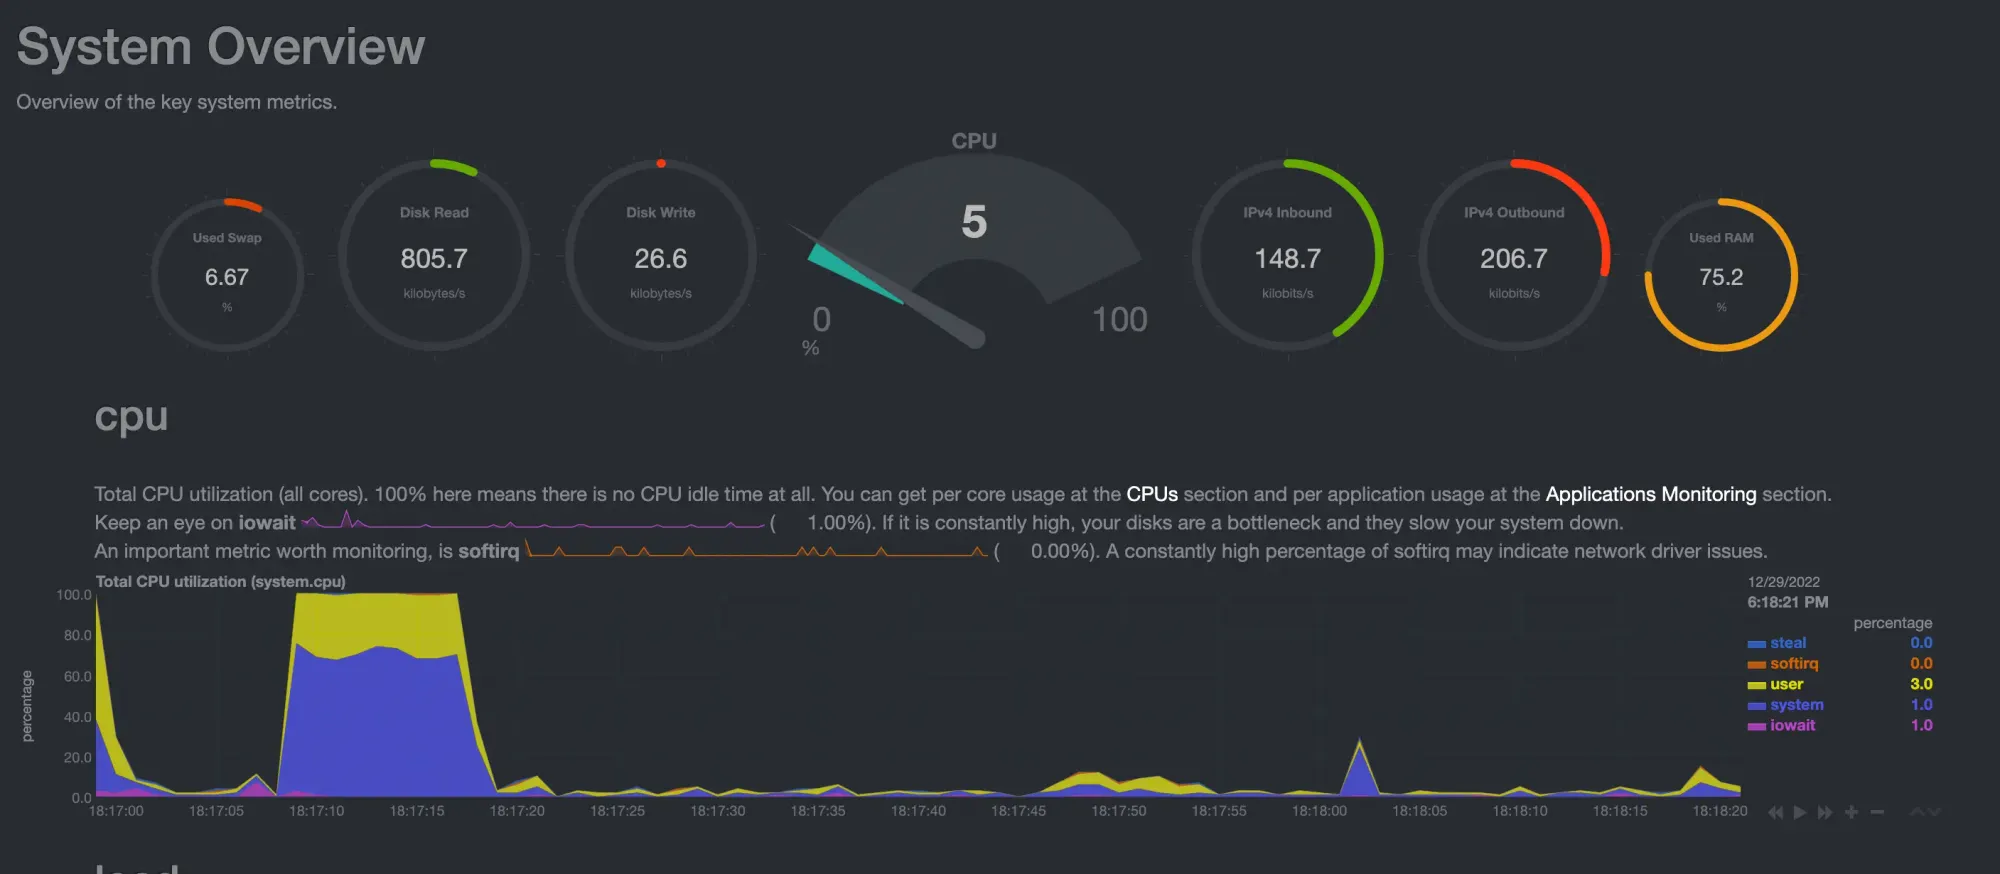
Mantap!
Kesimpulan
Berdasarkan artikel ini, dapat disimpulkan bahwa Cara Install CapRover di VPS atau Dedicated Server adalah proses yang relatif mudah, karena hanya memerlukan beberapa langkah sederhana untuk menyelesaikan instalasi, seperti mempersiapkan server, mengunduh CapRover, mengkonfigurasi, dan mengaktifkan.
Setelah itu, Anda akan siap untuk mengelola aplikasi Anda dengan CapRover dan menikmati manfaat yang ditawarkannya.
Di artikel ini juga kita sudah mencoba menginstall salah satu aplikasi yaitu Wordpress, proses instalasinya sangat mudah, cepat dan mudah di pahami. Pada artikel selanjutnya, kita akan mencoba menginstall dan menjelaskan aplikasi-aplikasi lainnya yang bisa memudahkan pekerjaan kita sehari-hari. Tetap pantau terus web Teknotut!
Semoga artikel ini membantu.