Pada tutorial kali ini akan membahas cara instalasi Flutter pada Sistem Operasi Windows, Mac OS dan Linux. Tutorial ini juga akan dilengkapi dengan proyek Flutter pertama, agar bisa memahami lebih jauh tentang Framework Flutter yang akan kita gunakan.
Dalam programming Fluter, kita bisa langsung memprogram dari Android Studio atau menggunakan Microsoft Visual Studio Code. Virtual device bisa langsung menggunakan AVD (Android Virtual Device) dan untuk aplikasi IOS, kita bisa menggunakan XCode. Nah, disini terlihat perbedaannya, bahwa Flutter sudah bisa multi platform. Koding sekali, aplikasi anda bisa langsung bisa di jalankan pada Android dan IOS. Menarik bukan?.
Apa Itu Flutter
Flutter adalah Framework untuk pengembangan aplikasi mobile yang bersifat Open Source. Flutter di kembangkan oleh Google dan mulai di perkenalkan pada Mei tahun 2017. Karena Flutter bersifat Open Source, pengembangannya menjadi lebih cepat. Flutter bisa membuat aplikasi mobile multi platform yang akan mempermudah pengembang untuk mempublikasikan aplikasinya.
Versi pertama Flutter diberi nama sky yang hanya bisa berjalan di Sistem Operasi Android. Sebagai Framework, Flutter sendiri ditulis menggunakan bahasa Dart yang sudah menyediakan fungsi-fungsi atau class dasar untuk membangun aplikasi mobile.
Dart sendiri adalah bahasa yang sudah mendukung Object Oriented (OOP) dengan syntax C-Style (Mirip bahasa C) yang dapat di ubah secara opsional menjadi JavaScript.
Widget
Sistem pendesaian pada Flutter menggunakan widget, yang memadukan widget-widget sederhana menjadi bagian yang lebih kompleks. Flutter memiliki sistem widget sendiri, yang menjadikan lebih unik dibanding pembangun aplikasi lainnya. Dengan Flutter, anda bisa membuat desain aplikasi yang berbeda dan stabil di jalankan pada Android maupun IOS. Hal ini karena Flutter memiliki sistem render engine sendiri.
Widget pada Flutter memiliki struktur hierarki yang akan mempermudah pendesaianan aplikasi. Sistem hierarki class ini memperbesar kemungkinan kombinasi desain secara maksimal. Gambaran hierarki class Flutter adalah seperti pada gambar di bawah ini.

Stateful Widget
Stateful Widget merupakan widget dinamis dan membutuhkan session. Pada Flutter, secara umum Stateful Widget menandakan bahwa komponen yang di tunjuk memiliki property state.
Stateless Widget
Stateless Widget bersifat statik dan tidak perlu menggunakan session. Stateless Widget bisa berarti bahwa komponen tidak memiliki property state.
Hot Reload
Jika anda pernah Membuat Aplikasi dengan Android Studio, saat ada perubahan biasanya kita akan melakukan build ulang agar tampilan bisa berubah. Berbeda dengan Flutter, pada proyek Flutter di Android Studio, tersedia tombol hot reload yang akan merefresh tampilan seketika tanpa harus membuild ulang. Ini menjadi kelebihan tersendiri bagi pengembang, karena akan mempercepat proses pembuatan aplikasi.
Kelebihan Flutter
Lalu apa keibihan dari Flutter sebagai bahan pertimbangan kita akan menggunakan Framework ini. Berikut adalah beberapa kelebihan Flutter untuk di pertimbangkan.
Lebih Produktif
Dengan Flutter, anda bisa membuat aplikasi yang bisa berjalan pada Android dan IOS sekaligus dengan kode yang sama. Ini tentu akan menghemat waktu lebih banyak dan meningkankan produktivitas. Dengan Flutter, karena sudah tersedia class untuk pembangunan aplikasi mobile, anda akan menggunakan sedikit kode pada aplikasi anda, namun tentu saja dengan fitur yang maksimal. Flutter menggunakan bahasa yang modern, expresif dan pendekatan deklaratif.
Pada sisi prototyping dan debuging, pengembang akan lebih mudah mendeteksi kesalahan program. Pada tingkat eksperimen, misalnya mencoba-coba kode tertentu, akan langsung terlihat hasilnya. Ini karena Flutter di lengkapi dengan hot reload, yang langsung menampilkan hasil kode anda tanpa build ulang. Anda bisa langsung memperbaiki kesalahan di tempat setelah aplikasi berhenti.
Desain Aplikasi yang Mudah dan Lebih Menarik
Dengan sistem widget dan hierarki class, akan lebih memudahkan pengembang untuk mendesain aplikasi yang indah. Flutter menyediakan tema Material Design untuk tampilan Android dan Cupertino untuk IOS. Dengan Framework desain ini, pengembang hanya perlu sedikit modifikasi pada template aplikasi.
Widget yang bisa di kustomisasi akan menghasilkan tampilan aplikasi yang lebih variatif dan lebih unik. Flutter sangat memanjakan pengembang dalam mambuat aplikasi yang lebih cepat, tepat dan akurat.
Flutter Studio
Flutter meluncurkan Flutter Studio dalam bentuk web based. Flutter Studio sangat berguna bagi anda yang ingin belajar Flutter tanpa harus menginstall aplikasi. Anda hanya tinggal membuka halaman web, dan langsung bisa memodifikasi layout aplikasi, serta memodifikasi source code. Silahkan mencoba langsung di halamannya url https://flutterstudio.app/.
Install Flutter di Windows
Untuk melakukan Instalasi Flutter pada Windows cukup mudah. Namun pastikan Windows anda sudah memenuhi syarat. Berikut adalah beberapa rekomendasi yang di Butuhkan.
- Microsoft Windows 7 SP1 atau diatasnya, direkomendasikan Windows 10.
- Disk Space 400MB
- Windows PowerShell 5.0 atau diatasnya (Sudah include di Windows 10)
- Jika anda menggunakan Windows 7 atau Windows 8, anda harus menginstall Windows PowerShell terlebih dahulu, silahkan mengikuti artikel di halaman Doc Microsoft.
- Git untuk Windows versi 2.0 atau diatasnya
- Sudah terinstall aplikasi Android Studio lengkap termasuk AVD. Atau, anda bisa menggunakan Microsoft Visual Studio Code. Saya sarankan install keduanya.
Pada Flutter Tutorial kali ini, kami menggunakan Windows 10 64 bit yang sudah di Install Android Studio dan Microsoft Visual Studio Code.
Install Flutter Plugin
Sebelum proses instalasi Flutter di lakukan, kita harus menginstall plugin pada Android Studio dan Microsoft Visual Studio Code. Silahkan ikuti langkah-langkah di bawah ini untuk melakukan penginstallan plugin.
Android Studio
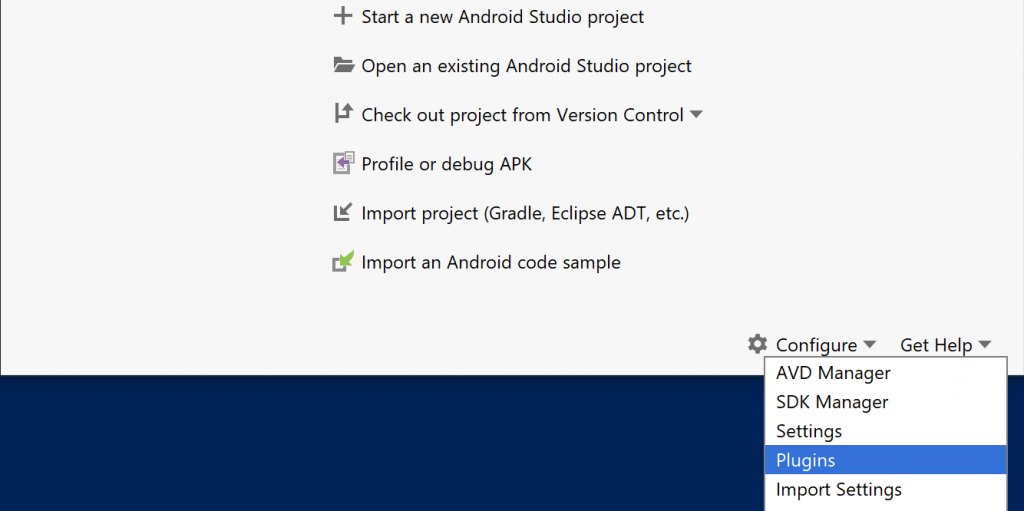
Buka apikasi Android Studio anda. Pada saat start screen, klik Configure, lalu pilih Plugin.
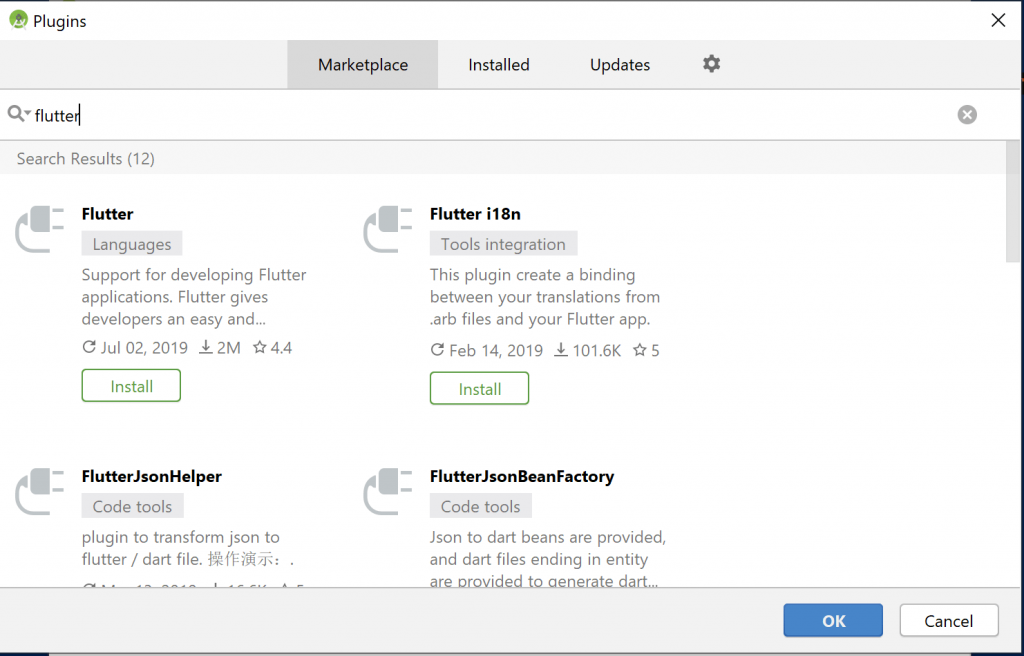
Pada kolom Search, ketikan keyword "flutter" lalu tekan enter. Setelah muncul plugin Flutter, klik Install. Tunggu hingga selesai. Setelah selesai, restart Android Studio Anda.
Microsoft Visual Studio Code
Jika anda belum menginstall Microsoft Visual Studio Code, silahkan download file instalasinya di halaman https://code.visualstudio.com/, lalu lakukan instalasi seperti biasanya.
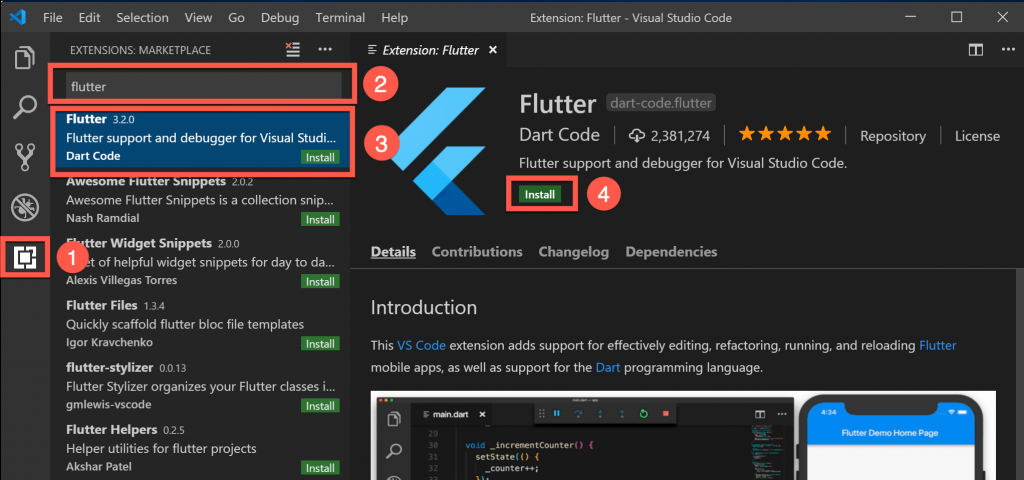
Buka aplikasi Microsoft Visual Studio Code anda. Setelah terbuka, klik pada tab Extension (1), lalu cari dengan keyword "flutter" (2), klik pada hasil pencarian Flutter (3), lalu klik Install (4). Tunggu hingga proses instalasi selesai. Jika perlu, restart Microsoft Visual Studio Code anda.
Install Git
Anda bisa mendapatkan file instalasi git pada halaman Git Installer. Download aplikasi Git Installer terbaru. Pada saat Flutter Tutorial ini ditulis, versi git terbaru adalah versi 2.22.0. Anda bisa langsung mendownload git installer untuk Windows 10 64 bit melalui halaman Git 2.22.0 64bit.
Lakukan instalasi Git seperti biasanya. Aplikasi Git ini merupakan komponen penting untuk Flutter. Anda harus berhasil menginstall git sebelum dilanjutkan ke penginstallan flutter.
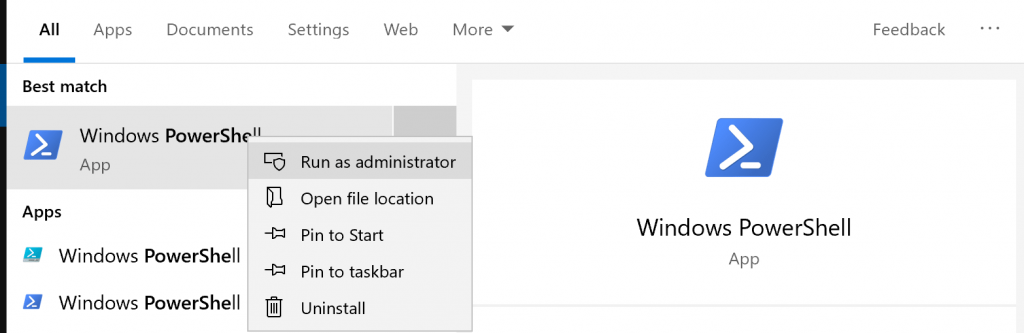
Selanjutnya, kita akan bekerja menggunakan PowerShell. Buka PowerShell anda dengan cara melakukan pencarian di search Windows 10, ketikan keyword "powershell", klik kanan pada menu PowerShell lalu klik pada Run as Administrator. Kita membutuhkan akses administrator karena akan melakukan beberapa instalasi.

Agar lebih terstruktur dan rapi, kita akan bekerja pada direktori C:\src\. Kita buat terlebih dahulu foldernya dan masuk ke dalam direktori tersebut dengan mengetikan perintah di bawah ini.
cd /
mkdir src
cd src
Sekarang kita coba cek apakah git sudah terinstall dengan baik. Ketikan perintah berikut.
git --versionJika sudah muncul versi git, berarti instalasi git sudah berhasil.

Jika perintah git menampilkan pesan error, pastikan kembali anda sudah berhasil melakukan instalasi git. Lalu coba tutut PowerShell dan buka kembali. Lakukan kembali pengecekan instalasi git dengan perintah.
git --versionInstall Flutter
Selanjutnya kita akan menginstall Flutter. Untuk semua release SDK Flutter anda bisa melihat langsung di halaman https://flutter.dev/docs/development/tools/sdk/releases. Saat Flutter tutorial ini ditulis, versi terbaru adalah v1.7.8+hotfix.3. Kita akan menginstallkan versi tersebut. Masuk ke PowerSHell anda dan ketikan perintah berikut.
wget https://storage.googleapis.com/flutter_infra/releases/stable/windows/flutter_windows_v1.7.8+hotfix.3-stable.zip -Outfile flutter.zip
Expand-Archive flutter.zip flutter
Perintah diatas akan mendownload Flutter versi v1.7.8+hotfix.3 dengan nama flutter.zip, mengestraknya lalu masuk ke direktori flutter.
Cara diatas adalah cara menggunakan Windows PowerShell, anda bisa saja menggunakan cara mendownload melalui browser dan menekstrak file zip ke folder src.
Selanjutnya kita akan masuk ke direktori Flutter, dan menjalankan file flutter_console.bat.
cd flutter/flutter
.\flutter_console.bat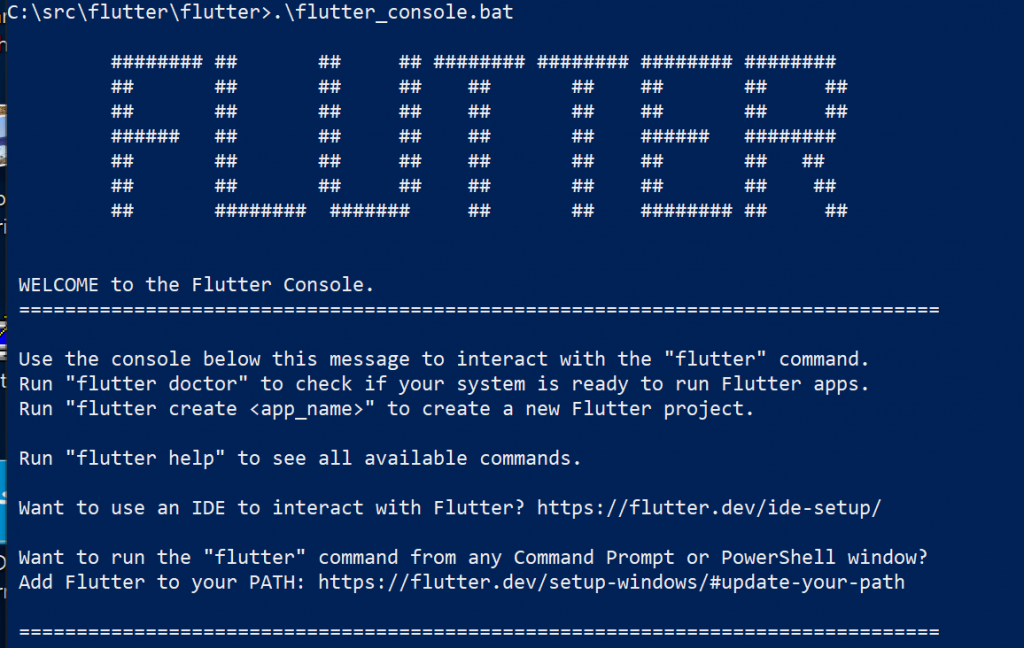
Selanjutnya kita akan menyetujui lisensi Android Studio dengan cara mengetikan perintah berikut.
flutter doctor --android-licensesAnda bisa membaca ketentuan lisensi Android Studio tersebut, dan jika setuju tekan tombol y hingga selesai. Setelah selesai, anda bisa memverifikasi hasil instalasi dengan cara mengetikan perintah di bawah ini.
flutter doctor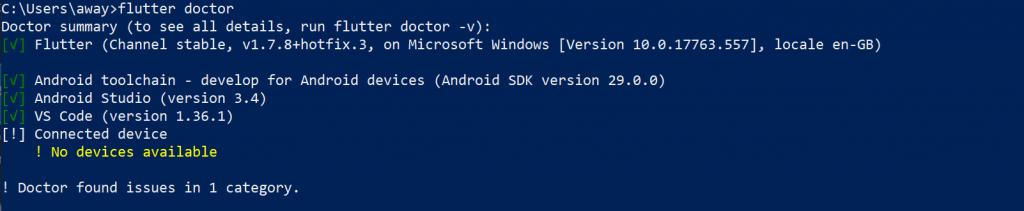
Seperti yang anda lihat pada gambar diatas, proses instalasi sudah berhasil. Tanda seru yang di identifikasi diatas karena saya tidak menyalakan AVD atau mengkoneksikan Android Device. Anda bisa menyalakan Android virtual device dari Android Studio dengan mengklik menu AVD Manager, lalu jalankan Android Emulatornya. Setelah dijakankan ketik kembali flutter doctor untuk memverifikasi.
Update Path
Perintah flutter diatas hanya bisa di eksekusi dari path atau folder dimana SDK Flutter berada. Kita membutuhkan agar perintah flutter bisa di eksekusi dari semua folder. Solusinya, kita harus menambahkan path default untuk flutter. Pada Sistem Operasi Windows, path default bisa di setting dari parameter environment.
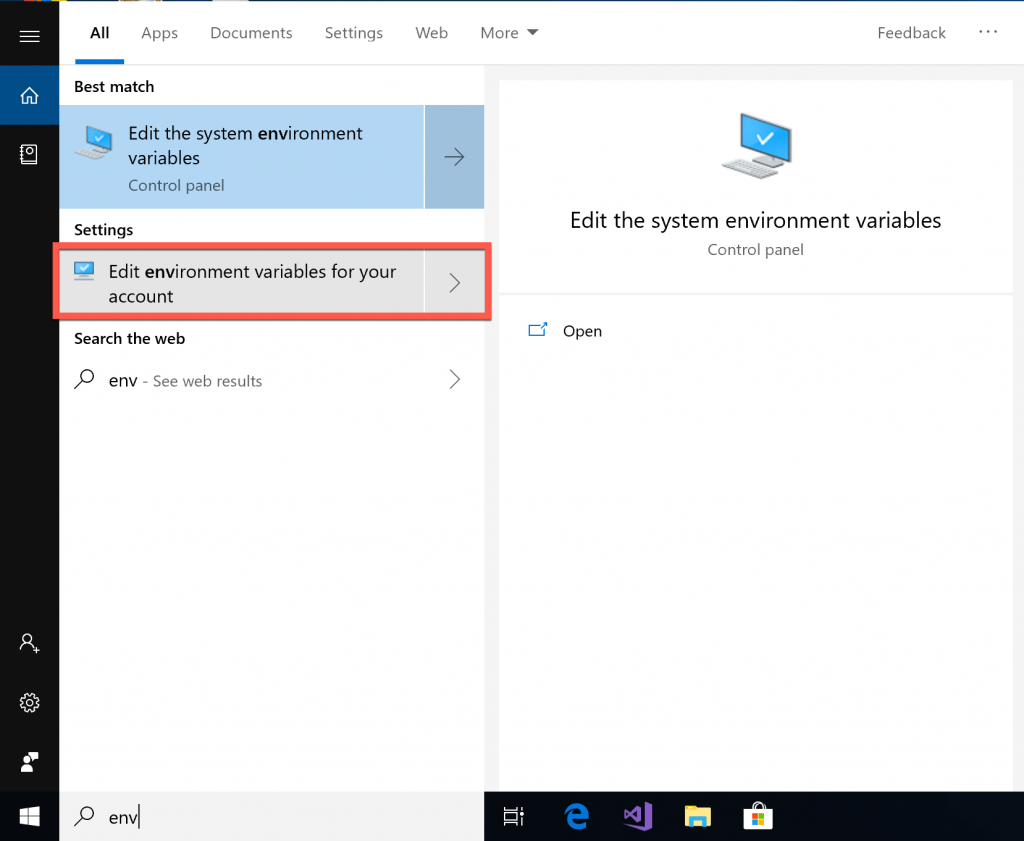
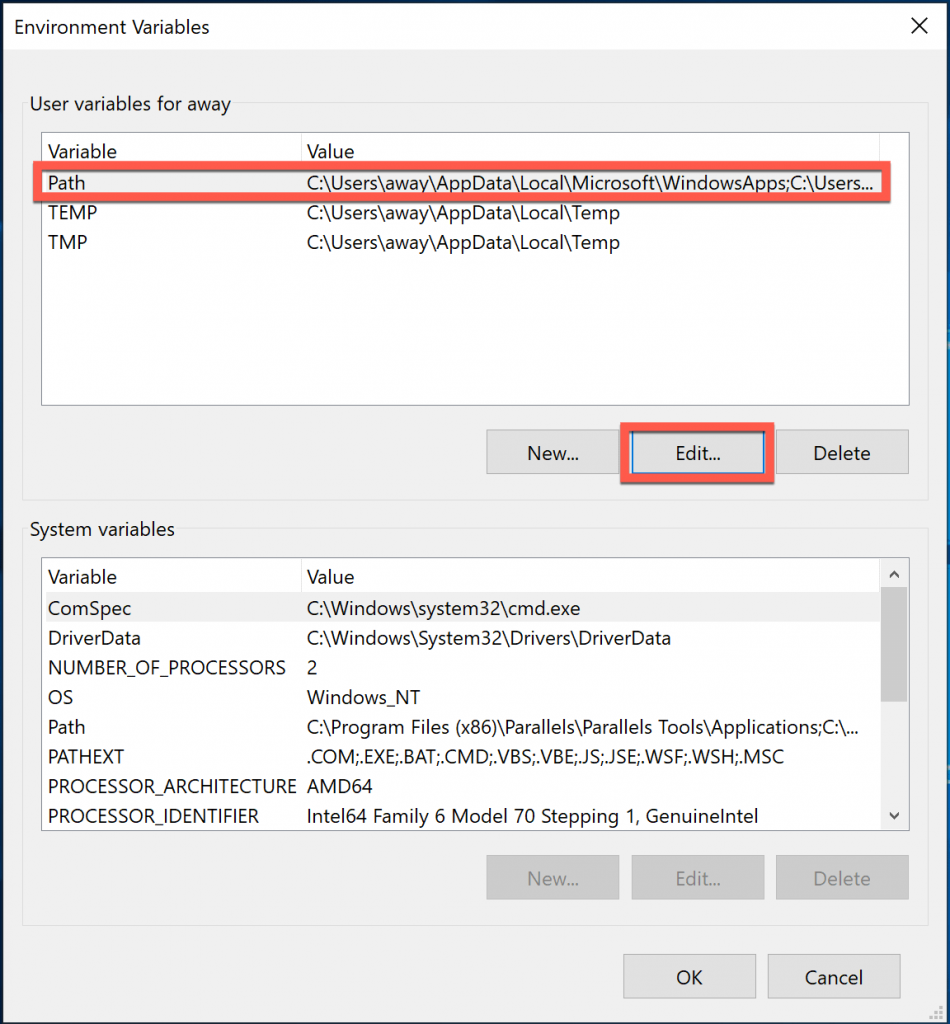
Untuk masuk ke pengaturan environment di Windows 10, pada kolom Search ketik "env" lalu pilih pada Edit environment variables for your account. Klik pada variable Path, lalu klik New, dan masukan lokasi Flutter SDK anda.
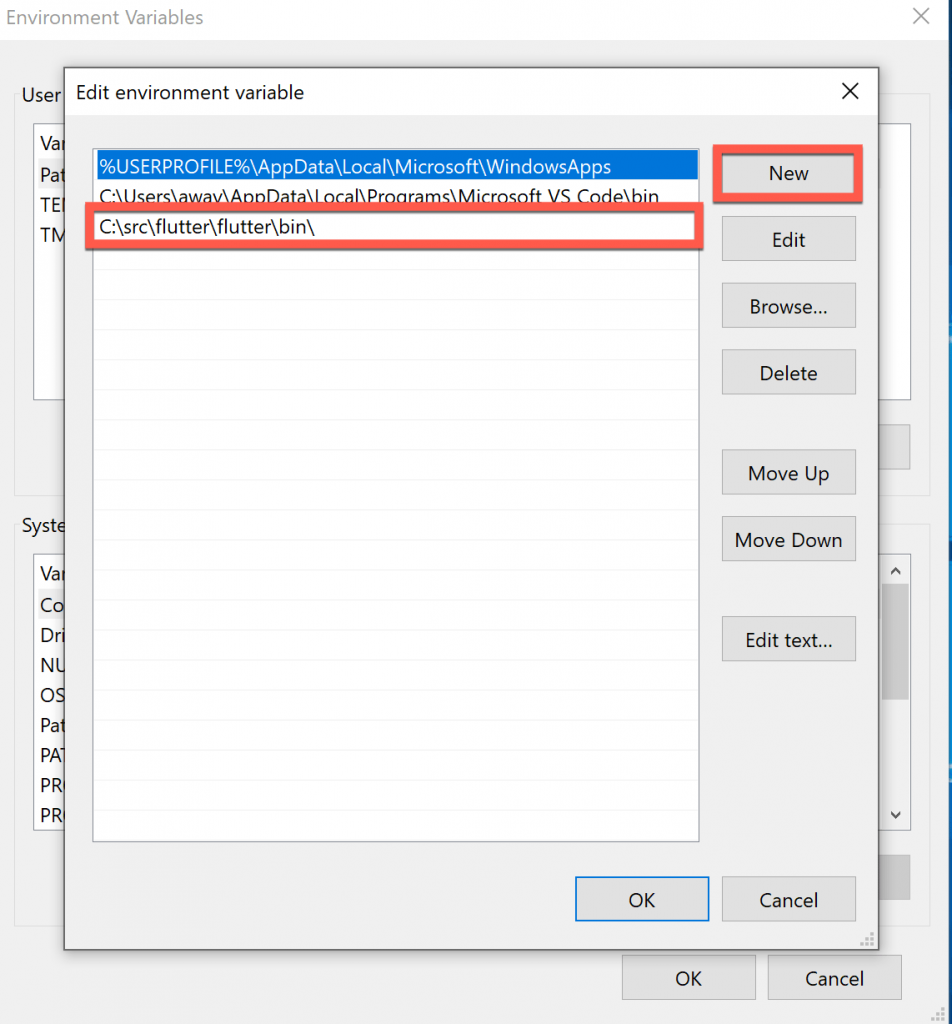
Jika anda mengikuti Flutter Tuttorial ini, lokasi Flutter SDK ada di C:\src\flutter\flutter. Maka anda harus mengisi dengan C:\src\flutter\flutter\bin. Contohnya seperti pada gambar di bawah ini.
Sampai tahap ini, instalasi flutter di Windows anda sudah selesai. Anda bisa melanjutkan ke bagian Membuat Aplikasi Pertama dengan Flutter.
Install Flutter di Mac OS
Untuk cara Instalasi Flutter di Sistem Operasi Mac OS tergolong lebih mudah di bandingkan instalasi di Windows. Ini karena Mac OS sudah built in dengan terminal dan git, kita hanya memerlukan beberapa modul tambahan.
Pada Flutter Tutorial ini, kami menggunakan Mac OS Mojave versi 10.14.5. Mungkin akan berjalan normal pada Mac OS sebelumnya.
Sebelum dilanjutkan, pastikan anda sudah menginstall Android Studio, Microsoft Visual Studio dan XCode di Mac anda. Untuk XCode, anda bisa menginstall langsung melalui App Store secara gratis. Jika sudah, anda bisa melanjutkan menginstall plugin Flutter. Caranya, silahkan mengikuti cara install plugin pada Android Studio dan Microsoft Visual Studio di sistem operasi Windows 10 diatas. Karena caranya sama baik di Windows, Mac OS maupun di Linux.
Setelah instalasi plugin selesai, kita akan mulai melakukan instalasi Flutter.
Install Homebrew dan wget
Homebrew merupakan package managemen pada Mac OS. Cara instalasinya bisa menggunakan Ruby yang sudah include pada mac OS. Untuk informasi lebih lengkap mengenai HomeBrew silahkan membaca artikel kami tentang cara install homebrew.
Ketik perintah berikut untuk menginstall homebrew.
/usr/bin/ruby -e "$(curl -fsSL https://raw.githubusercontent.com/Homebrew/install/master/install)"Setelah selesai, pastikan instalasi homebrew anda berhasil dengan cara mengecek versinya. Gunakan perintah berikut.
brew --versionJika output dari perintah diatas adalah versi dari homebrew, berarti instalasi homebrew anda sudah selesai.
Selanjutnya kita install wget menggunakan homebrew yang sebelumnya sudah kita install. Gunakan perintah berikut pada terminal anda.
brew install wgetTunggu hingga proses selesai. Silahkan cek wget anda dengan cara mengetikan perintah di bawah ini.
wget --versionContoh outputnya adalah seperti berikut.
GNU Wget 1.20.3 built on darwin18.6.0.Install dan Link lisensi XCode
Selanjutnya kita akan mengaktifkan lisensi XCode, silahkan ketik perintah berikut.
brew update
sudo xcodebuild -license
sudo xcode-select --switch /Applications/Xcode.app/Contents/Developer
Untuk perintah sudo, membutuhkan password Mac anda, silahkan masukan password Mac anda jika di minta. Lisensi dan link XCode berfungsi agar Flutter bisa membuat aplikasi IOS dengan menggunakan XCode.
Install USB Mux dan IOS Deploy
USB Mux berfungsi agar aplikasi yang di coding menggunakan Flutter bisa di jalankan pada device asli dengan di koneksikan oleh USB. Cara instalasinya silahkan ketikan kode berikut.
brew install --HEAD usbmuxd
brew link usbmuxd
brew install --HEAD libimobiledevice
brew install ideviceinstaller
brew install ios-deploy
Install CocoaPods
Cocoapods merupakan dependency manager untuk Swift dan Objective-C untuk Cocoa Project di XCode. Menurut situs aslinya, saat ini Cocoapods memiliki 63 ribu library dan di gunakan oleh lebih dari 3 juta aplikasi. Untuk instalasi Cocoapods, kita akan menggunakan homebrew yang sudah di install sebelumnya. Silahkan ketikan perintah berikut pada terminal Mac OS anda.
brew install cocoapods
pod setup
Install Flutter
Selanjutnya kita akan langsung install flutter pada Mac OS. Anda bisa melihat semua SDK Release untuk Mac OS di halaman Flutter MacOS. Pada Flutter Tutorial kali ini, kita akan coba menginstallkan Flutter Versi v1.7.8+hotfix.3 untuk Mac OS.
Download Flutter
Kita akan bekerja pada direktori ~/development, sebelumnya kita buat dan masuk ke direktori tersebut. Ketikan perintah berikut.
mkdir ~/development
cd ~/development
Selanjutnya kita akan mendownload Flutter, mengekstrak dan menginstall pada direktori ~/development tersebut.
wget https://storage.googleapis.com/flutter_infra/releases/stable/macos/flutter_macos_v1.7.8+hotfix.3-stable.zip -O flutter.zip
unzip flutter.zip
cd flutter
export PATH="$PATH:`pwd`/flutter/bin"
Precache
Selanjutnya, kita membutuhkan binary untuk IOS dan android. Gunakan perintah berikut.
flutter precacheSetelah selesai, lanjutkan dengan mengecek instalasi.
flutter doctor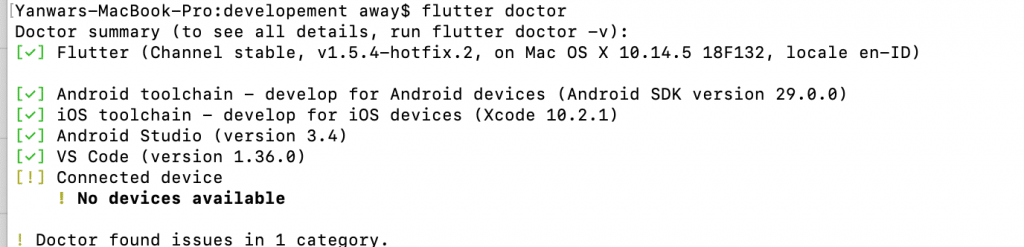
Update Path
Sama seperti pada Windows, perintah flutter hanya bisa di eksekusi dari path atau folder tempat kita mengekstrak Flutter SDK. Kita memerlukan perintah flutter bisa di eksekusi dari path manapun. Caranya, dengan mengupdate environment path pada Mac Os.
Untuk mengubah environment pada Mac Os, yang harus di lakukan adalah menambah source profile. Edit atau buat baru pada file $HOME/.bash_profile. Gunakan perintah berikut.
nano $HOME/.bash_profileJika file .bash_profile sudah ada isinya, tambahkan kode di bawah ini pada bagian paling bawah, namun bila masih kosong isi baru dengan baris berikut.
export PATH="$PATH:~/developement/flutter/bin"Setelah selesai, simpan dengan cara menekat CTRL+X lalu Enter, dan konfirmasi dengan menekan tombol Y.
Agar environment baru aktif, gunakan perintah source.
source $HOME/.bash_profileVerifikasi hasil pengaturan kita dengan cara mengetikan perintah di bawah ini.
echo $PATHApabila path baru anda sudah tampil, itu berarti pengaturan path sudah selesai. Sekarang perintah flutter sudah bisa di eksekusi dari path manapun.
Sampai tahap ini, proses instalasi Flutter di Mac OS sudah selesai. Anda bisa langsung melanjutkan ke bagian Membuat Aplikasi Pertama dengan Flutter.
Install Flutter di Linux
Pada Flutter tutorial kali ini, kita akan mencoba instalasi Flutter pada Linux Ubuntu. Pada saat tutorial ini di tulis, kami menggunakan Ubuntu 18.04 yang sudah terinstal Microsoft Visual Studio dan Android Studio.
Instalasi Flutter di Linux Ubuntu hampir tidak jauh berbeda dengan instalasi pada Mac OS. Ubuntu sudah di lengkapi dengan paket git, wget dan lainnya. Beberapa persyaratan dan tool yang harus di penuhi untuk instalasi Flutter adalah sebagai berikut.
- Linux 64 Bit
- Sisa disk space diatas 600mb
- Beberapa tool yang di butuhkan:
- Bash
- Curl
- Git Versi 2
- which
- mkdir
- rm
- unzip
- xz-utils
- Shared library harus tersedia pada environment seperti libGLU.so.1 dan libglu1-mesa.
Paket-paket diatas biasanya sudah tersedia jika anda menggunakan Ubuntu 18.04 Desktop. Jadi kita tidak perlu melakukan instalasi untuk paket-paket tersebut.
Sebelum berlanjut ke proses instalasi, silahkan anda install plugin Flutter di Android Studio dan Microsoft Visual Studio Code mengikuti cara install plugin di Windows. Proses instalasi plugin sama seperti pada Windows 10. Silahkan klik di Cara Install Plugin Flutter pada Microsoft Visual Studio dan Android Studio.
Install Flutter
Agar lebih rapi dan teratur, kita akan melakukan instalasi pada folder ~/development. Buat folder tersebut dan masuk kedalamnya dengan perintah berikut. Gunakan terminal di Ubuntu untuk mengetikan perintah ini.
mkdir ~/development
cd ~/development
Download dan Install Flutter
Selanjutnya kita akan mendownload SDK Flutter untuk linux. Untuk semua versi SDK nya, silahkan anda lihat di halaman Flutter SDK Linux. Saat Flutter Tutorial ini di tulis, versi SDK terbaru adalah versi v1.7.8+hotfix.3. Kita akan mendownload dan menginstall versi tersebut.
wget https://storage.googleapis.com/flutter_infra/releases/stable/linux/flutter_linux_v1.7.8+hotfix.3-stable.tar.xz -O flutter.zip
tar -xvf flutter.tar.gz
cd flutter
Tambahkan Flutter ke Path dengan perintah berikut.
export PATH="$PATH:`pwd`/flutter/bin"Lalu jalankan flutter precache dengan perintah berikut.
flutter precache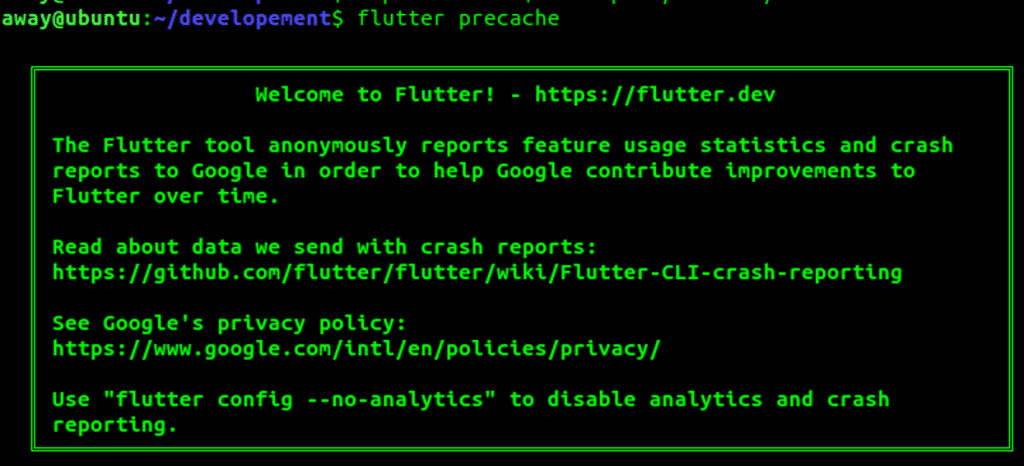
Selanjutnya jalankan perintah android license seperti di bawah ini. Accept semua permintaan dengan menekan tombol y sampai akhir.
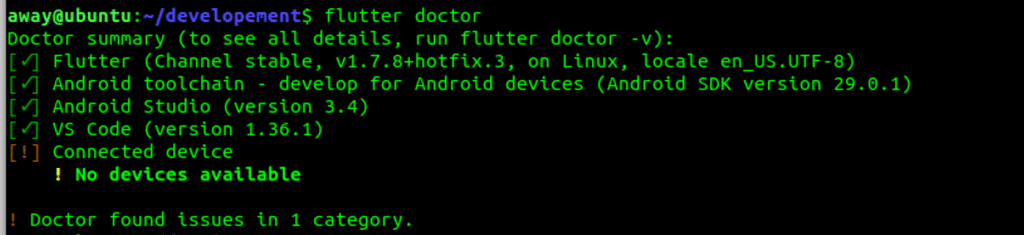
flutter doctor --android-licensesLalu, jalankan flutter doctor.
flutter doctorJika instalasi berhasil, output dari perintah flutter doctor adalah seperti gambar di bawah ini.
Update Path
Selanjutnya, kita akan melakukan pengaturan profile agar perintah flutter bisa di eksekusi dari path manapun di Ubuntu anda. Edit atau buat baru jika belum ada file $HOME/.bash_profile.
nano $HOME/.bash_profileIsikan atau tambahkan dengan baris berikut.
export PATH="$PATH:~/developement/flutter/bin"Lalu gunakan perintah source.
source $HOME/.bash_profileVerifikasi hasilnya dengan mengetikan perintah di bawah ini.
echo $PATHSampai tahap ini, proses instalasi Flutter di linux Ubuntu sudah selesai. Selanjutnya kita akan mencoba membuat aplikasi pertama dengan Flutter.
Membuat Aplikasi Pertama dengan Flutter
Aplikasi yang akan kita buat, bisa menggunakan editor Android Studio dan Microsoft Visual Studio Code. Kita akan coba keduanya agar lebih memahami Flutter. Nanti, silahkan anda putuskan akan menggunakan Android Studio, atau Microsoft Visual Studio Code. Saya sendiri cenderung lebih nyaman menggunakan Microsoft Visual Studio Code, karena terasa lebih ringan.
Flutter dengan Android Studio
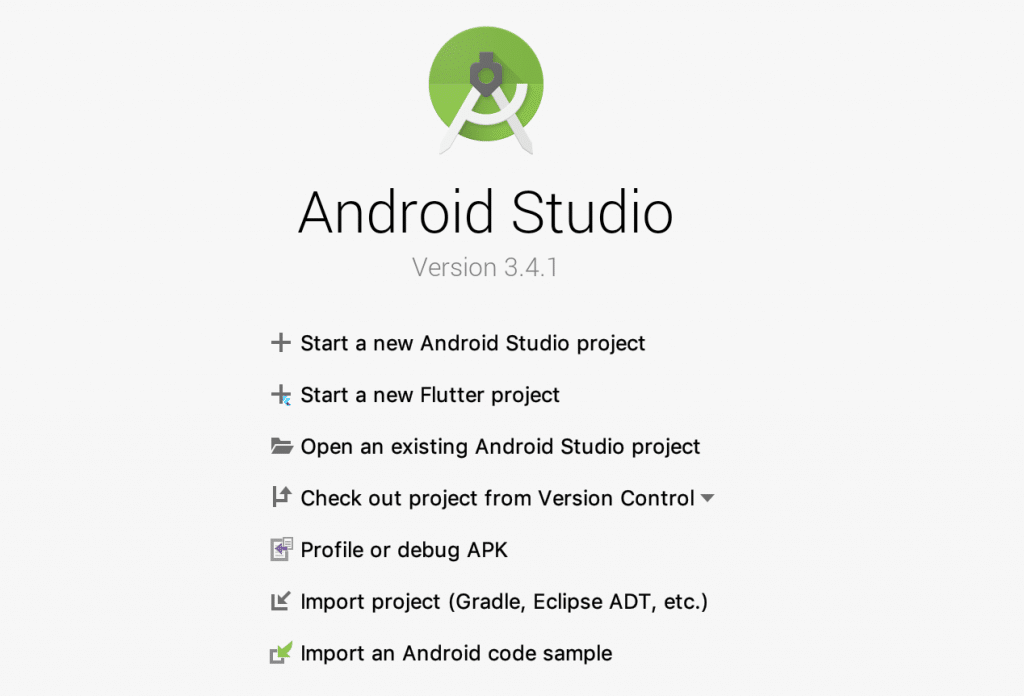
Buka aplikasi Android Studio anda. Karena sebelumnya kita sudah menginstall plugin Flutter, pada Start Screen Android Studio akan muncul pilihan baru yaitu Start a New Flutter Project. Pilih pada tombol tersebut untuk memulai proyek Flutter baru.
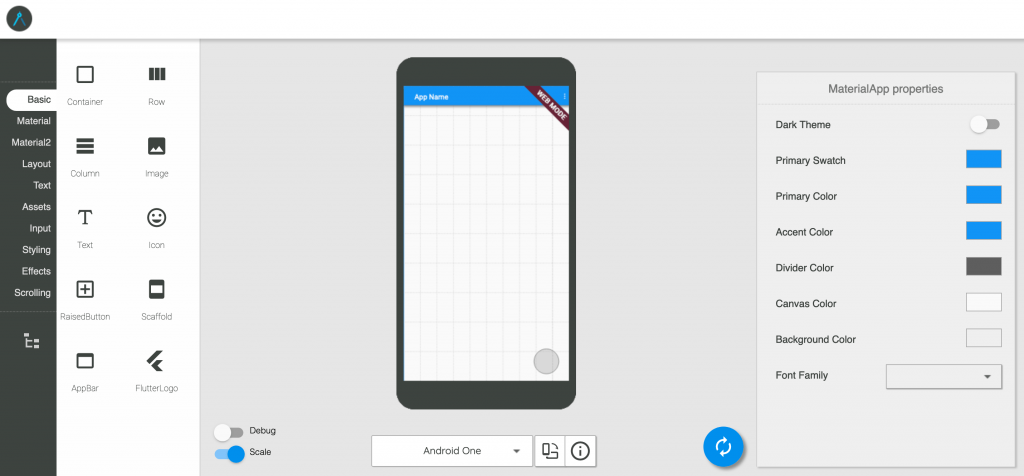
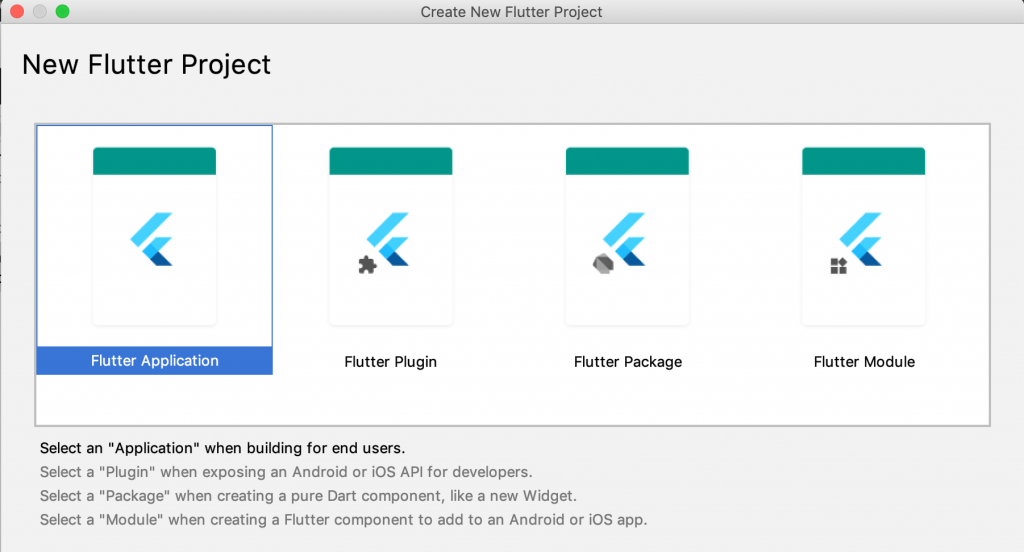
Pilih Tipe Project
Selanjutnya akan tampil jendela baru berupa pilihan aplikasi. Pilih pada Flutter Aplication lalu klik tombl Next.
Konfigurasi Aplikasi
Jendela yang akan tampil selanjutnya adalah jendela konfigurasi Aplikasi. Isi aplikasi sesuai yang anda inginkan. Contohnya, seperti pada gambar di bawah ini.
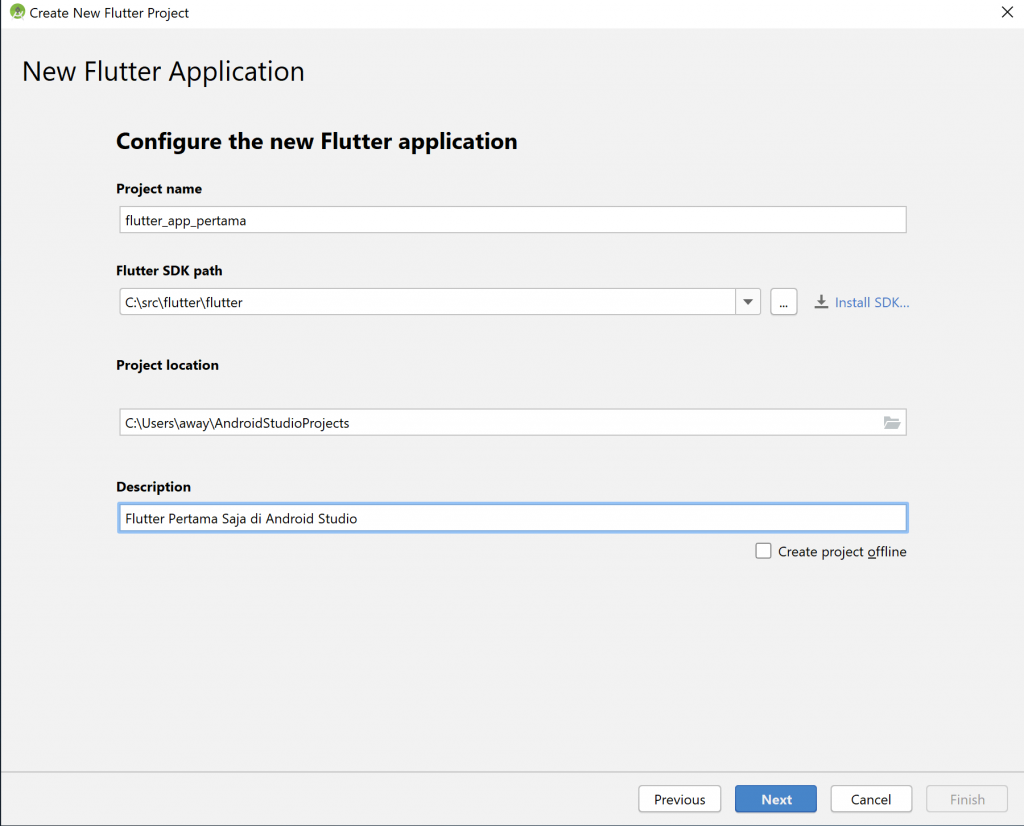
Untuk Flutter SDK Path, isi sesuai pada saat kita mendownload Flutter. Pada Tutorial Flutter saat instalasi diatas, isi path sesuai Sistem Operasi yang anda gunakan. Detailnya sebagai berikut.
- Windows : C:\src\flutter\flutter
- Mac OS : ~/development/flutter
- Linux : ~/development/flutter
Khusus untuk Mac OS dan Linux, jika terdapat error direktori SDK tidak ditemukan, gunakan full path. Caranya bisa menggunakan perintah berikut.
which flutterContoh jika hasilnya seperti di bawah ini.
/Users/away/development/flutter/bin/flutterMaka, isi Flutter SDK Path dengan /Users/away/development/flutter. Biasanya pada MacOS tidak bisa menggunakan path home dengan tanda ~.
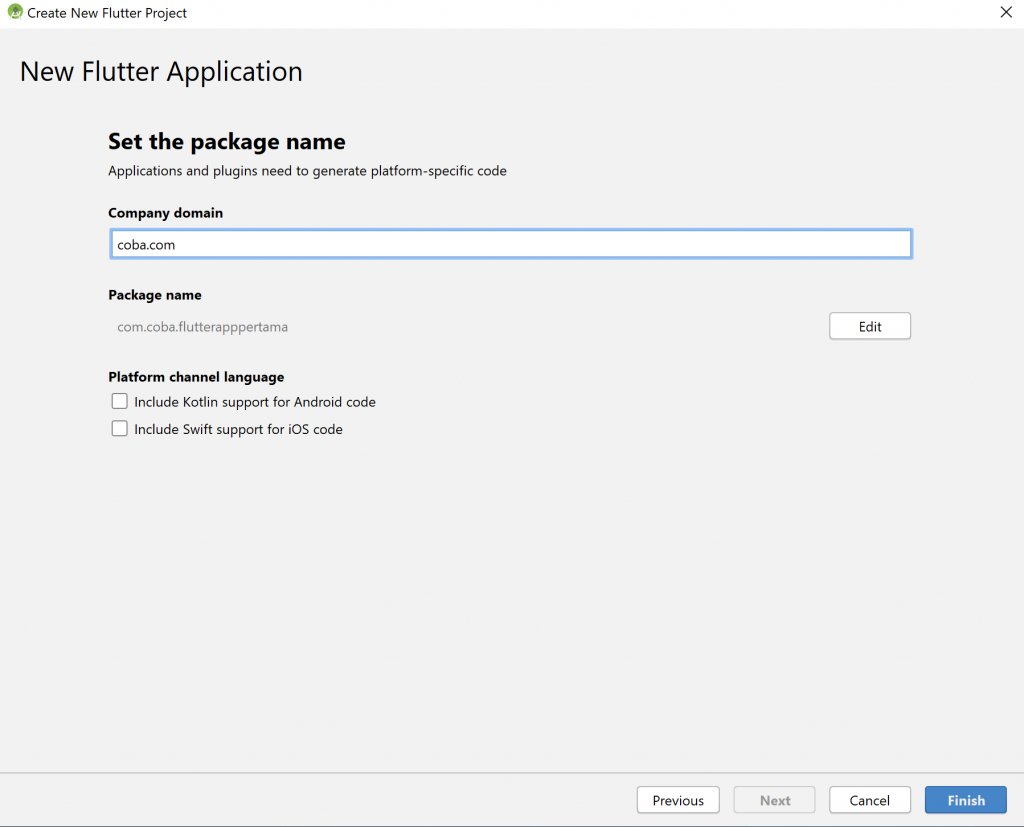
Setting Package Name
Setelah selesai pengisian konfigurasi project, tekan tombol Next. Jendela selanjutnya yang akan muncul adalah jendela package name. Coba isi misalnya dengan coba.com seperti pada gambar di bawah ini. Setelah selesai, klik pada tombol Finish.
Menjalankan Program
Setelah selesai, akan tampil jendela utama. File yang pertama kali di buka adalah file main.dart. Kita akan coba menjalankan program dengan AVD. Atau anda bisa mengkoneksikan mobile phone anda dengan perangkat USB. Untuk menggunakan AVD, aktifkan AVD dengan menekan tombol AVD Manager. Lalu, jalankan salah satu simulator pilihan anda.
Setelah simulator tampil, klik pada tombol Run, tunggu hingga Initializing Gradle selesai. Setelah selesai, aplikasi pertama anda akan langsung tampil di simulator.
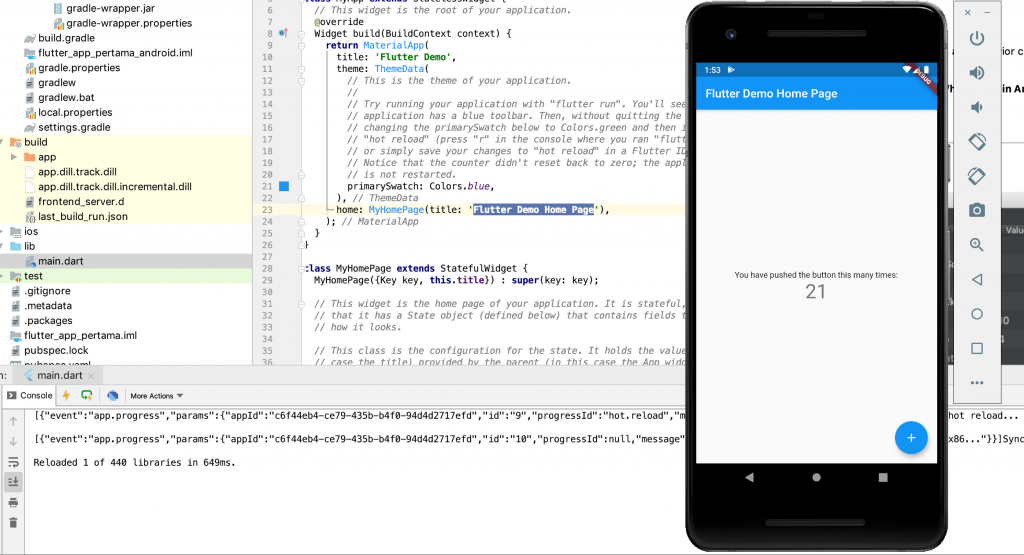
Pada simulator, coba tekan tombol + (plus) di kanan bawah, dan lihat yang terjadi pada angka. Ini terjadi karena kode class pada loop saat menekan tombol.
int _counter = 0;
  void _incrementCounter() {
    setState(() {
      // This call to setState tells the Flutter framework that something has
      // changed in this State, which causes it to rerun the build method below
      // so that the display can reflect the updated values. If we changed
      // _counter without calling setState(), then the build method would not be
      // called again, and so nothing would appear to happen.
      _counter++;
    });
  }
Kalau kita lihat kode diatas, terlihat sangat mudah di baca. Ini karena Flutter menggunakan bahasa Dart yang C-Style.
Memodifikasi Kode Aplikasi
Selanjutnya, kita akan coba memodifikasi kode. Kita lakukan hal yang paling dasar yaitu merubah text Title dan merubah warna tema Aplikasi. Coba lakukan perubahan pada baris 21 dan 23.
primarySwatch: Colors.blue,
menjadi
primarySwatch: Colors.green,
dan
home: MyHomePage(title: 'Flutter Demo Home Page')
menjadi
home: MyHomePage(title: 'Aplikasi Pertamaku'
Coba simpan proyek dengan menekan tombol CTRL+S. Perhatikan pada emulator atau device Android anda. Setelah anda menyimpan perubahan, pada layar simulator akan langsung berubah menjadi update terbaru. Tanpa melakukan build ulang sama sekali. Inilah hebatnya Flutter dengan fitur hot reload. Jika seperti ini, pemrograman aplikasi akan lebih cepat bukan?.

OK, untuk pembuatan aplikasi pertama Flutter dengan Android Studio sudah berhasil. Selanjutnya, kita akan coba membuat aplikasi dengan menggunakan Microsoft Visual Studio Code.
Flutter dengan Microsoft Visual Studio Code
Silahkan buka Microsoft Visual Studio Code anda. Kita akan memulai proyek baru Flutter dengan Microsoft Visual Studio Code. Setelah terbuka masuk ke menu View -> Command Pallete. Atau anda bisa menggunakan shortcut dengan cara menekan kombinasi tombol CTRL+SHIFT+P pada Windows dan Linux, COMMAND+SHIFT+P pada Mac OS.
Buat Proyek Baru
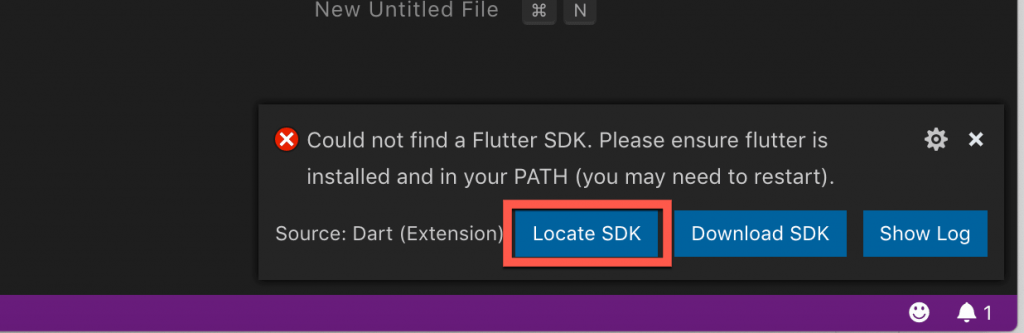
Pada Command Pallete, ketikan Flutter dan pilih pada Flutter: New Project. Untuk pertama kali jika ada warning SDK tidak ditemukan, kita arahkan SDK ke folder download Flutter seperti di Android Studio. Lalu restart Microsoft Visual Studio Code anda.

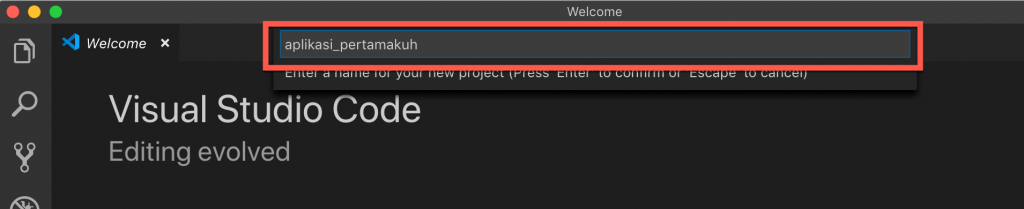
Setelah restart, ulangi dengan masuk ke Command Pallete, pilih Flutter: New Project. Jika SDK sudah OK, akan langsung muncul kolom input nama aplikasi. Masukan nama aplikasi anda, lalu tekan Enter.
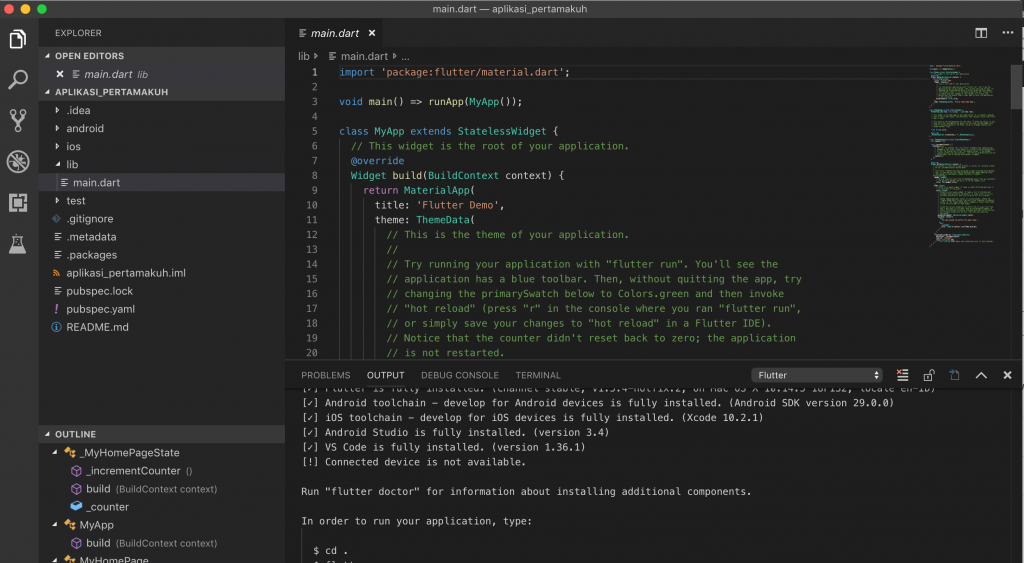
Selanjutnya akan muncul permintaan lokasi penyimpanan. Silahkan pilih lokasi penyimpanan proyek anda, lalu klik select folder. Setelah selesai, akan muncul jendela editor seperti di bawah ini.
Menjalankan Aplikasi
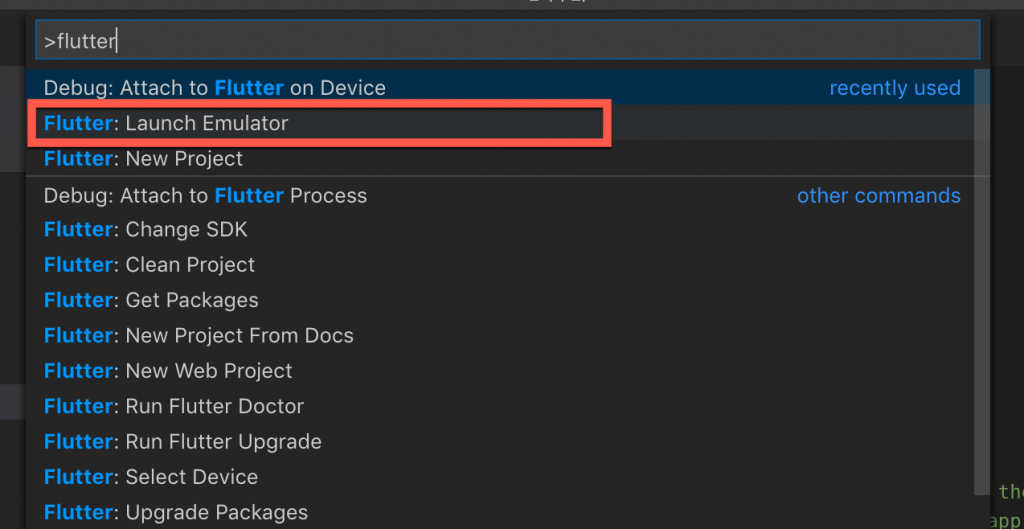
Untuk menjalankan aplikasi, anda bisa menggunakan AVD Android atau IOS simulator jika anda menggunakan Mac OS. Atau anda bisa menghubungkan device mobile phone anda langsung dengan USB. Untuk memilih device mana yang akan di gunakan kita masuk ke Command Pallete dengan menekan CTRL+SHIFT+P. Ketikkan Flutter dan pilih pada Flutter: Launch Emulator.
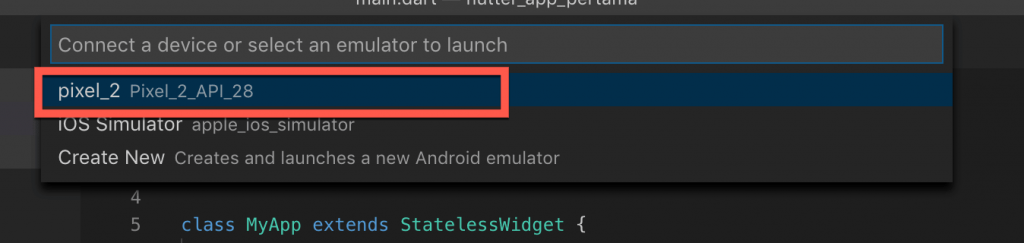
Dalam Flutter Tutorial kali ini saya akan menggunakan Emulator dari AVD. Karena saya menggunakan Emulator Pixel 2, maka saya memilih pada pilihan Pixel_2.
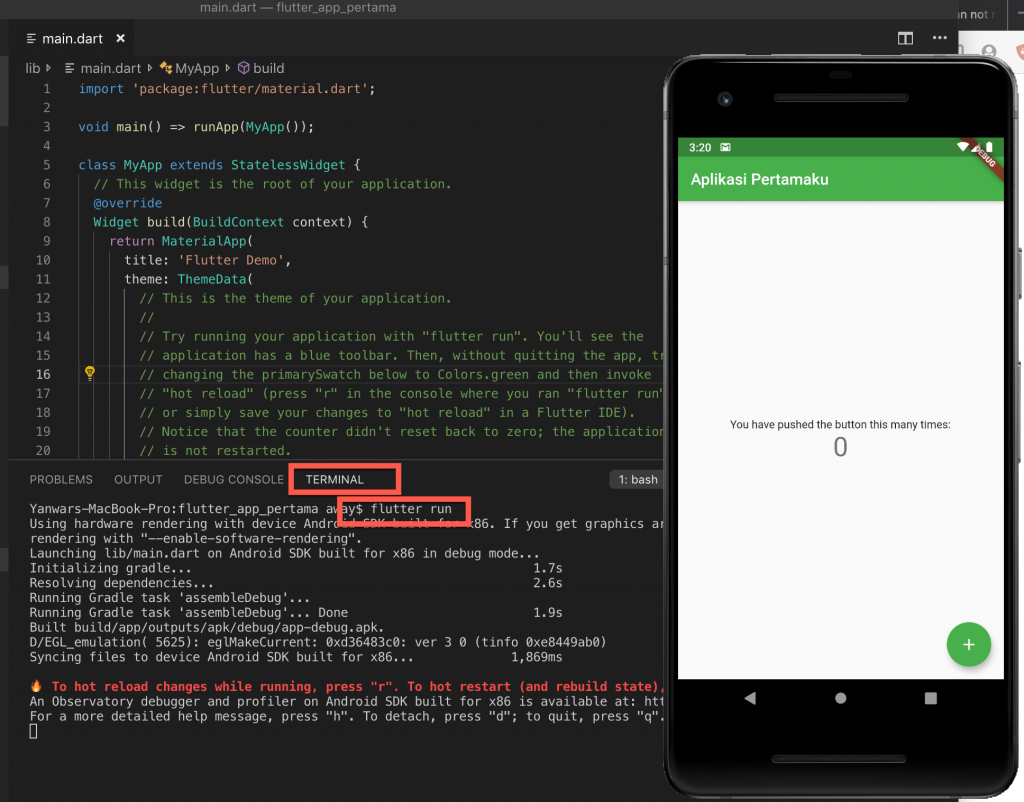
Emulator AVD akan muncul, namun program belum berjalan. Untuk menjalankan program, kita akan menggunakan console. Visual studio dilengkapi dengan terminal untuk mempermudah pengaksesan aplikasi. Pada jendela editor main.dart, klik pada tab terminal, lalu ketik:
flutter runTunggu hingga aplikasi anda muncul di emulator.
Nah, sekarang aplikasi anda sudah tampil. Mudah bukan?.
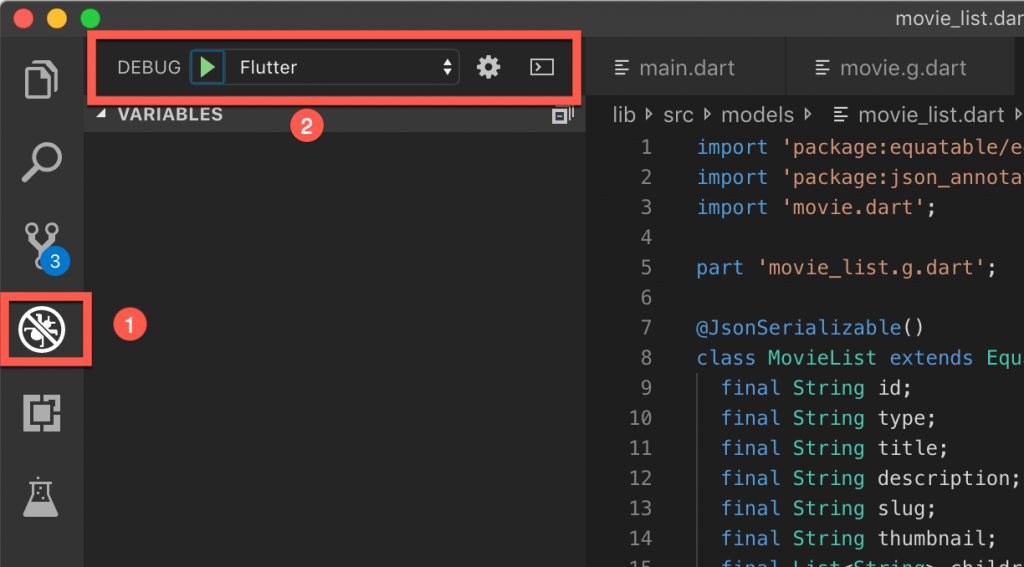
Alternatif lainnya, untuk menjalankan Flutter bisa melalui tombol debug. Pada Microsoft Visual Studio Code anda klik pada icon Debug (1), lalu klik tombol Play (2).
Atau anda bisa langsung mengakses menu Debug -> Start Debuging untuk menjalankan aplikasi. Jika ingin lebih cepat, anda bisa menggunakan hotkey dengan menekan tombol F5.
Modifikasi Aplikasi
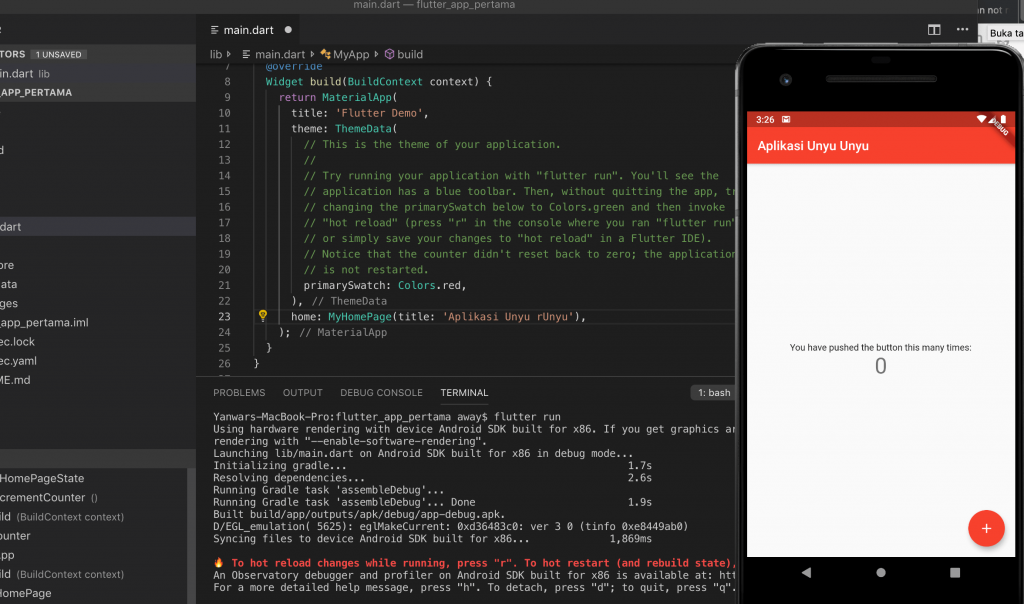
Untuk memodifikasi aplikasi, sama seperti pada Android Studio. Coba anda ubah warnanya, misalnya menjadi red, dan ganti tulisannya. Setelah selesai, tekan CTRL+S untuk menyimpan, dan lihat hasilnya di Emulator.
Tampilan langsung berubah saat kita menyimpan perubahan program. Inilah kehebatan fitur hot reload dari Flutter.
Aplikasi Pertama Flutter dengan Microsoft Visual Studio Code sudah berhasil. Anda bisa mengekplorasi fitur-lainnya dengan coba-coba merubah-rubah kode di main.dart.
Mencoba Aplikasi Flutter yang Sudah Jadi
Flutter berifat Open Source. Para pengembang banyak yang membuat aplikasi Flutter yang di publikasikan secara terbuka. Anda bisa mencarinya di Github.
Salah satu pengguna Github mengumpulkan aplikasi Flutter Open Source yang bisa anda coba. Anda bisa melihat di halaman ini https://github.com/tortuvshin/open-source-flutter-apps. Banyak aplikasi-aplikasi yang bagus di halaman itu. Anda tinggal mengklik pada link yang di sediakan untuk membuka halaman github yang bersangkutan.
Dalam percobaan kali ini, kita akan mencoba aplikasi tubi_tv_flutter dari halaman github https://github.com/xieweizhi/tubi_tv_flutter yang merupakan aplikasi pemutar film online.
Untuk memulai mencoba aplikasi ini, kita akan melakukan cloning dengan git. Siapkan terminal atau PowerShell anda. Kita akan membuat folder ~/Project dan bekerja di folder tersebut.
Buat Direktori Project
Untuk Windows, gunakan powershell, lalu ketikan kode berikut.
cd /
mkdir Project
cd Project
Untuk Mac OS atau Linux gunakan perintah berikut.
mkdir ~/Project
cd ~/Project
Clone dan Buka Project
Selanjutnya, kita akan melakukan clone dari Github, gunakan perintah berikut dari direktori Project anda.
git clone https://github.com/xieweizhi/tubi_tv_flutter.git
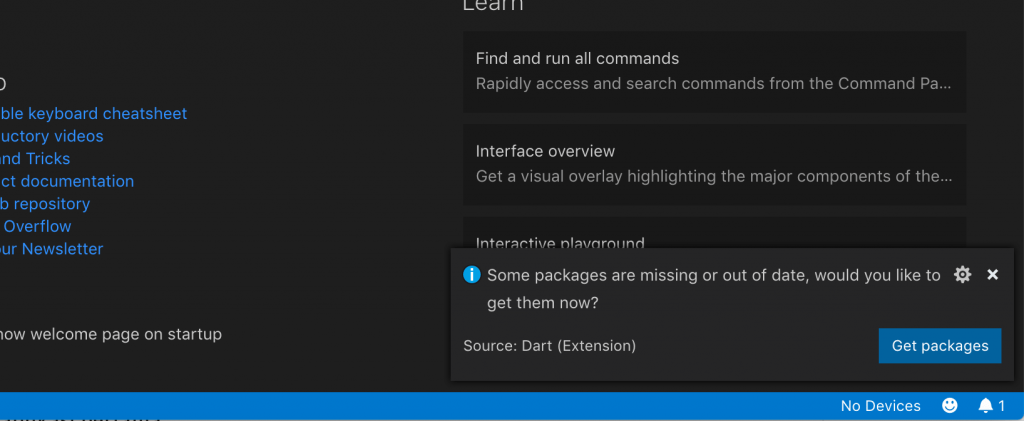
cd tubi_tv_flutterBuka Microsoft Visual Studio anda, lalu pilih File -> Open, dan pilih folder proyek hasil clone diatas. Jika anda mendapatkan warning bahwa beberapa package harus di download, klik saja pada Get Package.
Lakukan Launch Emulator seperti pada percobaan membuat aplikasi baru dengan Visual Studio Code. Pada tab terminal, ketikan perintah flutter run. Dan tunggu hasinya di Emulator anda.
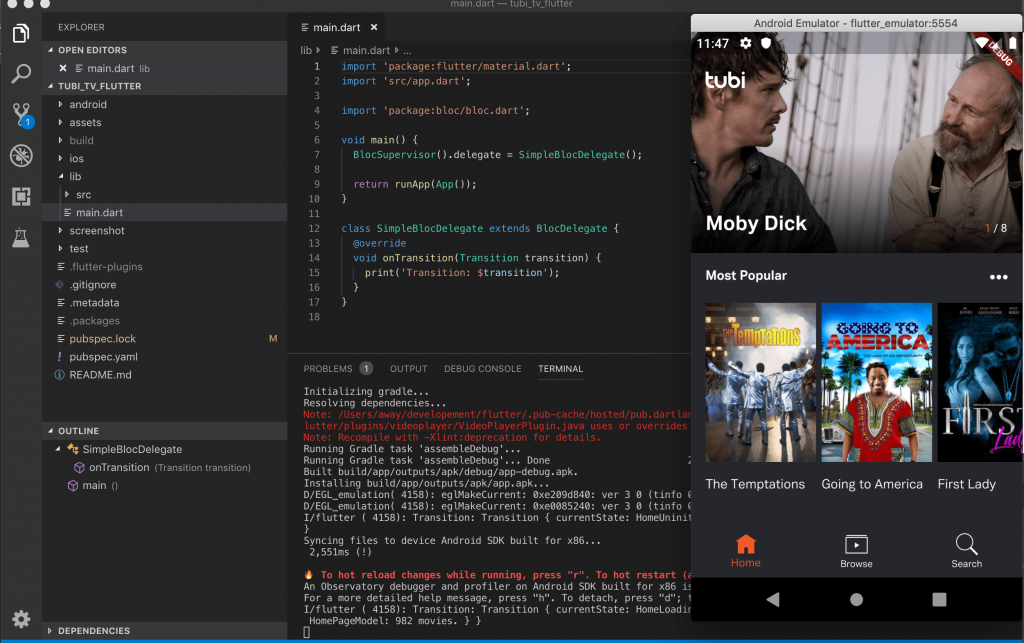
Nah, aplikasinya sudah berjalan dengan baik, coba anda buka pada menu-menu di aplikasi tersebut. Dengan aplikasi yang sudah jadi, anda bisa mengekplorasi kode-kode yang di buat oleh ahli Flutter. Ini akan membantu pemahaman anda pada struktur aplikasi dengan Flutter.
Selanjutnya anda bisa mencoba aplikasi lainnya dengan langkah-langkah seperti diatas.
Kesalahan yang Mungkin Terjadi
Pada Mac OS Error: RPC failed
Pada Mac OS saat ingin menjalankan di emulator IOS jika terjadi error "error: RPC failed; curl 56 LibreSSL SSL_read: SSL_ERROR_SYSCALL, errno 54". Ini dikarenakan git mengalami timeout saat setup Cocoapods. Solusinya ubah nilai git buffer secara global, lalu lakukan pod setup.
git config --global http.postBuffer 524288000
pod setup
Kesimpulan
Sekarang, anda sudah bisa membuat aplikasi pertama Flutter dengan menggunakan Android Studio dan Microsoft Visual Studio Code. Flutter Tutorial kali ini cukup lengkap dari mulai pemahaman Fluter, instalasi, hingga membuat aplikasi pertama dan mencoba aplikasi yang sudah jadi.
Anda sudah bisa memilih apakah akan menggunakan Android Studio atau Visual Studio Code. Silahkan anda coba keduanya, dan pilih platform yang paling nyaman.
Dengan Flutter, pembuatan aplikasi menjadi lebih cepat. Karena Flutter sudah dilengkapi dengan class bawaan yang umun di gunakan pada aplikasi mobile. Pada tutorial selanjutknya, kita akan coba membuat aplikasi sederhana dengan Flutter. Tetap ikuti TeknoTut untuk mendapatkan artikel dan tutorial yang berkualitas.
Semoga Tutorial ini membantu.